


05/2/2 HT-X1W(LA)E1.fm
E-9
ENGLISH
TINSZA048AWZZ
HT-X1W
General Information
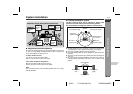
Controls and indicators
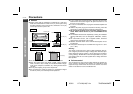
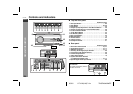
" Top and front panel
Reference page
1. Disc Eject Button . . . . . . . . . . . . . . . . . . . . . . . . . . . . . . . . . 26
2.Stop Button . . . . . . . . . . . . . . . . . . . . . . . . . . . . . . . . . . . 25, 26
3.Play Button . . . . . . . . . . . . . . . . . . . . . . . . . . . . . . . . . . . . . . 26
4. Chapter (Track) Skip Down or Fast Reverse Button . . . . . 28
5. Chapter (Track) Skip Up or Fast Forward Button . . . . . . . 28
6. Function Selector Button . . . . . . . . . . . . . . . . . . . . . . . . . . 48
7. Tuner (Band) Button . . . . . . . . . . . . . . . . . . . . . . . . . . . . . . 44
8. On/Stand-by Button . . . . . . . . . . . . . . . . . . . . . . . . . . . . . . . 22
9. Disc Compartment . . . . . . . . . . . . . . . . . . . . . . . . . . . . . . . . 25
10. Main Unit Stand . . . . . . . . . . . . . . . . . . . . . . . . . . . . . . . . . . 15
11.Remote Sensor . . . . . . . . . . . . . . . . . . . . . . . . . . . . . . . . . . . 23
12. Volume Control . . . . . . . . . . . . . . . . . . . . . . . . . . . . . . . . . . . 24
13. Headphone Socket . . . . . . . . . . . . . . . . . . . . . . . . . . . . . . . . 21
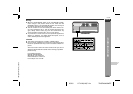
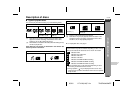
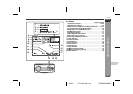
" Rear panel
Reference page
1. FM 75 Ohm Aerial Socket . . . . . . . . . . . . . . . . . . . . . . . 16, 17
2. Aerial Earth Terminal . . . . . . . . . . . . . . . . . . . . . . . . . . . 16, 17
3. AM Aerial Terminal . . . . . . . . . . . . . . . . . . . . . . . . . . . . . 16, 17
4. Auxiliary (Audio Signal) Input Sockets . . . . . . . . . . . . . . . . 60
5. Component Video Output Sockets . . . . . . . . . . . . . . . . . . . 20
6. S-video Output Socket . . . . . . . . . . . . . . . . . . . . . . . . . . . . . 20
7. Video Output Socket . . . . . . . . . . . . . . . . . . . . . . . . . . . . . . 19
8. System Connection Sockets
(to subwoofer/amplifier unit) . . . . . . . . . . . . . . . . . . . . . 16, 17
9. Optical Digital Audio Input Socket . . . . . . . . . . . . . . . . . . . 60
1 2 3 4 5 6 7 8
12
11
9
10
13
11
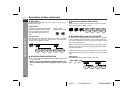
Display
21 34 5 76 8 9
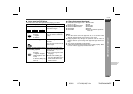
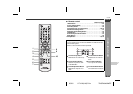
Removing the back cover of
the main unit:
For system connections, remove
the back cover first.
1
2