


27
Calibration with an SPL meter:
Calibrating the system with an SPL meter, rather
than by ear, provides more precise results and
improves the system’s performance significantly.
Inexpensive SPL meters are widely available
and the procedure is quick and easy.
Both Dolby and DTS specify a standard cali-
bration level for all theaters to ensure that
soundtracks can be played at the volume level
intended by the director of the film. This ref-
erence level should result in spoken dialog
played at about 80 dB (a realistic level for nor-
mal speech) with the loudest peaks in any single
channel at about 105 dB.
This calibration can be accurately done in a
home theater using a sound pressure level (SPL)
meter and the pink noise test tones described
above. Set the meter to its SLOW response
with C-weighting and hold it away from your
body at your listening position pointing towards
the speaker being adjusted. Increase the master
volume control on the RSP-1066 until the meter
reads 75dB when playing the test tone through
one of the front speakers. Then, use the indi-
vidual channel adjustments on the TEST TONE
menu to adjust each of the individual speak-
ers, including the subwoofer, to the same 75dB
on the SPL meter. Note the setting of the mas-
ter volume control. Whenever you play a Dolby
Digital or DTS soundtrack with that master
volume setting, you will be playing it at the
reference volume level.
The idea of a reference volume setting to be
used in every theater has its merits. However,
many home theater listeners find this setting
to be excessively loud. It’s worthwhile cali-
brating your system to a known standard, but
let your own ears be the judge for deciding
how loud to playback movie soundtracks. Re-
gardless of your listening levels, using an SPL
meter to calibrate equal levels for all speak-
ers in the system is well worth the effort.
English
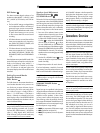
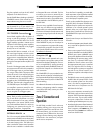
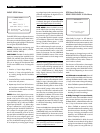
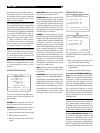
DELAY SETUP Menu
DELAY SETUP
Dolby D Dolby
/DTS Pro LogicII
CENTER: 1ms
R SURROUND: 15ms 25ms
L SURROUND: 15ms 25ms
CNTR-BACK: 15ms 25ms
ENT KEY=MAIN MENU UP KEY=up
+/– KEY=change DWN KEY=down
This menu, which is reached from the MAIN
menu, allows you to set the delay for individual
speakers. This ensures that the sound from each
speaker arrives simultaneously at the listening
position, even when the speakers are not all
placed at equal distances from the listener.
Although personal preference is the ultimate
guide, you typically increase the delay to speak-
ers located closer to the seating area and de-
crease the delay to speakers located farther
from the seating area.
Start by measuring the distance from your
seating position to each speaker. The speaker
farthest away should receive no additional
delay. Each of the other speakers will receive
one millisecond of delay for each foot (30 cm)
closer to you than the farthest speaker. For ex-
ample, if the left front speaker is farthest away
at 13 feet and the left rear speaker is 8 feet
away, you should add 5 milliseconds of de-
lay to the left rear speaker. Continue setting
delays for each speaker until you have com-
pensated for each speaker that is closer to you
than the farthest speaker.
The delay times for the surround speakers are
set longer for Dolby Pro Logic II mode than in
Dolby Digital/DTS mode. When you change
delay setting for Dolby Digital/DTS, the de-
lay time for Dolby Pro Logic II will automati-
cally be set for MUSIC or CINEMA/EMULA-
TION modes.
The available settings for the CENTER chan-
nel (Dolby Digital/DTS only) are 0ms, 1ms,
2ms, 3ms, 4ms, and 5ms. For SURROUND
and CENTER BACK (Dolby Digital/DTS), the
settings are 0ms, 5ms, 10ms, and 15ms. For
SURROUND and CENTER BACK (Dolby Pro
Logic II), the MUSIC mode settings are the same
as the Dolby Digital/DTS settings. For SUR-
ROUND and CENTER BACK (Dolby Pro Logic
II), the CINEMA/EMULATION mode settings
are 10ms, 15ms, 20ms, and 25ms.
To change a setting, place the highlight on the
desired line using the UP/DOWN buttons and
use the +/– buttons to increase or decrease
the delay setting. To return to the MAIN menu,
press the ENTER button. Press the MENU key
on the remote to cancel the display and re-
turn to normal operation.
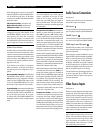
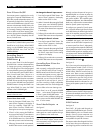
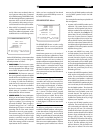
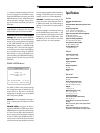
SUBWOOFER SETUP Menu
SUB SETUP
CROSSOVER: 100HZ
DOLBY: +1dB
DTS: -2dB
STEREO: +5dB
MUSIC: +3dB
MULTI INPUT: MAX
ENT KEY=MAIN MENU UP KEY=up
+/– KEY=change DWN KEY=down
The SUBWOOFER SETUP menu allows selec-
tion of the subwoofer crossover frequency and
independent adjustment of subwoofer level for
each surround mode. These settings are memo-
rized and engaged automatically each time
a music or theater surround mode is selected.
When going to the SUBWOOFER SETUP menu
from the MAIN menu, the current surround
mode is automatically highlighted. Use the +/–
buttons to adjust the subwoofer level (–10dB
to +10dB) for the current surround mode.
NOTE
: Only the current surround mode can
be adjusted on this menu. You will need to
change surround modes using the front-panel
or remote buttons to adjust a different mode.
We recommend starting with the level settings
for all surround modes at the default 0 dB setting
during the test tone calibration of the system
and for a period of familiarization after that.
As you listen to a variety of source material
over time, you may notice that certain surround
modes consistently produce too much or too
little bass from the subwoofer. Use these sub-
woofer level settings to adjust the relative bass
output of various surround modes.
NOTE
: In Dolby Digital and DTS recordings,
the LFE channel is used to produce spectacu-
lar low bass effects. This LFE channel can
generate output 10 dB louder than the other
channels, placing considerable demands on
your subwoofer system. If you hear distortion
or other signs of distress from your subwoofer
at loud listening levels, you may consider re-
ducing the subwoofer level for the Dolby Digi-