


10
connected to metal that is welded to the main body,
or chassis, of the vehicle.
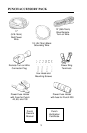
The following is a list of tools you will need for installing
the Punch amplifier:
Allen Wrenches (7/64" & 3/32")
Wire Strippers
Battery Post Wrench
Electric Hand Drill with assorted bits
Voltmeter
Wire Crimpers (i.e., Perfect Interface RT-KT1)
Tools
Needed
BATTERY AND CHARGING
Punch amplifiers will naturally put an extra load on your
battery and charging system. We recommend you check
your alternator capacity to insure ample charging capa-
bility to handle the additional load of your new Punch
equipment. Stock electrical systems in good condition
should typically handle the extra load of any individual
Punch unit without problems, although battery and alter-
nator life may be slightly reduced. If problems arise, we
suggest you use a heavy duty battery and a high output
alternator.
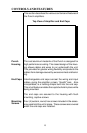
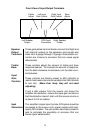
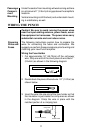
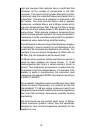
MOUNTING AND LOCATION
The mounting location and position of the Punch will
have a great effect on its ability to dissipate the heat
generated in normal operation. The Punch has a heatsink
designed for heat dissipation and internal shutoff cir-
cuitry to avoid overheating, so it is reasonably tolerant of
mounting variations. However, care should be taken to
ensure adequate ventilation.
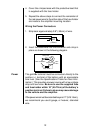
The temperature inside a trunk can reach as high as 175°
F (80° C) during the summer months. Since the thermal
shutoff point for the Punch is 195° F (90° C), it is easy to
see that the amp must be mounted for maximum cooling
capability. Mounting the amplifier on the floor of the trunk
prevents sufficient convectional air flow cooling. Mount-
ing the unit vertically on a surface with the fin grooves
running up and down usually results in the best cooling.
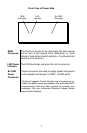
Trunk
Mounting