


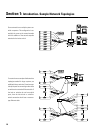


NETWORK- The network should be operable and QSControl
software should be installed/running on the system controller
computer.
24
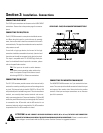
AMPLIFIER SETUP-
The amplifiers connected to the CM16a
must have their power switches in the “on” position. For initial
testing, it is advisable that the amplifiers be set for the lowest
useful gain (volume) setting until it is verified that the system is
operating as expected. After the system setup has been verified
and tested, gain settings may be set as required.
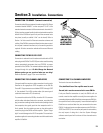
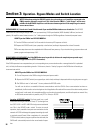
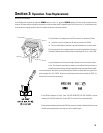
CM16a OPERATION-
To turn the CM16a on, press on
the upper portion of the power switch. The green
colored POWER LED will illuminate when the power
switch is in the “on” position. If not, verify that the IEC
power cord in properly connected to the unit and to an
operating AC source between 100 and 240 volts.
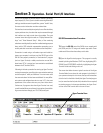
Operation
of the CM16a is accomplished with QSControl soft-
ware.
START-UP BEHAVIOR AND PRESET OPERATING
MODES-
It is important to understand the start-up behavior
outlined below. Some of the terminolgy is specific to QSControl
software; refer to the software’s helpfile for detailed informa-
tion.
When first taken out the box, the CM16a will power up in
a muted state with all faders at -95.5 dB., polarity set to normal,
sensitivity set to 3V, and any amplifiers connected to the CM16a
will be in STANDBY mode. This “setup” is the factory setting.
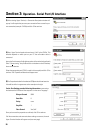
PRESETS- The CM16a has 16 Presets for quickly recalling
settings. They are numbered 0 (zero) through 15. These presets
are useful for quickly changing from one setup to another without
having to change each individual control to a new setting. An
example might be in a house of worship where the audio system
setup is different for each service. Instead of having to keep a
trained system operator on location, another individual with
minimal training can be shown how to change to the desired
preset for each situation.
The presets are useful tools, but Preset 0 acts differently than the
others. Each time the CM16a is powered up, it recalls its settings
from Preset 0. The factory Preset 0, discussed above, is a muted
state with amps in STANDBY mode. When setting up your own
presets, they should be stored in Preset 1 through Preset 15. See
next page for notes regarding Preset 14’s use as a “scratchpad”.
The reason for not actively using Preset 0 is as follows:
Let’s say you’re operating your system in Preset 12 and you
change the setting of one fader. The new setup is NOT the same
as Preset 12, so the CM16a starts a 4 minute timer from the
time the control was changed. After the 4 minutes has
elapsed with no further control changes, it saves the
NEW scene into Preset 0 . Preset 12 is left unchanged.
Whatever
was
in Preset 0 is now gone forever. This insures that
the next time the CM16a is powered up, it’s settings are the same
as you left them. Remember, the CM16a always powers up
in Preset 0. Refer to the software documentation for further
information.
Preset 0 will only be overwritten 4 minutes after the last
control change. This includes if the CM16a is placed into
one of its BYPASS modes as discussed in the following
section. If the CM16a is placed into BYPASS mode and operated
for at least 4 minutes without control changes, then the BYPASS
mode is saved in Preset 0. The next time the CM16a is powered
up, it will start up in Preset 0 (or BYPASS in this case). This could
cause dangerously high output levels from the system.
Insure amplifier gain controls are reduced to safe levels
ANY time BYPASS mode is used.
The CM16a has all outputs momentarily muted at power-up to
prevent unexpected audio pops, clicks or thumps.
Remember:
A t
power up, the CM16a will always start operating with the
settings saved in Preset 0. Once network communication has
been established between the host computer and the CM16a,
the CM16a may be controlled remotely . In the event that the
network communications link is lost while the CM16a is
operating, it will continue to operate with its last settings
intact.
Section 3: Operation- General Information & Presets