


Step 6: Repeat step 3 to step 5 until the brightness and contrast settings need not be changed,
and R/G/B Offset and R/G/B Gain settings of the video source are satisfactory.
Step 7: If the color balance of the video source still isn’t satisfactory after the R/G/B Offsets and
Gains have been calibrated, use Crystalio II’s Advanced Gamma Correction* function to
make further adjustments.
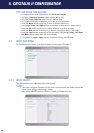
• Press the Menu remote control key to enter the OSD (On Screen Display) menu
• Select the Advanced Option under System sub-menu and turn Advanced Option ON
• Select Image, then Gamma Correction, then R/G/B and press the action button
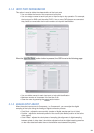
• You can adjust the color balance of mid-tone by selecting
Standard Gamma Curve
• You can adjust the color balance of low-mid-tone by selecting
Low IRE Gamma Curve
• You can adjust the color balance of h-mid-tone by selecting
High IRE Gamma Curve
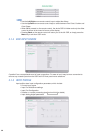
• After Gamma Correction, remember to store this gamma setting in a Gamma Profile and
associate it to this input source. When switching input, you should load this Gamma
Profile in order to keep the color balance
* Advanced Gamma Correction function is available only in firmware version 2.00 or later
To calibrate all video sources, you must perform the above steps to all video sources.
Remember:
• To reset Crystalio II’s video settings for each input before your calibration
• To associate Gamma Profiles to each input if you have used Advanced Gamma
Correction to fine tune the color balance of the source
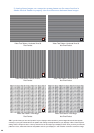
• If you don’t have a test pattern for adjusting black level, select a scene with lots of dark
areas (for example, a man wearing a black jacket in a dark night background), and
adjust the brightness just as in step 3 above, using the black background and the
near-black object instead of the bars test pattern
• If you don’t have a test pattern for adjusting white level, select a scene with lots of bright
areas (for example, a sunny sky with a little bit of cloud), and adjust the contrast just as
in step 4 above, using the white background and the near-white object instead of the
bars test pattern
• If you don’t have a test pattern with 0 to 100 IRE for adjusting color balance, try to find
some black and white video material and adjust the color balance just as in steps 5 to 7
above. Black and white video material can also be useful to verify final color balance
calibration since the human eye is much more sensitive to changes in Luminance (the
black and white part of the picture) than Chrominance (the color signal added to black
and white for a color image)
• If you have two kinds of video source, which have different level and/or color balance,
from a single input port (for example a DVD player used for both NTSC and PAL discs);
or you wish to have a selection of different video setups available, you can do the
calibration and store the video settings in different Video Profiles. Note that Crystalio II
has 10 different Video Profiles for each individual video input port. If you use both NTSC
and PAL video into an input you can program DynamicVP™ to automatically load the
appropriate video profile depending on the input vertical refresh rate Crystalio II detects
4.6.4 DIGITAL PROJECTOR WITH ANAMORPHIC LENS
If you are using an anamorphic lens to compress your 16:9 projector to show a 2.35:1 image,
remember to configure the Screen Shape to be 2.35:1 instead of the default 16:9. Follow the
steps below:
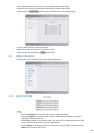
• Press Menu remote control key to enter OSD (On Screen Display) menu
• Select Output then Screen Shape
• Configure Screen Shape as 2.35:1 instead of the default 16:9
26