


• If you are not sure which video level is correct, leave it at the default setting. Or, if the
picture is excessively dark or very washed out, try changing the HDMI output level to see
which one looks the best
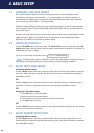
Step 3: Calibrate the black level (brightness) of your display:
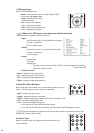
• Show the internal video test pattern Black 1-3% (under the OSD menu System and
Video Test Patterns)
• Turn the brightness setting of your display down excessively so that the whole
screen is black
• Turn the brightness up until you can barely see the difference of the 1%, 2%,
and 3% bars
Step 4: Calibrate the white level (contrast or peak white level) of your display:
• Show the internal video test pattern White 97-99%
• Turn the contrast setting of your display up excessively so that you see the whole
image as white
• Turn the contrast down until you can barely see the difference between the 97%,
98%, and 99% bars
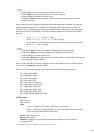
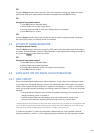
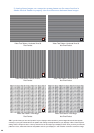
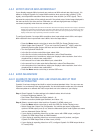
Step 5: Calibrate the color balance of your display:
• Show the internal video test pattern Cross Gray Steps, and pay attention to the
black bar and white (100 IRE) bar
• Adjust Red, Green, and/or Blue offset/bias settings of your display to fine tune
the color of the black bar if it doesn’t look a neutral black*
• Adjust Red, Green, and/or Blue gain settings of your display to fine tune the
color of white bar if it doesn’t look a neutral white*
*Aim to lower the color you see as dominant rather than increasing the other two
Step 6: Repeat step 3 to step 5 until the brightness and contrast settings don’t need changing,
and R/G/B offset and R/G/B gain settings of your projector are satisfactory.
Step 7: If the color balance of your projector still isn’t good enough after the R/G/B offsets and
gains have been tuned, you need to use Crystalio II’s Advanced Gamma Correction*
function to adjust further.
• Press Menu remote control key to enter OSD (On Screen Display) menu
• Select the Advanced Option under System sub-menu and turn Advanced Option ON
• Select Image, then Gamma Correction, then R/G/B and press the action button
• You can adjust the color balance of mid-tone by selecting
Standard Gamma Curve
• You can adjust the color balance of low-mid-tone by selecting
Low IRE Gamma Curve
• You can adjust the color balance of hi-mid-tone by selecting
High IRE Gamma Curve
• After Gamma Correction, remember to store this gamma setting in a Gamma Profile and
associate it to the primary output port. When switching primary output port, you should
load this Gamma Profile in order to keep this color balance with your projector
* Advanced Gamma Correction function is available only in firmware version 2.00 or later
If you have two digital displays connected to Crystalio II’s HDMI output ports, you have to
calibrate each of them according to the steps above. Remember to:
• Reset Crystalio II’s video settings before your calibration
• Associate Gamma Profiles to each HDMI output if you have used Advanced Gamma
Correction to fine tune the color balance of your displays
24