


4.1 CONFIGURE YOUR VIDEO SOURCE
Even if your standard definition video source has the option to output progressive video
(denoted by a number and then the letter ‘p’, for example 480p), for maximum results, it is
recommended to disable such an option and select interlaced video mode instead (denoted
by a number and then the letter ‘i’, for example 480i).
Crystalio II features state-of-the-art technology specifically designed to convert interlaced video
into progressive video. This will usually deliver higher performance than the converter built into
your source device.
Similarly, your high definition source may have an option to scale the incoming signal to a fixed
output resolution. Again, it is advisable to turn this feature off as the sophisticated scaling
algorithms in Crystalio II will produce far cleaner results.
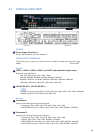
4.2 SWITCH ON CRYSTALIO II
Press the POWER button on the front panel. The Power LED should show green and the LCD
display illuminates. Note that you will need to wait for approximately 5 seconds for Crystalio II to
initialize and for video to display.
If you do not see video as expected, refer to Section 8: Troubleshooting.
The default video output of Crystalio II is 720p. Most high definition displays can lock to
720p which should then enable you to use the OSD to correctly configure Crystalio II.
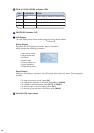
4.3 SELECT INPUT VIDEO SOURCE
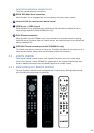
Using the remote control
Press the Menu remote control key to enter the OSD menu, then select Input Select in the Input
sub-menu. Select the type of input port via which your input device has been connected and
press OK to confirm.
OR
Press the Input remote control key and a mini menu selection list pops up. Select the type of
input port via which your input device has been connected and press OK to confirm.
OR
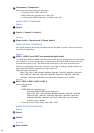
Using the front panel control
1 Press OK button to start Main Menu
2 Select Input and choose Input Select
3 Choose input port via which your input device is connected
4 Press OK button to confirm
OR
Press the INPUT button to cycle through the various input terminals and stop at the one through
which your input device is connected.
4.4 SELECT PRIMARY OUTPUT PORT
Using the remote control
Press the Menu remote control key to enter the OSD menu, then select Output Select in the
Output sub-menu. Select the output terminal via which your display device has been connected
and press OK to confirm.
4. BASIC SETUP
20