


The System Setup and Other Setup menus
11
85
En
X-Curve
Most soundtracks mixed for cinema sound too bright
when played back in large rooms. The X-Curve setting acts
as a kind of re-equalization for home theater listening, and
restores proper tonal balance of movie soundtracks.
1
1 Select ‘
X-Curve
’ from the
Manual SP Setup
menu.
2 Choose the X-Curve setting you want.
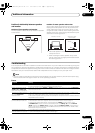
Use / to adjust the setting. The X-Curve is expressed
as a downwards slope in decibels per octave, starting at
2 kHz. The sound becomes less bright as the slope
increases (to a maximum of –3.0dB/oct). Use the
following guidelines to set the X-Curve according to your
room size:
•If you select OFF, the frequency curve will be flat and
the X-Curve has no effect.
3 When you’re finished, press
RETURN
.
THX Audio Setting
This menu allows the user to adjust various THX features
including Loudness Plus, SBch processing, SB Speaker
Position, THX Select2 Subwoofer (on/off), and Boundary
Gain Control. Please see page 100 for details regarding
these THX features.
1 Select ‘
THX Audio Setting
’ from the
Manual SP
setup menu.
2 Select either
ON
or
OFF
for the
THX Loudness Plus
setting.
3 Specify whether the SBch processing is AUTO or
MANUAL.
• AUTO –
When surround back speakers are connected,
whether or not surround back channel signals are
present in the audio signals being input is detected
and the appropriate THX surround mode is set.
• MANUAL – The desired THX surround mode can be
selected regardless of whether or not surround back
channel signals are present in the audio signals
being input.
4 Specify the distance of your surround back speakers
from each other.
• 0–1 ft – Surround back speakers within 1 foot apart.
• >1–4 ft – Surround back speakers between 1 and 4
feet apart.
• 4 ft< – Surround back speakers more than 4 feet
apart (default).
5 Specify whether your subwoofer is THX Select2
certified or not.
If your subwoofer isn’t THX Select2 certified, but you still
want to switch boundary gain compensation on, select
YES here, but the effect might not work properly.
6 Select either
ON
or
OFF
for Boundary Gain
Compensation setting.
7 When you’re finished, press
RETURN
.
You will return to the Manual SP Setup menu.
Network Setup menu
Setting up the network to listen to Internet radio on this
receiver.
1 Press on the remote control, then press
HOME MENU
.
A Graphical User Interface (GUI) screen appears on your
TV. Use /// and ENTER to navigate through the
screens and select menu items. Press RETURN to
confirm and exit the current menu.
2Select ‘
System Setup
’ from the
Home Menu
.
3Select ‘
Network Setup
’ from the
System Setup
menu.
4 Select the setting you want to adjust.
If you are doing this for the first time, you may want to
adjust these settings in order:
• IP Address, Proxy – Sets up the IP address/Proxy of
this receiver (see below).
• Information – Checks the MAC address of this
receiver (page 86).
• Network Standby – Allows the Web Control
function to be used even when the r eceiver is in the
standby mode (page 86).
IP address/Proxy setting
In case the router connected to the LAN terminal on this
receiver is a broadband router (with a built-in DHCP
server function), simply turn on the DHCP server
function, and you will not need to set up the network
manually. You must set up the network as described
below only when you have connected this receiver to a
broadband router without a DHCP server function.
Before you set up the network, consult with your ISP or
the network manager for the required settings. It is
advised that you also refer to the operation manual
supplied with your networ k component.
2
Note
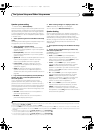
1Since the principal is the same, X-Curve isn’t applied when you’re using any of the Home THX or Pure direct modes.
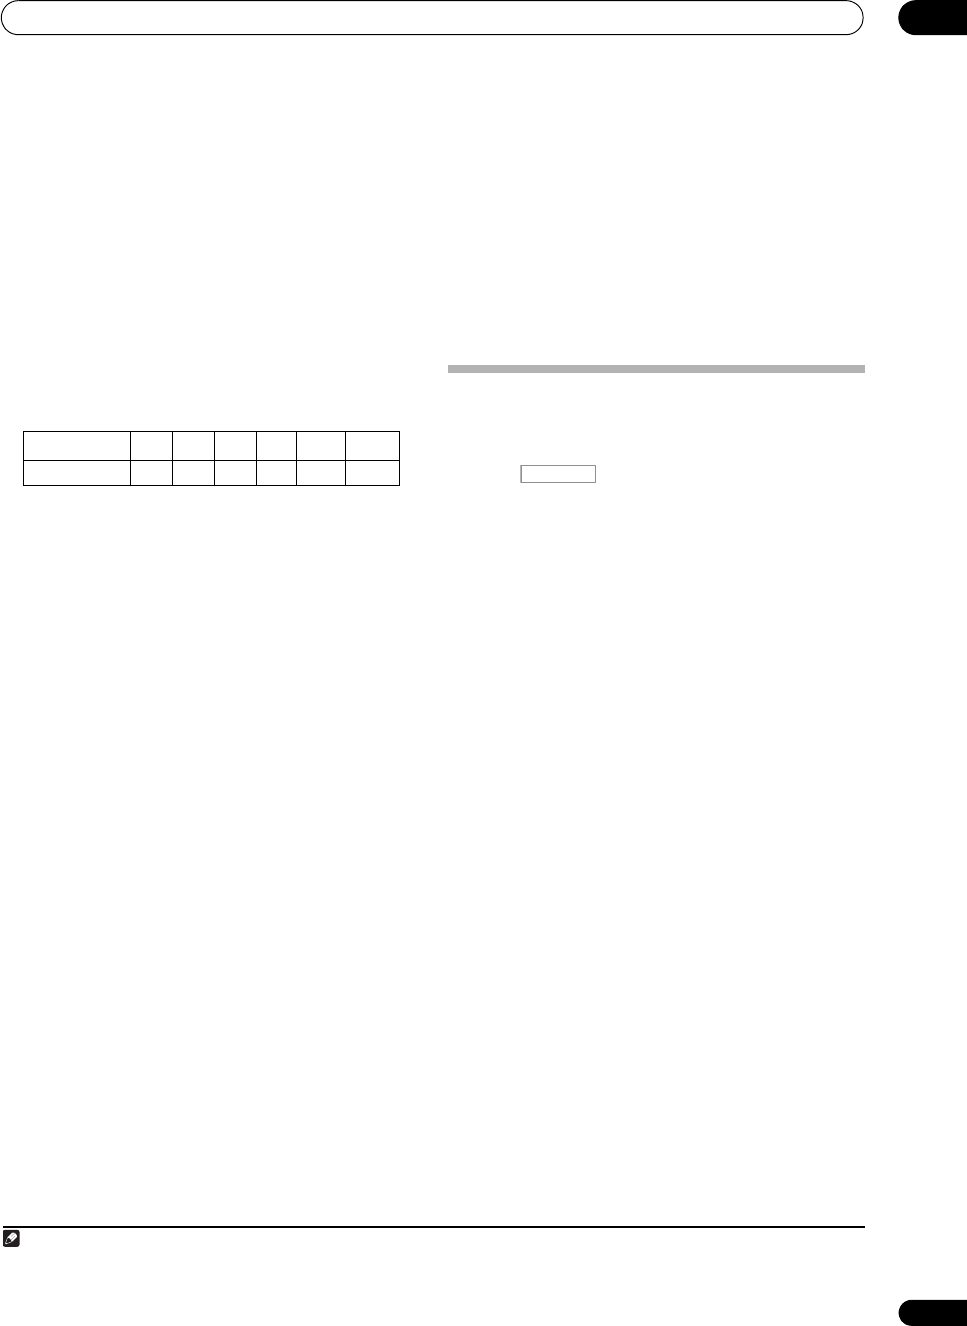
Room size (ft
2
)
≤400 ≤550 ≤650 ≤800 ≤2200 ≤12000
X-Curve (dB/oct)
–0.5 –1.0 –1.5 –2.0 –2.5 –3.0
2 In case you make changes to the network configuration without the DHCP server function, make the corresponding changes to the network
settings of this receiver.
RECEIVER
VSX-1325_UXJCB.book 85 ページ 2010年3月9日 火曜日 午後3時4分