16
4 Getting Started
En
Playback modes
The different play modes let you play either a single disc, or up to
four discs one after another for an uninterrupted playing time of up
to five hours.
1 Load a disc into disc tray 1 of the
changer.
2 Press OPEN/CLOSE 2 0.
Disc tray 1 closes and 2 opens. Load a disc into tray 2 of the
changer, then close the disc tray.
3 Load discs into tray 3 and the CD-R
(if you want to).
Load them in the same way as described above.
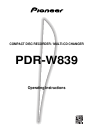
4 Press PLAY MODE to select the disc
playback mode.
Press repeatedly to switch between the three play modes:
• ALL – all discs loaded in the changer play one after the
other (default mode)
• SINGLE – a single disc from the changer plays, then stops
• RELAY – all discs in the changer, followed by the disc in the
CD-R tray, play one after the other
5 Press DISC 1 (CD SELECT 1 on the
front panel) to start playback.
If you're in SINGLE mode, press the DISC (CD SELECT)
button for the disc you want to play.
In ALL or RELAY modes, you can start playback from a disc
other than 1. However, playback will still stop after disc 3
(ALL mode) or the disc in the CD-R tray (RELAY mode).
• You can also start playback using the 6 button on the
3-CD changer side. Playback will start from whichever
CD SELECT button is lit.
DISC
1
DISC
2
DISC
3
MENU/
DELETE
PLAY
MODE
3
- COMPACT DISC MULTI CHANGER
COMPACT DISC DIGITAL RECORDER
◊ÛB¿ˆ˘≤/
CO MPA CT DI SC REC OR DER / MUL TI -CD CH AN GER
Le gat o Lin k Co nve rsi on
CD TEXT
CD SE LEC T
OP EN/ CLO SE
1
3
2
1
3
2
PL AY MOD E
0
0
0
6
MEN U
/DE LET E
Starting playback with a timer
You can use this unit with a standard audio timer to start playback
at a set time. Simply load a disc (or discs) and set the timer. When
power is restored to this unit by the timer, playback will start
automatically in the default ALL mode. Playback starts with the CD
selected (shown in the display) when the unit was last turned off.
• Before setting the timer, make sure that all discs loaded
into the changer have been read by the unit (wait for the
TOC READ message to disappear).
Using the menu features
Several features of the CD recorder can be accessed by using the
MENU/DELETE key. This menu is like a selection of preferences
that will stay in memory even if the system is turned off (see note
below). The jog dial cycles you through the features listed below
(refer to the page numbers listed to set your preferences in the
menu).
• Headphone level (p.14)
• Fader length (p.27)
• Automatic track numbering (p.27)
• Silence threshold for auto track numbering (p.28)
• Time increment recording (p.29)
• Recording balance (p.30)
Note: The time increment will default to OFF when: recording is
stopped; auto track numbering is turned off; power is switched off.