


40
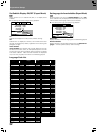
Basic Operations
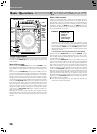
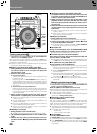
REV
FWD
DIRECTION
HOT CUE
REC MODE
LOOP
OUT ADJUST
TEMPO
ENTER
OUT
RELOOP/
EXIT
4-BEAT
ONE-TRACK
CUE / LOOP
CALL
BACK & FORTH
ANGLE SUBTITLE AUDIO
DISPLAY
DELETE
MEMORY MENU T.MENU
RETURN
SETUP
TOUCH/BRAKE
RELEASE/START
JOG MODE
VINYL
HYPERJOG MODE
TEMPO
MASTER TEMPO
WIDE
TEXT MODE
TIME
MODE
AUTO
CUE
DVD TITLE
MP3 FOLDER
JOG ADJUST
LIGHT
HEAVY
TEMPO
RESET
REV
FWD
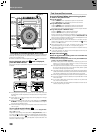
POWER
OFF ON
STOP
LOCK
UNLOCK
EJECT
PLAY/PAUSE
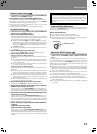
DVJ-1000
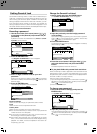
PREVIOUS
NEXT
FWDREV
IN ADJUST
REALTIME CUE
IN
CUE
REV 1,
FWD ¡
PLAY/PAUSE
6
TEMPO
MASTER
TEMPO
TEMPO
TEMPO
RESET
JOG
ADJUST
DVD TITLE
MP3 FOLDER
/
PREVIOUS
4
NEXT ¢
TEXT MODE
IN/
REAL TIME CUE/
IN ADJUST
CUE
NORMAL/DJ
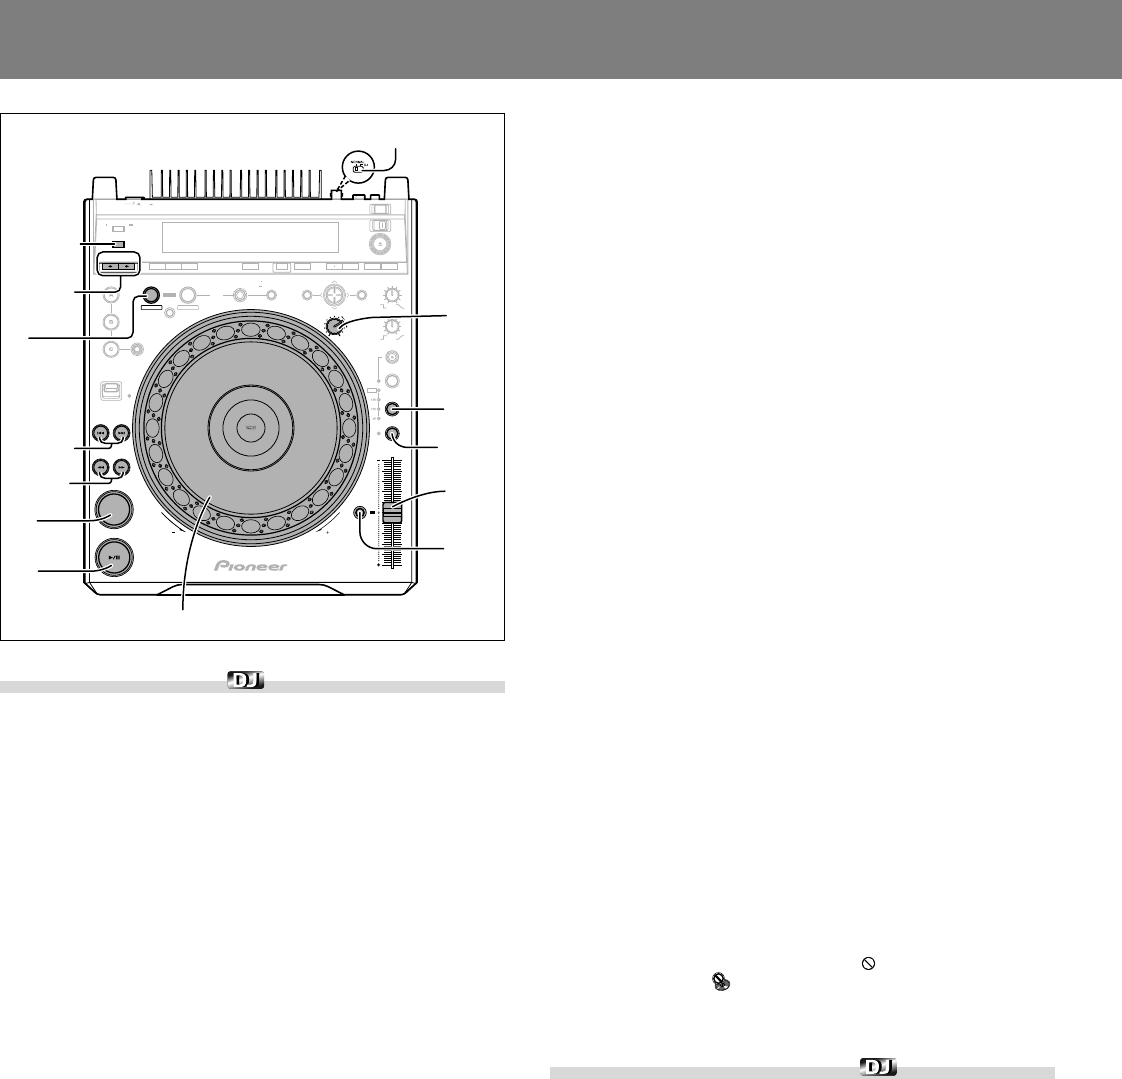
Jog dial
Setting cue points
★ This function is not supported when the rear panel NORMAL/DJ
switch is set to the NORMAL position.
When a cue point has been previously set, pressing the CUE button
during playback will cause the player to move instantly to the cue point
and enter the cue standby mode.
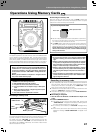
¶ Storing to memory may not be possible while the jog dial’s audio/
video memory status display is flashing.
■ Setting a cue point with VINYL mode OFF
1. During playback, press the PLAY/PAUSE (6) button near
the point you wish to set as a cue point. The player will
enter the pause mode.
2. Search for the precise cue point.
¶ Using frame numbers:
The cue point position can be set in units of single frames (75
frames per second).
Using the jog dial or the REV1/FWD¡ buttons, advance or
reverse the frames to the desired point. One revolution of the jog
dial is equivalent to 135 frames; each time the search button is
pressed, the disc moves one frame in the direction corresponding
to the button.
¶ Search for cue point using audible pause:
Rotate the jog dial slowly and reverse the disc to the instant just
prior to the point from which you wish to begin playback (the cue
point will be set at the point immediately after the sound heard
during audible pause).
3. When you have found the desired cue point using the
frame number or audible pause, press the CUE button.
¶ When the cue indicator lights, the new cue point has been re-
corded in memory.
¶ During DVD playback, a thumbnail of the cue point appears on the
preview monitor screen.
¶ During CD or MP3 playback, the cue point's track number and
time are displayed on the preview screen.
¶ When a new cue point is recorded in memory, the previously
memorized cue point will be erased.
[Modifying a cue point]
1. During playback, press the CUE button.
¶ Playback will return to the set cue point and enter cue standby.
2. Use the REV1/FWD¡ buttons to enter audible pause
mode.
3. Find the new cue point by performing steps 2 and 3 of
the above section “■ Setting a cue point with VINYL mode
OFF”.
■ Setting a cue point with VINYL mode ON
1. As playback nears the desired cue point, either press the
top surface of the jog dial or press the PLAY/PAUSE (6)
button to set the unit in pause mode.
2. While pressing the surface of the jog dial, listen to the
playback sound as you rotate the dial, and return play-
back to the point just before the spot you wish to use as
the cue point.
3. When the sound is at the desired cue point, continue hold-
ing the surface of the jog dial depressed, and press the
CUE button.
¶ When the cue indicator lights, the new cue point has been re-
corded in memory.
¶ When a new cue point is recorded in memory, the previously
memorized cue point will be erased.
[Modifying a cue point]
1. During playback, press the CUE button.
¶ Playback will return to the set cue point and enter cue standby.
2. Perform steps 2 and 3 of the previous section “■ Setting
a cue point with VINYL mode ON”.
¶ In the same way as for VINYL mode OFF, the REV1/FWD¡
buttons can also be used to modify a cue point.
■ Real time cue
During forward playback, press the IN/REALTIME CUE/IN
ADJUST button at the place you wish to set as cue point.
¶ This point will be recorded as the new cue point.
■ Confirm cue point (cue point sampler)
After setting a cue point, depress the CUE button while the
unit is in the cue standby mode.
¶ The audio and video from the cue point will be played back while
the CUE button is held depressed, allowing you to confirm the point.
■ To return to a cue point (back cue)
During playback, press the CUE button.
¶ Playback will return to the previously set cue point, sound will be
muted, and the monitor screen will display black background as
the unit enters the cue standby mode.
¶ Press the PLAY/PAUSE (6) button to resume playback instantly
from the cue point.
¶ When playing a DVD that prohibits title or other searches, playback
will continue, and the prohibited mark will appear in the display;
the similar mark will appear on the monitor screen.
¶ In the case of MP3, back cue is supported only within one and the
same folder.
Changing playback speed
★ This function is not supported when the rear panel NORMAL/DJ
switch is set to the NORMAL position.
Slide the TEMPO control slider forward or back.
When the slider is moved forward (+), playback speed will increase, and
when moved back (–), playback speed will decrease.
¶ The rate of tempo change is displayed.
¶ It is also possible to change playback speed without affecting the
pitch (☞ P.41, “Setting master tempo”).
■ Selecting a tempo control range
Press the TEMPO button.
Each time the button is pressed, the TEMPO control slider’s variable
control range alternates between the values ±6 %, ±10 %, ±16 %, and
WIDE. The range can be adjusted in increments of 0.02 % (for ±6 %),
0.05 % (for ±10 %), 0.05 % (for ±16 %), and 0.5 % (for WIDE).
The variable control range setting value is shown by the tempo control
range indicator (±6, ±10, ±16, WIDE), as well as in the onscreen display.
¶ The variability in the WIDE range is:
±100 % (CD)
+70 % to –100 % (DVD, MP3)
■ Tempo Reset
Press the TEMPO RESET button.
The TEMPO RESET indicator lights and the tempo change rate is reset to
“0” (normal tempo), regardless of the position of the TEMPO control slider.
¶ If the TEMPO RESET button is pressed once again, tempo reset is
canceled, and the tempo returns to the value set with the TEMPO
control slider.