


TECHNICALLY SPEAKING continued
even risk overloading your speakers. You can only
adjust the bass and treble controls on the front panel.
However, you can compare the sound with the tone
controls on or off by pressing the Tone button on the
front panel or remote control.
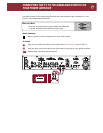
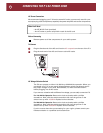
DC Trigger Input Jack
The P 3 can be turned on automatically when a trigger
voltage is received from an external source such as a
system controller. The DC Trigger circuit can be
activated with a DC voltage from between +9 Vdc to +
12 Vdc and requires only 0.2 mA of current to activate.
Use the provided gray color cable with 2.5 mm sub-
mini plugs to connect the output of the DC trigger
source to the P 3’s 12 V Trigger input. Depending on
the component used to trigger the P 3 on, you may
need to modify the DC trigger wire differently. To
trigger properly, the positive voltage must appear at
the tip of the 2.5 mm plug. The wire with the red stripe
corresponds to the positive connection.
Note: When a live DC source is connected to the P 3’s
12 V Trigger Input jack, you cannot turn the P 3 off
with its front panel On-Off button or remote control
handset Off button.
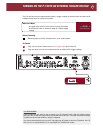
DC Trigger Output Jack
The P 3 generates its own +12 Vdc voltage at the 12 V
Trigger Out jack so you can trigger on other components.
External Remote Input and Loop Out
The External Remote input is for connection to a
wired infrared repeater system or system controller.
This input jack accepts a standard 1/8" (3.5 mm) two-
conductor mini-plug with a positive tip and a negative
sleeve. Your Authorized Parasound Dealer or Custom
Installer can recommend a compatible infrared
repeater system for the P 3.
The External Remote circuit has a loop output so you
can connect an additional IR controlled component.
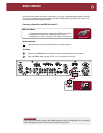
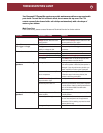
Front Panel Display
The display on the front panel indicates operational
status of the P 3 including:
• Source Selected
• Volume Level of both channels
• Muting status
Eliminating Hum and Buzz Caused by Ground Loops
Audible hum and buzzing noises in a system are
usually related to issues with the component
grounds. Ground (sometimes called common) is a
point of reference for voltages in virtually all audio
and video components. Ground is supposed to
remain at zero volts while the audio signal swings
positive (voltage above ground) and negative (voltage
below ground). If ground isn’t at zero, there can be an
audible 60 Hz hum (or 50 Hz hum in regions with 50
Hz AC). The harmonics of these frequencies (120 Hz,
240 Hz, 480 Hz or 100 Hz, 200 Hz, 400 Hz) may add
buzz in addition to the hum.
The ideal of zero voltage ground for all the
components in a system is practically impossible,
because some resistance between the ground points
of different components is inevitable. By keeping
components close together with their power cords
plugged into a common AC outlet or power strip,
you’ll avoid the problems created by resistance in the
house’s wiring.
Hum and buzz is also caused when unwanted voltage
flows through multiple component ground points
called ground loops. Here are three tips to avoid
ground loops:
1. Use balanced input lines with your Parasound P 3.
(See Balanced and Unbalanced Lines in this section).
2. When rack mounting, always use insulated
“shoulder” washers. These break the ground loops
caused by metal-to-metal contact between the rack,
the units, and their rack-mount bolts. Washers are
included in Parasound rack mount kits. Extras are
available from rack manufacturer Middle Atlantic
Products, www
.middleatlantic.com.
3. Use the ground switch on your power amplifier to
eliminate most ground loops. This separates the
amplifier’s signal input ground from its chassis ground
to isolate unwanted voltage in the shields of the
unbalanced (RCA) interconnect cables. Be sure your
system installation is finished before you try moving
the ground switch from its “Normal” to its “Lift”
position.
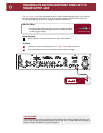
Headphone Circuit
The P 3 includes a high-quality headphone amplifier.
It is suitable for headphones with an impedance of 8 Ω
or higher. The headphone jack accepts a standard
1/8” (3.5 mm) mini-jack. If your headphones have a
1/4” jack, you will need a stereo 1/4” jack-to-stereo
1/8” mini-plug adapter.
Tape Record and Play Circuitry
The Tape Play/In and Rec/Out jacks on the P 3 enable
you to connect a cassette deck or the analog input
and output of a MiniDisc or CD recorder. You can also
play back analog audio outputs from your computer’s
sound card or MP3 player.
If you don’t have a recording device, you can use the
P 3’s Tape Play/In jacks as an input for another line
level source component. The P 3 bass and treble
controls function only for playback, so you can’t use
them when making recordings.
23