


9
9
RQT8164
ENGLISH
8
RQT8164
Power Supply Preparations : Headphones
8
2
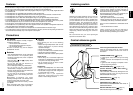
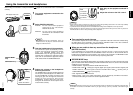
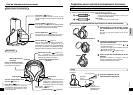
Put the headphones on the transmitter
making sure that the charging terminals
are in contact with each other.
• The POWER/CHARGE lamp on the transmitter
glows red.
• The lamp goes out when the batteries are fully
charged. It takes approximately 16 hours to
charge the supplied batteries.
• When putting the headphones on the
transmitter, hold the left and right housings in
each hand and put the headphones straight
down onto the transmitter.
• During charging the transmitter is turned off automatically.
• Disconnect the AC adapter from the power outlet if the unit is not going to be used for a long time. This unit
consumes a small amount of power (approximately 1.3 W) if the AC adapter is connected, even when it is turned off.
• Do not attempt to charge dry cell batteries.
• Charge the batteries in an environment with an ambient temperature between 0 ˚C (32 ˚F) and 40 ˚C (104 ˚F).
If the POWER/CHARGE lamp does not light up
Check that the left and right sides of the headphones are correctly placed on the left and right sides
of the transmitter.
Check that the charging terminals on the headphones and transmitter are touching each other.
Adjust them if they are not touching.
To charge the batteries after using the headphones
Put the headphones back on the transmitter. The POWER/CHARGE lamp glows red. The DECODE
MODE lamp goes out approximately 1-2 seconds later and charging begins. It takes approximately
16 hours to charge the supplied batteries. The unit’s internal timer will stop charging when the
batteries are fully charged so leaving the headphones on the transmitter will not cause battery
overcharging or damage to the unit.
NOTE
• The charging takes approximately 16 hours even if the batteries are not fully discharged.
• If you take the headphones off the transmitter while charging or after charging has finished, the charging will again
take approximately 16 hours when you put the headphones on the transmitter.
NOTE
Charging and operating times
Charging time
Approx. 1 hour
Approx. 16 hours*
2
Operating time*
1
Approx. 1 hour 15 minutes*
3
Approx. 20 hours*
3
*
1
At 1 kHz, 1 mW+1 mW output.
*
2
Time required to fully charge from empty.
*
3
Operating times may differ depending on the
temperature of the surrounding environment
and operating conditions.
To check the remaining battery
power
Pull up the free-adjusting band and check if the
POWER lamp on the right housing is dim or
flashing. This means that the batteries have run
down and should be replaced or charged.
If the sound is distorted, intermittent or there is
excessive background noise the batteries should
also be replaced or charged.
Service life for rechargeable batteries
If the duration of use for the supplied nickel-metal hydride rechargeable batteries is half the usual time
after charging, the batteries have reached the end of their service life. Replace them with new batteries.
Using dry cell batteries (not included)
Use “R6/LR6, AA” dry-cell batteries.
Put the batteries into the headphones in the same way as described in [Inserting the supplied nickel-
metal hydride rechargeable batteries]( page 7).
You cannot charge dry cell batteries even if you put the headphones on the transmitter.
Operating times for dry cell batteries
Battery type
Alkaline battery
Manganese dry cell battery
Operating time*
1
Approx. 34 hours*
2
Approx. 12 hours*
2
*
1
At 1 kHz, 1 mW + 1 mW output.
*
2
Operating times may differ depending on the
temperature of the surrounding environment
and operating conditions.
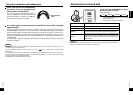
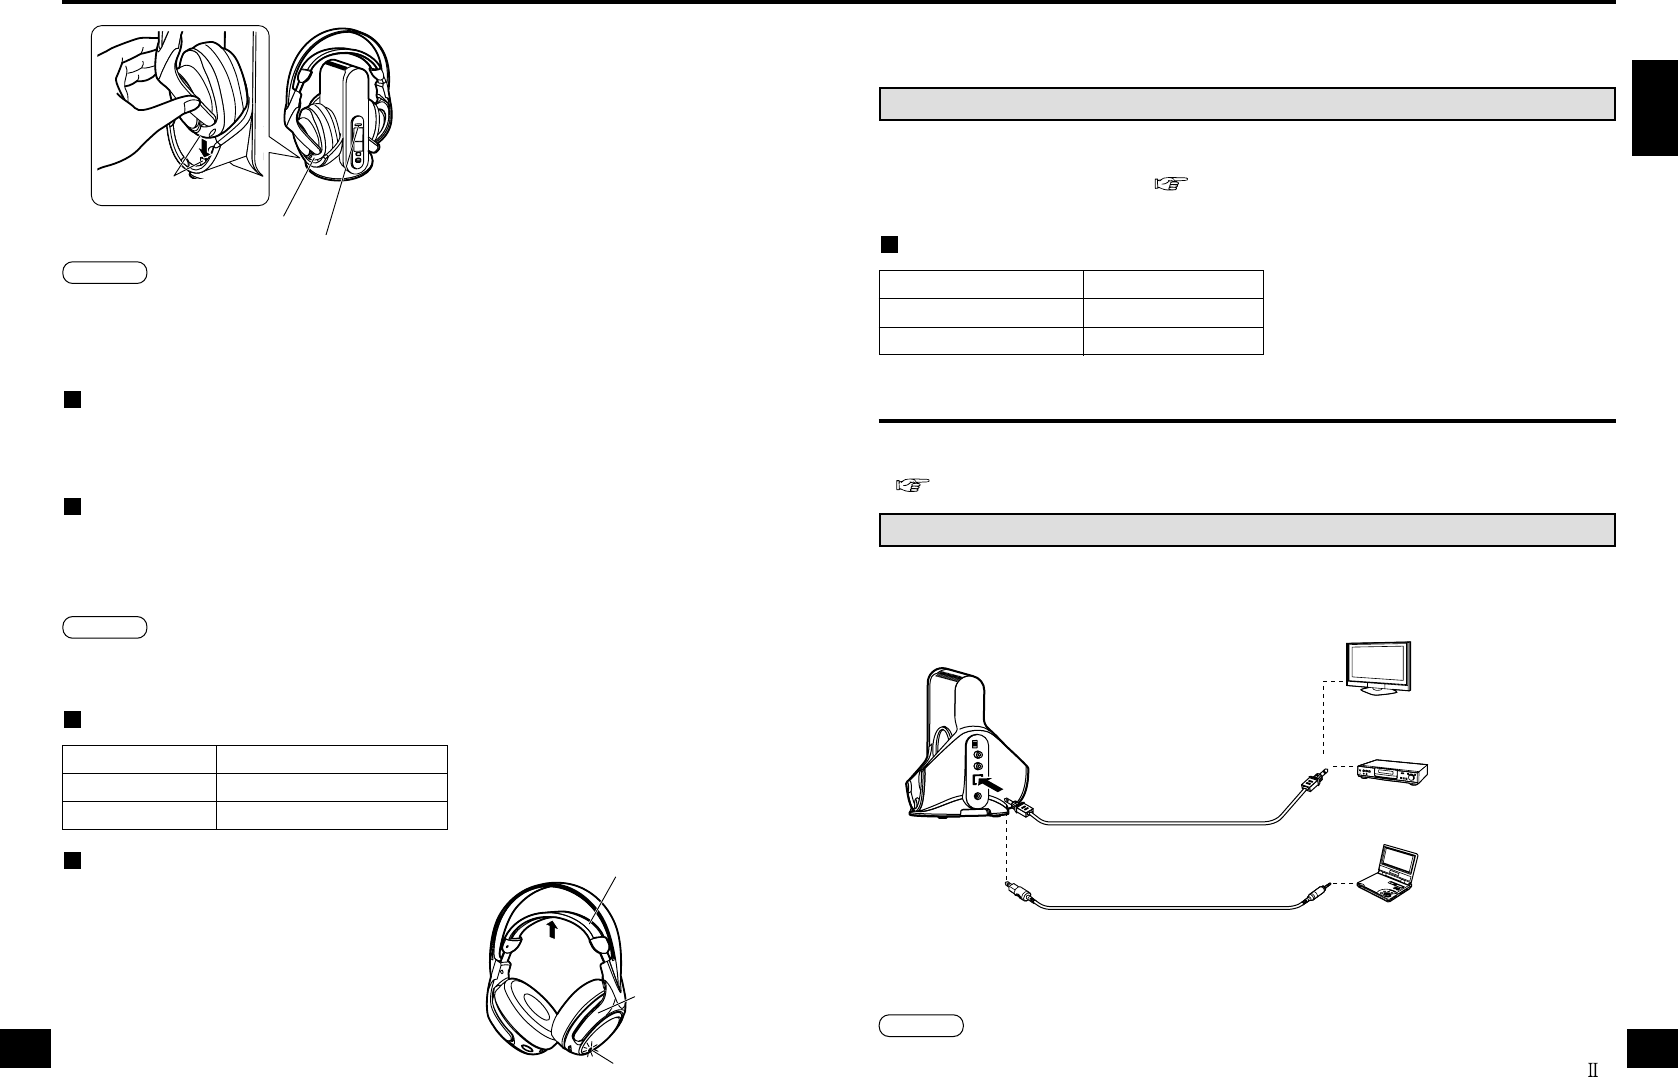
Connections
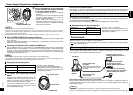
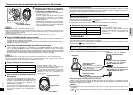
Optical digital cable (optical mini plug) (not included)
When connecting the optical DIGITAL AUDIO OUT terminal of, for example, a portable DVD player or
portable CD player to the transmitter’s DIGITAL IN terminal, use the optional digital cable (mini plug to
angular plug) or similar.
• Before connecting, turn off the digital or analog equipment.
• After connecting the digital or analog equipment to the transmitter, connect the AC adapter supplied.
( page 7 [Charging] step 1)
Connecting digital equipment
Use the supplied optical digital cable to connect a television or DVD player’s optical DIGITAL AUDIO
OUT terminal*
1
to the transmitter’s DIGITAL IN terminal*
2
.
*
1
Operation is not guaranteed when connecting to a computer’s optical DIGITAL AUDIO OUT terminal.
*
2
When the connected equipment supports PCM output only, the surround sound will become DOLBY PRO LOGIC .
NOTE
Charging terminals
Left housing
POWER/CHARGE lamp
Free-adjusting band
Right housing
POWER lamp
Transmitter
Optical digital cable
(supplied)
Remove the plug caps and insert
the cable firmly into the correct
terminals.
Optical digital cable
(not included)
Television with an optical
DIGITAL AUDIO OUT terminal
Equipment such as a DVD
recorder with an optical
DIGITAL AUDIO OUT terminal
Equipment such as a portable
DVD recorder with an optical mini
DIGITAL AUDIO OUT terminal
DIGITAL IN
terminal