


42 ADVANCED FEATURES / MULTIROOM OPERATION
Advanced Features / Multiroom Operation
To turn off the semi-OSD system, you will need to
make an adjustment in the
ADVANCED
SELECT
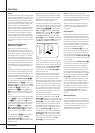
menu (Figure 13).To start the adjust-
ment, press the OSD button
L
to bring the
MASTERMENU to the screen. Press the
⁄
Button
E
, until the on-screen › cursor is next to
the
ADVANCEDline. Press the Set Button
F
to enter the ADVANCEDSELECT menu.
At the
ADVANCEDSELECT menu make
certain that the on-screen
› cursor is next to the
SEMIOSDline by pressing the
⁄
/
¤
buttons
E
as needed. Next, press the
›
button
E
so
that the word
OFFis highlighted in the video
display.
Note that this setting is temporary and will re-
main active only until it is changed or until the
AVR is turned off. Once the unit is turned off, the
semi-OSD displays will remain activated, even if
they were switched off for the previous listening
session.
To change the length of time that the semi-OSD
displays remain on the screen, go to the
ADVANCEDSELECT Menu as outlined ear-
lier, and press the
⁄
/
¤
buttons
E
as needed,
until the on-screen
›
cursor is next to the
SEMI-OSDTIME OUTline. Next, press the
‹
/
›
Buttons
E
until the desired time in sec-
onds is displayed. Note that unlike most of the
other options in this menu, this is a permanent
setting change, and the time-out entry will remain
in effect until it is changed, even when the unit is
turned off.
If you wish to make other adjustments in the
menu, press the
⁄
/
¤
Buttons
E
until the on-
screen
›
cursor is next to the desired setting or
the
BACKTOMASTERMENUline and
press the Set button
F
. If you have no other
adjustments to make, press the OSD Button
L
to exit the menu system.
Full-OSD Time Out Adjustment
The FULL OSDmenu system is used to
simplify the setup and adjustment of the AVR
using a series of on-screen menus. The factory
default setting for these menus leaves them on
the screen for 20 seconds after a period of inac-
tivity before they disappear from the screen or
Time Out. This Time Out is a safety measure to
prevent the menu text from burning into the CRTs
in your monitor or projector, which might happen
if they were left on indefinitely. However, some
viewers may prefer a slightly longer or shorter
period before the Time Out display.
To change the Full-OSD Time Out, you will need
to make an adjustment in the
ADVANCED
SELECT
menu (Figure 13).To start the adjust-
ment, press the OSD button
L
to bring the
MASTERMENU to the screen. Press the
⁄
button
E
, until the on-screen ¤ cursor is next
to the
ADVANCEDline. Press the Set Button
F
to enter the ADVANCEDSELECT
menu (Figure 13).
At the
ADVANCEDSELECT menu make
certain that the on-screen
› cursor is next to the
FULLOSDTIME OUTline by pressing the
⁄
/
¤
Buttons
E
as needed. Next, press the
‹
/
›
buttons
E
until the desired time is dis-
played in seconds. Note that unlike most of the
other options in this menu, this is a permanent
setting change, and the time-out entry will remain
in effect until it is changed, even when the unit is
turned off.
If you wish to make other adjustments in the
menu, press the
⁄
/
¤
Buttons
E
until the
on-screen
›
cursor is next to the desired setting
or the
BACKTOMASTERMENUline and
press the Set button
F
. If you have no other
adjustments to make, press the OSD Button
L
to exit the menu system.
Digital Auto-Poll Settings
In order to provide the greatest flexibility in
accommodating the widest range of sources, the
AVR 635 includes both analog and digital audio
inputs for all sources. In most cases you will want
to use one or the other, but not both. However, in
some circumstances it is desirable to make both
an analog and digital connection between a
source device and the AVR.
An important application for dual audio connec-
tions is with cable or satellite boxes, where the
audio output may change depending on the
channel being viewed and the type of audio the
cable system or satellite receiver associates with
it.To eliminate the need to constantly switch back
and for to select an audio type each time you
change channels, the AVR 635 is programmed by
default to automatically “poll” the audio inputs.
When a digital audio stream it is selected first,
but if the digital audio is removed the AVR will
switch to the analog inputs associated with that
input as a back-up. In most systems this is the
correct operation and no further change is
required.
However, if this configuration does not suit your
system application the AVR 635 gives you the
flexibility to turn the digital audio auto polling on
or off on an input-by-input basis. When the Auto
Polling is set to
OFF, the system will keep the
digital audio input active and not attempt to
switch to the analog source even when the digital
data stream stops.
If you wish to change the auto poll setting, first
select the input you wish to configure by pressing
the appropriate Input Selector
4
on the
remote, or on the
SOURCEline pf the
IN/OUTSETUP menu (Figure 2). Next, with
the
ADVANCEDSELECT MENU(Figure
13) on the screen, press the
‹
/
›
Navigation
Button
E
so that the cursor is pointing to the
AUTOPOLLline. Press the
‹
/
›
Navigation
Button
E
to change a default setting so that
OFFis shown in highlighted video or to ONso
that the original setting is restored and the auto
polling is once again activated.
Since this setting is unique to each input, you
must return to the
IN/OUTSETUP menu to
change any other inputs. To do that, press the
‹
/
›
Navigation Button
E
so that the cursor
is pointing to the
BACKTOMASTER
MENU
line and press the Set Button
F
.At
the
MASTERMENU (Figure 1), press the
‹
/
›
Navigation Button
E
so that the cursor is
pointing to the
IN/OUTSETUP line. Press
the Set Button
F
and then follow the instruc-
tions shown on page 20 to change the input
source. Return to the
ADVANCEDMENU to
reconfigure the auto poll setting for the newly
selected input.
When all changes to the Auto Poll settings have
been made, press the
‹
/
›
Navigation Button
E
to select another configuration option on the
ADVANCEDSETUP Menu, move the cursor
to
BACKTOMASTERMENUline and press
the Set Button
F
to make a change to anoth-
er menu option, or simply press the OSD Button
L
to exit the menu system.
Multiroom Operation
The AVR is fully equipped to operate as the con-
trol center for a complete multiroom system that
is capable of sending one source to a second
zone in the house while separate source is lis-
tened to in the main room. In addition to provid-
ing for control over the selection of the remote
source and its volume, the AVR offers a com-
prehensive range of options for powering the
speakers in the second zone.
• Using the line-level Multiroom Audio
Outputs
7
, the selected source may be fed to
optional, external power amplifiers that may be
matched to the specifics of the installation.
• When the main room system is configured for
5.1 operation, the Surround Back Left/Right
amplifier channels may be used to power the
remote zone so that no additional amplifiers are
required.
• Using built-in A-BUS Ready technology, option-
al A-BUS modules may be connected to the AVR
via a single Category Five wire, so that remote
zone speakers may be powered directly from the
module or keypad without the need for additional
power, IR sensor or volume control wires to be
run to the second zone.
In addition, the AVR includes a remote IR sensor
input so that remote control commands from the
Zone II remote included with the unit may be
transmitted to the unit, while standard IR
input/output jacks allow the remote zone’s com-
mands to be sent to compatible IR-controlled
source devices.