64
Recording
This section explains how to record the input source and
how to record audio and video from separate sources.
Notes:
• The surround sound and DSP listening modes cannot
be recorded.
• Copy-protected DVDs cannot be recorded.
• Sources connected to the multichannel DVD input
cannot be recorded.
• Various restrictions apply to digital recording. Refer to
the manuals supplied with your digital recording
equipment for more details.
• Digital input signals are output by only the digital out-
puts, and analog input signals are output by only the
analog outputs. There is no internal conversion from
digital to analog or vice versa.
• DTS signals will be recorded as noise, so don’t
attempt analog recording of DTS CDs or LDs.
• While the Pure Audio listening mode is selected, the
VIDEO 1 and 2 OUT V and S jacks don’t output video
signals, so select another mode when recording.
Audio sources can be recorded to a recorder (e.g., cas-
sette deck, CDR, MD) connected to the TAPE OUT or
DIGITAL OPTICAL OUT jacks. Video sources can be
recorded to a video recorder (e.g., VCR, DVD recorder)
connected to the to VIDEO 1 OUT or VIDEO 2 OUT
jacks. See pages 25 to 38 for hookup information.
Note:
• If you select another input source during recording,
that input source will be recorded.
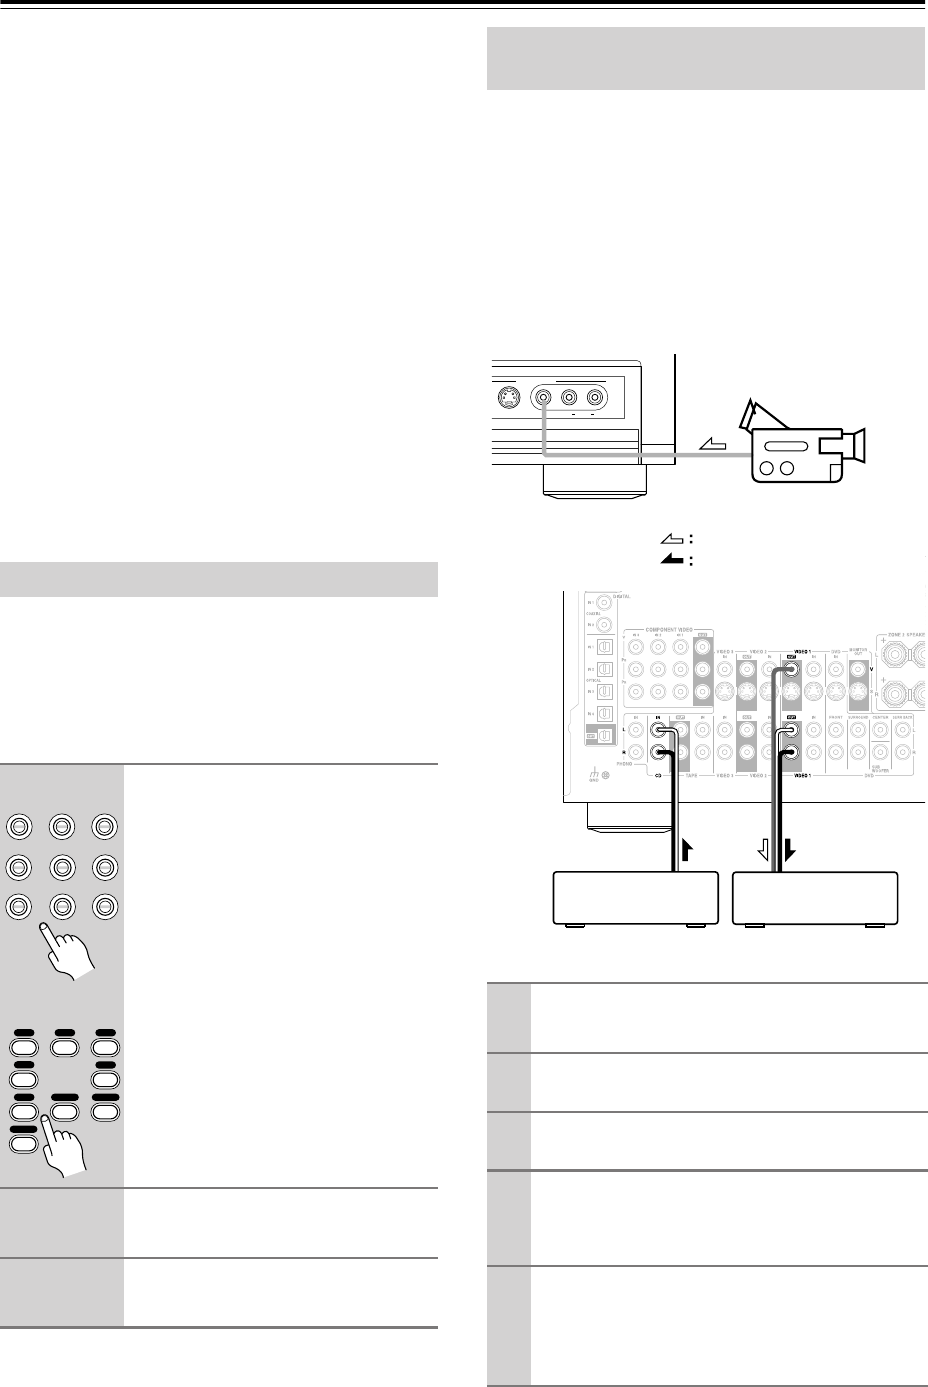
You can overdub audio onto your video recordings by
simultaneously recording audio and video from two sep-
arate sources. This is possible because only the audio
source is switched when an audio-only input source,
such as TAPE, TUNER, or CD, is selected, the video
source remains the same.
In the following example, audio from the CD player con-
nected to the CD IN and video from the camcorder con-
nected to the VIDEO 4 INPUT VIDEO jack are recorded
by the VCR connected to the VIDEO 1 OUT jacks.
Recording the Input Source
1
Use the input selector buttons to
select the source that you want
to record.
See “Which Connections Should I
Use?” on page 25 to see which signals
can be output and recorded.
You can watch the source while record-
ing. The AV receiver’s VOLUME con-
trol has no effect on recording.
2
On your recorder, start record-
ing.
3
On the source component, start
playback.
DVD VIDEO 1 VIDEO 2
VIDEO 3 VIDEO 4 PHONO
TAPE
TUNER CD
Remote
controller
123
46
789
CD
V1
V4
V2 V3
DVD
TAPE
TUNER
+
10
PHONO
Recording Audio and Video from
Separate Sources
1
Prepare the camcorder and CD player for
playback.
2
Prepare the VCR for recording.
3
Press the [VIDEO 4] input selector button.
4
Press the [CD] input selector button.
This selects the CD player as the audio source but
leaves the camcorder as the video source.
5
Start recording on the VCR, then start
playback on the camcorder and CD player.
Video from the camcorder and audio from the CD
player are recorded by the VCR.
VIDEO
S VIDEO
VIDEO 4 INPUT
AUDIOLR
Camcorder
VCRCD player
video signal
audio signal
