


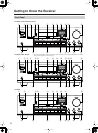


11
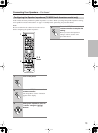
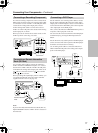
Remote Controller
—Continued
For detailed information, see the pages in parentheses.
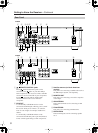
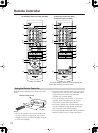
A
ON/STANDBY button (20)
Sets the receiver to On or Standby.
B
SLEEP button (22)
Used with the Sleep function.
C
INPUT SELECTOR buttons (21) and number
buttons (26)
When any of these buttons is pressed, the input
source will be changed to the one shown below the
button. The button with no label does not work for
input source selection. After the DIRECT TUNING
button is pressed, these buttons work as number
button for about 5 seconds. During this time, the
buttons can be used to select AM and FM radio
stations and satellite radio channels directly.
D
CLR button (26)
Used to enter the station frequency directly or
cancel the number entry.
E
HDD PLAYLIST [ ]/[ ] buttons
Selects a playlist stored on the player on an HDD
component.
F
RETURN button
Selects the previously displayed setup menu.
G
Arrow [ ]/[ ]/[ ]/[ ] and ENTER buttons
(26)
North American model only
For AM and FM, the Up and Down [ ]/[ ]
buttons are used for tuning.
For XM, the Up and Down [ ]/[ ] buttons are
used to select channels, and the [ENTER] button is
used to change the search mode. The Left and Right
[ ]/[ ] buttons are used to select categories.
H
CD operation buttons
RANDOM:
Used with the random playback
function.
REPEAT:
Used with the repeat playback functions.
DISC SKIP:
Switches the disc loaded when the CD
changer is connected.
[ ]: Pauses playback on a CD.
[ ]: Stops playback on a CD.
[ ]: Starts playback on a CD.
I
DIMMER button (22)
Adjusts the display brightness.
J
DISPLAY button (30)
Displays various information about the selected
input source.
K
TUNING/CH [ ]/[ ] buttons (26)
When AM, FM is selected, the TUNING UP
[ ]/DOWN [ ] buttons are used for radio tuning.
L
PRESET [ ]/[ ] buttons (27)
Used to select radio presets.
M
DIRECT TUNING button (26)
When you know the frequency for the station you
want to listen to, you can select the station by
entering the frequency directly using this button and
number buttons. When SAT RADIO is selected, you
can select the channel number.
N
HDD ALBUM [ ]/[ ] buttons
Selects an album stored on the player on an HDD
component.
O
Previous and Next [ ]/[ ] buttons
These buttons are used to select the previous or next
track on an HDD component. Pressing them
repeatedly selects earlier or later tracks. On a
cassette deck, they’re used for rewind and fast
forward.
P
Reverse and Fast Forward [ ]/[ ] buttons
These buttons are used for reverse and fast forward
on an HDD component.
Q
DECK A/HDD (DOCK) buttons
Pause [ ]/Reverse Play
[ ]: Pauses playback
on an HDD component; starts reverse playback on a
cassette deck.
Play [ ]
: Starts playback on an HDD or cassette
component.
Stop [ ]
: Stops playback on an HDD or cassette
component.
R
DECK B buttons
On twin cassette decks, only deck B can be
controlled.
Play [ ]
: Starts playback.
Stop [ ]
: Stops playback.
Reverse Play [ ]
: Starts reverse playback.
S
SETUP button (13)
Used to access the setup menus.
T
MUTING button (22)
Mutes or unmutes the receiver.
U
VOL [ ]/[ ] buttons (21)
Adjusts the volume of the receiver regardless of the
currently selected remote controller mode.