


ChartScan User’s Manual ChartScan - Unit Startup and ChartView Tutorial 1-13
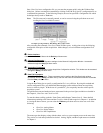
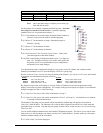
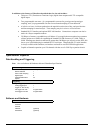
Chart Setup Wizard, Automatic Options
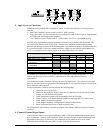
Setup Type
Group Setup
Chart Setup
Channel Setup
Simple
1 group only
Up to 16 charts
1 channel per chart
Moderate*
1 group only
Up to 16 charts
Up to 4 overlapping channels per chart
Advanced*
Up to 64 groups
Up to 16 charts per group
Up to 4 overlapping channels per chart
*Moderate and Advanced modes are only available with activation of ChartView Plus.
Note: Once your chart setup is complete you can always go
back and edit the setup.
For the purpose of our tutorial, complete the following steps. Note that
these steps are catered to ChartView Plus. Comments regarding
standard ChartView are presented in brackets [ ].
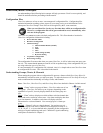
◊
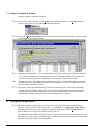
(5) Verify that the Advanced tab (under Automatic Chart Creation) is
selected. [Simple must be used for standard program].
◊
(6) Choose “2” for the number of groups. [Standard program is
limited to 1 group].
◊
(7) Choose “3” for the number of charts.
◊
(8) Choose “4” for the number of channels.
◊
(9) Click Automatic Chart Creations/Create Charts. At this point
your chart appears on the Main Window.
◊
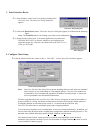
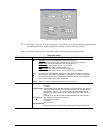
(10) Click on the Display Configuration button (item 7, see figure on
page 1-8). Though you usually won’t do this at this point, this
act permits you to see a representation of your configuration,
and permits you to make changes.
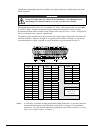
You should end up with a configuration display of two groups, each with 3 charts, and each chart with 4
channels [for standard ChartView users the display will be for 1 group only].
Because Automatic Chart Creation was chosen (starting with Channel 1) for ChartView Plus users, the Channel
arrangement was automatically assigned as follows:
Group 1
Group 2
Chart 1
CH1, CH2, CH3, CH4
Chart 1
CH13, CH14, CH15, CH16
Chart 2
CH5, CH6, CH7, CH8
Chart 2
CH17, CH18, CH19, CH20
Chart 3
CH9, CH10, CH11, CH12
Chart 3
CH21, CH22, CH23, CH24
By using the mouse arrow and clicking on a Group, Chart, or Channel you will alter the appearance of the
display, but not alter its actual configuration. For example, in the previous Display tree figure we see channels 1
through 4 assigned to Chart 1 of the first Group.
◊
(11) ChartView Plus users: click on the word/number “Group 2.”
◊
(12) ChartView Plus users: click on the word/number “Chart 3” (of Group 2). You should now see channels
21 through 24 listed at that location.
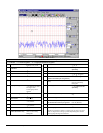
The channels in the setup you just created will be automatically enabled and will appear in chart form on
ChartView’s Main Window. The Channels will overlap on their assigned Chart, and will be visible when the
applicable Group is selected. Note that only one group of charts can be viewed at a time, even if you are using
ChartView Plus.
You can enable additional channels from the Channel Configuration window. This allows you to acquire more
data; however, it will not change your display on ChartView’s Main Window. In other words, you can acquire
data from channels which you do not monitor.
◊
(13) Click “Okay” to exit the dialog box.