


QUICK START
1. Connect the speakers to the rear Speaker sockets and sources to
the relevant rear input sockets.
2. Plug in the AC Mains cable.
3. Press the POWER button to turn the S300 on.
4. Press the required input selector.
A NOTE ON INSTALLATION
This unit may be installed on any level surface that is strong enough
to support its weight. Avoid placing the unit in direct sunlight or near
sources of heat and damp. Since its power transformers generate a
significant magnetic hum field, a turntable (especially one with a
moving-coil pick-up cartridge) or a TV should not be located adjacent
to the amplifier or directly above it.
The heat-sink fins make it awkward to lift the S300 by grasping the
left and right sides. You may find it more practical to place your
hands under the front and rear panels. Much of the amplifier’s
weight is near the front panel.
CAUTION: The amplifier’s weight must always rest on its bottom feet.
Never put the amplifier down on its rear panel, with its front panel
facing up. Doing so risks damage to the input/output connectors.
The amplifier generates some heat, even when idling, requiring
internal and external ventilation. Allow adequate ventilation. Do not
place it in an enclosed position such a bookcase or cabinet that may
impede the air-flow through the ventilation slots.
Do not permit the ventilation slots on the top cover to be obstructed
by papers or articles of clothing. If you want to locate the amplifier on
a carpeted floor, place a board under the amplifier in order to prevent
it from sinking into the carpet, blocking the air inlets on its bottom.
CAUTION: To prevent a fire or shock hazard, do not permit liquid or
moisture to enter the amplifier. If liquid is accidentally spilled on it,
immediately shut off the power and unplug the AC Mains cable.
Have the unit inspected by a qualified service technician before
attempting to use it again.
Switch the unit off before making any connections. The RCA
connectors on your S300 are colour coded for convenience. Red and
white are Right and Left audio respectively, and yellow for NAD-Link.
Always use high quality leads and connectors for optimum
performance and reliability. Ensure that leads and connectors are not
damaged in any way and all connectors are firmly pushed home.
For best performance, use quality speaker leads of 16 gauge or 2
sq.mm. thickness or more.
If the unit is not going to be used for some time, disconnect the plug
from the AC socket.
Do not open the amplifier or attempt to modify or repair it
yourself. Refer all servicing to a qualified technician. Do not
remove the cover, there are no user-serviceable parts inside.
Use a dry soft cloth to clean the unit. If necessary, lightly dampened
the cloth with soapy water. Do not use solutions containing benzol
or other volatile agents.
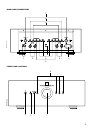
REAR PANEL CONNECTIONS
1. IEC AC MAINS (POWER) INPUT
The S300 comes supplied with a separate AC Mains cable. Before
connecting the cable to a live wall socket ensure that it is firmly
connected to the NAD S300’s AC Mains input socket first. Always
disconnect the AC Mains cable plug from the live wall socket first
before disconnecting the cable from the S300 Mains input socket.
VOLTAGE CONVERSION
A notice printed on the rear indicates the AC power-line voltage that
the preamplifier requires. However, every model S300 amplifier has a
“universal” power supply that can be modified easily for operation in
other countries. If you wish to transport your S300 to a nation that
employs a different power-line voltage, an authorised NAD dealer or
service agency can convert it for such use.
2. BALANCED CD INPUT
Input for a CD or other line-level signal source that uses balanced
XLR output connectors, like NAD S500. In case you do not wish to
use a CD player featuring balanced outputs, use the AUX input for
RCA connectors instead.
The wiring standard used for the balanced connectors is:
Pin 1:Chassis Earth (Ground)
Pin 2:Hot (Live)
Pin 3:Signal Ground (Return)
THE BENEFITS OF BALANCED CONNECTIONS
With a conventional (unbalanced) connection, audio signal current
flows from the CD player to the amplifier via the cable’s centre
conductor. To complete the circuit, audio signal current flows back to
the CD player ground via the cable’s outer conductor. The outer
conductor also serves as the cable’s shield.
When two audio components are connected together, power-supply
noise and “leakage” hum may also flow on the cable shields,
combining with the return audio current. The resulting distortion and
noise may depend on the orientation of AC power plugs in their
sockets. Designers of some audiophile cables combat this
contamination by leaving the shield unconnected at one end. Since
the shield is grounded at only one end, the performance of such a
cable may depend on the direction of its connection, i.e. whether the
shield is grounded at the CD player or at the amplifier.
A three-wire balanced connection avoids all of these uncertainties.
The signal “hot” and return currents are both carried on inner
conductors. The separate cable shield, connected to the amplifier
chassis at both ends, protects the audio signal from all forms of
interference and power-supply noise.
3. VIDEO INPUT
Input for the audio signal from a stereo VCR (or stereo
TV/Satellite/Cable receiver) or other line-level audio source. Using
twin RCA-to-RCA leads, connect to the left and right ‘Audio
Outputs’ of the unit to these inputs.
NOTE: These are audio inputs only.
GB
6
NAD S300 Dual Mono Integrated Amplifier