13
English
English
OTHER OPERATIONS
Caution:
¡ If you must stop playback or recording in the middle of a tape,
be sure to press the STOP button first, then turn the power
off. If the power is turned off in the middle of an operation, the
cassette tape remains loaded, and it may be impossible to
eject. In such a case, turn the power on, enter PLAY mode,
then press STOP
button, and then eject the tape.
¡ The same caution as above applies in cases of power failure.
To prevent damage, never attempt to force the removal of a
cassette while the power is off.
ERASURE OF TAPE
When a program source is recorded onto a tape, the previously
recorded sound is erased automatically, and replaced with the
new recording. If you wish to erase a tape without recording,
set the REC LEVEL control to the minimum (0) position or re-
move the input source, and let the tape travel in the REC mode.
AUTO TAPE SELECTOR
This unit is equipped with auto tape selector which automati-
cally sets the bias and equalizer level using the detection holes
provided in the cassette shell. The bias and equalizer level is
automatically set according to the type of cassette as follows.
(See Figure 7)
¡ Normal tapes EQ ; 120 µS , Bias ; Low
¡ High tapes EQ ; 70 µS , Bias ; High
¡ Metal tapes EQ ; 70 µS , Bias ; Metal
AUTOMATIC BIAS ADJUST
With this feature, the microcomputer built into the PMD520 ad-
justs the bias and record gain automatically so that the charac-
teristics of the tape in use can be exhibited fully. (Refer to page
15 for more information)
1. Insert the cassette in the cassette holder of the well to be
subjected to bias setting.
2. While holding down the REC
button Press the REC MUTE
button.
3. Ab will appear on the display followed by a number that will
count down until the adjustment is complete.
4. If an Error occurs during this process, please refer to the
next section.
5. When the bias has been set, the BIAS RESET indicator lights
up.
6. To reset the bias to the factory setting, press the BIAS RE-
SET button. The indicator is extinguished and the factory-
set bias is recalled.
7. To return to the set bias, press the BIAS RESET button so the
indicator lights up.
8. To change the bias setting, start the adjustment from the be-
ginning.
TAPE STOP ALARM
When either Well A or B reaches the end of a tape, the PMD520
generates a buzzer sound to indicate it.
AUTO COUNTER RESET
When a cassette is removed from a cassette holder and an-
other tape is inserted, the tape counter is reset automatically to
"00:00".
TO PROTECT VALUABLE RECORDINGS
In the record mode, information previously recorded on the tape
will automatically be erased. To prevent this from happening,
use a small screwdriver to break out one or both safety tabs
(See Figure 8). It is possible to restore the recording capability
of either side of the cassette by covering the opening with clear
adhesive tape (See Figure 9).
ENHANCED REMOTE CONTROL OPERATIONS
SIMULTANEOUS (PARALLEL) RECORDING
Check to insure that both wells are in REC PAUSE mode after
pressing the A+B REC button on the front of the unit. The unit
will start recording when either a PLAY or A+B command from
the remote controller has been received. During the REC mode,
the unit can be placed into a REC PAUSE mode by sending a
PAUSE, A+B, or REC command from the remote controller and
started again by a PLAY or A+B command from the remote
controller. Pressing the STOP
button on the front of the unit
or sending a STOP command from the remote controller will
cancel this operation.
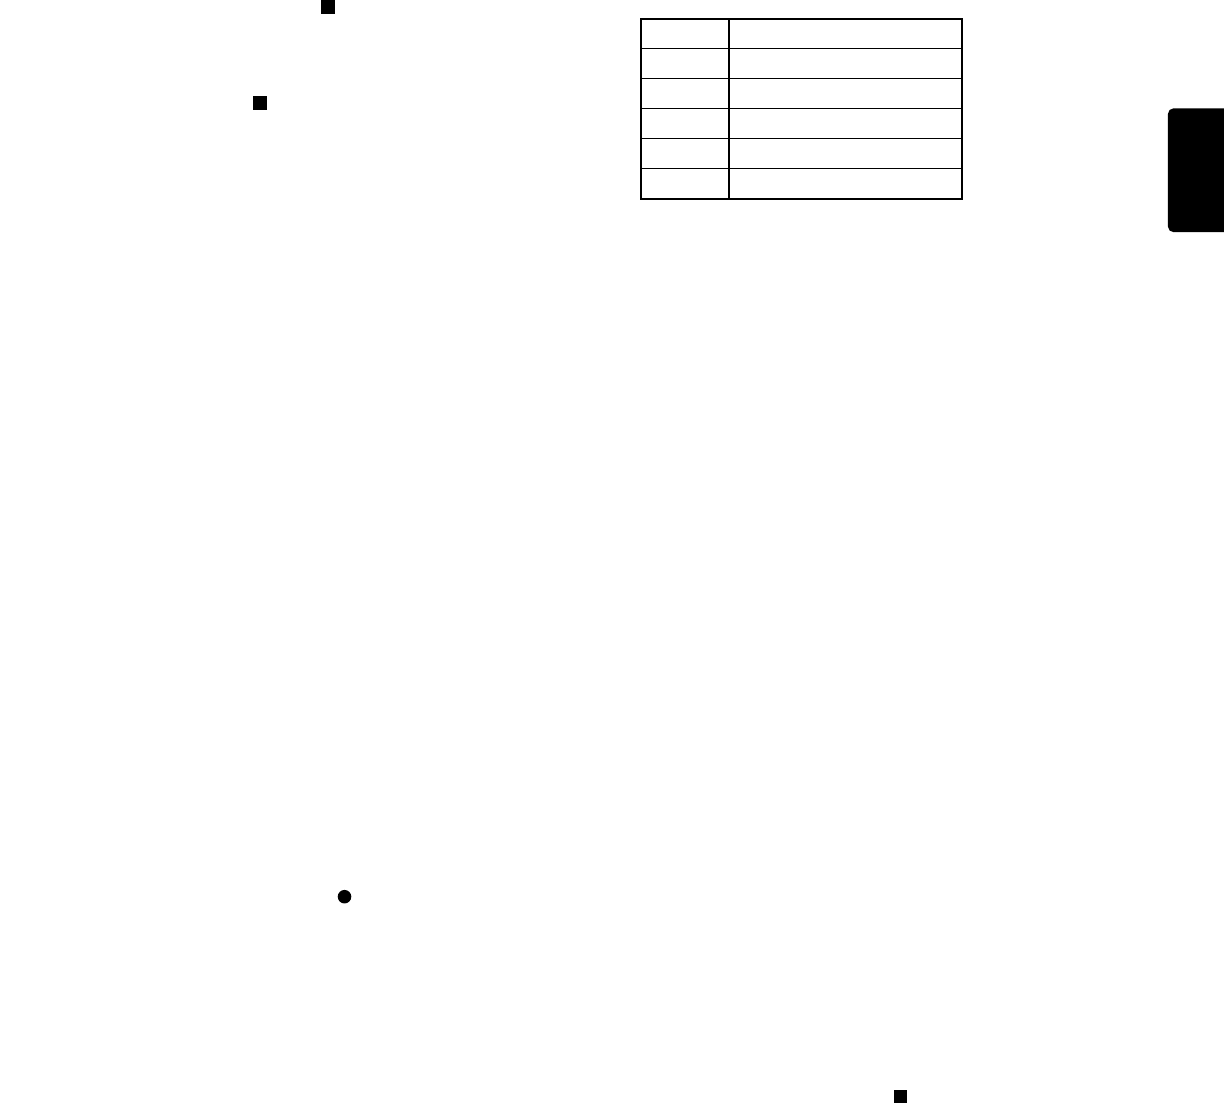
Error Message
If a problem occurs during the AUTOMATIC BIAS routine,
an Error message will appear on the display. Please refer
to the following table.
Err No. Meaning
Err 1 Tape End Error
Err 2 Internal Oscillator Error
Err 3 Bias setting Error
Err 4 REC EQ Adjust Error
Err 5 Total Adjust Error
Errors 2-5 are probably the result of a bad tape. Please rerun
the AUTO BIAS program with a different tape.


