


21
ENGLISH
7
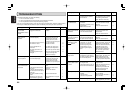
Confirm and change timer
program
• You can check and change the timer program
setting as follows.
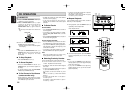
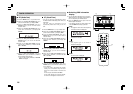
1. Press the TIMER button x.
2. Either turn the Easy JOG 4/¢ knob !5 or
press the 5 or ∞ button c to select timer
program number.
3. You can change the displayed contents with the
Easy JOG 4/¢ knob !5 or 5 or ∞ button
c and ENTER buttons b if necessary.
Note
• Timer program is not changed if you quit
confirming halfway through a procedure.
7
Timer program off
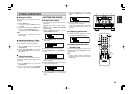
1. Press the TIMER button x, “TIMER
PROGRAM 1” is displayed.
2. Either turn the Easy JOG 4/¢ knob !5 or
press the 5 or ∞ button c to select timer
program number.
3. Press the Easy JOG 4/¢ knob !5 or
ENTER button b, “TIMER PROGRAM x SET”
is displayed.
4. Either turn the Easy JOG 4/¢ knob !5 or
press the 5 or ∞ button c to select “TIMER
PROGRAM x OFF”.
5. Press the Easy JOG 4/¢ knob !5 or
ENTER button b to turn off the timer program.
Note
• To turn a timer program back on again, repeat
this procedure and select “TIMER PROGRAM x
ON”.
7
Sleep timer
• The sleep timer function allows the unit to be in
standby mode automatically after specific period
of time.
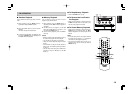
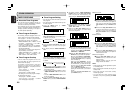
1. Press the SLEEP button ⁄7 on the remote
control.
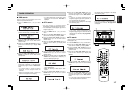
2. Each press of the button will increase the time
before shut down in the following sequence.
3. The sleep timer will be shown for 5 seconds in
the display, and it will count down until the time
has elapsed. When the programed sleep timer
has elapsed, the unit will automatically turn off.
Note that the display will be dimmed when the
sleep timer is programed.
4. Press the SLEEP button ⁄7. The display shows
the remaining time until standby mode begins.
5. To cancel the sleep timer, press the SLEEP
button ⁄7 repeatedly until the display shows
“SLEEP OFF”.
• When the sleep timer is programed, DIMMER
function does not activate.
10
20
30 60 90 120OFF
LAST FUNCTION MEMORY
• This unit is equipped with a last function memory
which stores the input and output setting
conditions as they were immediately before the
power is switched off.
This function eliminates the need to perform
complicated resettings when the power is turned
on.
• The unit is also equipped with a back-up
memory.
This function provides approximately one week
of memory storage when the main unit’s power
switch is off and with the mains cord
disconnected.
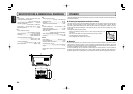
INITIALIZATION OF THE
MICROPROCESSOR
• When the indication of the display is not normal
or when the operation of the unit does not shows
the reasonable result, the initialization of the
microprocessor is required by the following
procedure.
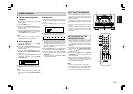
1. Unplug the mains cord from the power outlet
after pressing the POWER ON/STANDBY
switch q or button z and setting the
standby mode.
2. Holding both the MENU button u and POWER
ON/STANDBY switch q, plug the mains cord
into the power outlet.
3. Check that the entire display is flashing with an
interval of about 1 second, and release your
fingers from the 2 buttons and the
microprocessor will be initialized.
Notes
• If step 3 does not work,start over from step 1.
• If the microprocessor has been initialized all the
button settings are reset to the default values
(the values set upon shipment from the factory).
STANDBYSTANDBY
PHONESPHONES
POWER ON / STANDBYPOWER ON / STANDBY
CD RECEIVER CR401CD RECEIVER CR401
PUSH TO ENTERPUSH TO ENTER VOLUMEVOLUME
TREBLETREBLEBASSBASS
INPUTINPUT MENUMENU DIRECTDIRECT
q
!5 u
MEMO
AUTO TUNE SLEEP SHIFT
DIRECT
AMFMDAB
--/---
MUTE
DISPLAY
VOL
INPUT
DIMM
VOL
10/0
9
8
7
6
5
4
3
21
INPUT
MODE
TUNING
PRESET
ENTER
CLOCK
CALL
MENU
CLEAR
TIMER
REPEAT
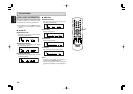
REMOTE CONTROLLER
RC601CR
REMOTE CONTROLLER
RC601CR
REMOTE CONTROLLER
RC601CR
⁄7
x
z
n
b
c
OTHER OPERATION