


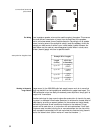

27
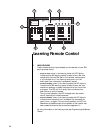
• path: pressing this button will cycle the PAV through the various
signal paths. Having selected a particular path, subsequent source
selections affect only that path (e. g., main, remote, both, or
record).
• recall: pressing this button restores the various channel offsets to
their calibrated, most accurate settings (set up during installation
and calibration). You can experiment with adjusting the levels of
the subwoofers, center channel, surrounds, etc. to suit your prefer-
ence or a particular recording, knowing that a single press of re-
call
will restore the PAV to its calibrated settings.
• bal: pressing this button temporarily allows the volume +/– keys
to affect the balance of the left front and right front speakers
rather than the overall volume.
• delay: pressing this button temporarily allows the volume +/–
keys to adjust the amount of time the rear channel signals are
delayed when in the various surround modes. This time delay
may be adjusted between 15–30 mS in 1 mS increments.
• sub: pressing this button temporarily allows the volume +/– keys
to affect the level of the subwoofer relative to the rest of the sys-
tem.
• rear: pressing this button temporarily allows the volume +/– keys
to affect the level of the rear (surround) speakers relative to the
rest of the system.
• cntr: pressing this button temporarily allows the volume +/– keys
to affect the level of the center front speaker relative to the rest of
the system.
• master: pressing this button allows the volume +/– keys to affect
the overall volume of the system, maintaining any relative settings
between the various loudspeakers. This is the default mode for
the volume +/– keys, to which the PAV will return after a few sec-
onds of inactivity.
• display: pressing this button will turn off the front panel display
of the PAV to facilitate listening to music or watching movies in a
darkened room without visual distractions. The PAV’s display will
turn back on momentarily when adjusting the unit’s operation in
order to acknowledge the changes. The display may be returned
to its normal, always-on mode by pressing the display button
again.
• input: pressing this button temporarily places the volume +/–
keys in input level mode, allowing you to fine-tune the input sen-
sitivity of each particular input for proper Pro Logic calibration.
This control also allows you to adjust the relative volumes of the
various source components to avoid abrupt changes in volume
when switching between inputs.
• mute: pressing this button duplicates the function of the mute
button on the front panel, reducing the volume of the main sys-
tem by a user-selectable amount.
• volume +/–: these buttons normally adjust the overall system vol-
ume, although they are also used in conjunction with other but-
tons and/or menu items to vary most of the available system ad-
justments.
For more information on the teaching your remote new functions, see Pro-
gramming the Remote Control.