Commissioning Radar Tank Gauge
48 Installation and Operations Manual
To successfully commission a precise measurement to the nearest mm, it is important
you carry out a history reset on first installation after mechanical installation and after
the basic setup of the device (see Page 56). Only after a history reset the mounting cali-
bration is carried out. Enter the measurement offset as the first point in the dip table for
the mounting calibration. When a value is dipped at a later date, make a second entry
into the dip table, again using the semi-automatic mode. This way, you can easily carry
out a linearization of the measurement.
When configuring the function in "basic setup" (00) please take into account the
following notes:
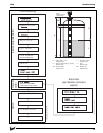
• Select the functions as described on page 31.
• Some functions can only be used depending on the parameterization of the
instrument. For example, the pipe diameter of a stilling well can only be entered if
"stilling well" was selected beforehand in the "tank shape" (002) function.
• Certain functions (e.g. starting an interference echo mapping (053)) prompt you to
confirm your data entries. Press
O or S to select "YES" and press F to confirm. The
function is now started.
• If you do not press a key during a configurable time period (→ function group
"display (09)"), an automatic return is made to the home position (measured value
display).
Note!
• The instrument continues to measure while data entry is in progress, i.e. the current
measured values are output via the signal outputs in the normal way.
• If the envelope curve mode is active on the display, the measured values are updated
in a slower cycle time. Thus, it is advisable to leave the envelope curve mode after the
measuring point has been optimized.
• If the power supply fails, all preset and parameterized values remain safely stored in
the EEPROM.
Note!
All functions are described in detail, as is the overview of the operating menu itself, in
the 7500 RTG "Service manual and description of instrument functions".


