


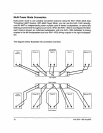

Reconfiguring the KAV-1500 for MAT
See Figure 3 on page 13
Tools needed: T-15 Torx wrench and four ribbon connection cables
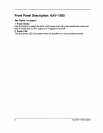
1. Turn the KAV-1500 off by pressing the power button (1) on the front panel. The blue
power LED (2) extinguishes. Unplug the AC power cord (23) from AC power.
2. Using the T-15 Torx wrench, remove the 14 screws that secure the amplifier cover.
Carefully remove the cover.
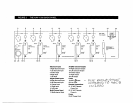
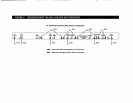
3. Locate the PC input board and jumper pins at the rear of the amplifier.
IMPORTANT
Do not remove or change the ribbon connection cables already in place. These
connections are polarized to ensure the correct phase.
4.
Connect one end of the first ribbon connection cable to jumper pin J5. Connect the
other end of the ribbon connection cable to jumper pin J11.
5. Use the remaining ribbon connection cables to connect:
J10 to J16
J 17 to J22
J23 to J28
6. Replace the cover, sliding the front panel end in first and, using the T-15 Torx
wrench, secure all 14 cover screws.
The KAV-1500 amplifier is now reconfigured for MAT operation.
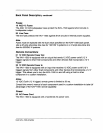
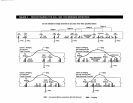
Connecting the KAV-1500 Reconfigured for MAT
See Figure 2 on page 7
1. Connect your output device to one of the balanced inputs (3, 4, 5, 6, or 7) or one
the single-ended inputs (8, 9, 10, 11, or 12) on the KAV-1500 back panel.
IMPORTANT
Do not use the multi-channel input if you have reconfigured the KA V-1500 for MAT or
bridged operation.
2. Connect each amplifier channel output (14, 15, 16, 17, 18) to a separate
loudspeaker, using the positive and negative terminals on the speaker binding posts.
14 Krell KAV-1500 Amplifier