


Connecting the KAV-1500 Amplifier to Your System
INPUT AND OUTPUT CONNECTIONS
Follow these steps to connect the KAV-1500 amplifier to your system.
1. Make sure all power sources and components are off before connecting inputs and
outputs=
2.
Neatly organize the wiring between the amplifier and all system components.
Separate AC wires from audio cables to prevent hum or other unwanted noise from
being introduced into the system,
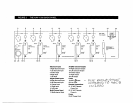
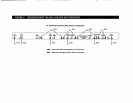
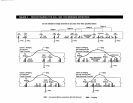
3. Connect the interconnect cables from your output device to the amplifier inputs. The
KAV-1500 is equipped with balanced (3, 4, 5, 6, 7) or single-ended (8, 9, 10, 11,
inputs located on the back panel. The balanced inputs use three-pin XLR
connectors; the single-ended inputs use RCA connectors.
or
Use the multi-channel (DB-25) connector to simplify the integration of the KAV-1500
into your system.
Connect the DB-25 output on your preamp/processor to the DB-25 input (13)
located on the back panel of the KAV-1500. The DB-25 cable simultaneously
transmits audio outputs and Trigger 1 signals from the Krell Home Theater Standard
Surround Preamp/processor (HTS) DB-25 output to all inputs and a 5 VDC (5 Volt
trigger) on the KAV-1500 via the DB-25 input.
Note
You need to configure Trigger 1 on the HTS before operation.
IMPORTANT
Do not connect the multi-channel input and single-ended or balanced inputs at the
same time.
4. Connect the loudspeaker cables to the KAV-1500 amplifier channel output speaker
binding posts (14, 15, 16, 17, 18)located on the back panel.
The amplifier channel outputs for the KAV-1500 use five-way loudspeaker binding
posts. The loudspeaker binding post terminals accept spade lugs, bare wire, banana
plugs, or pins. Use the red terminal for the positive connection and the black
terminal for the negative connection.
5. Plug the end of the AC power cord into the AC outlet.
The amplifier is now ready for operation. See Amplifier Operation, on page 19.
1 o
Krell KAV-1500 Amplifier