


23
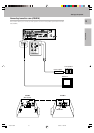
Preparations
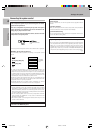
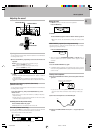
Preparing for surround sound
4
5
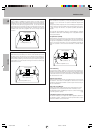
“SW RE-MIX” scrolls across the display
TI.VOLB
CLIP MUTE
RDS EON PTY
TP TA NEWS
SP A
FM
AM
MHz
kHz
PRO LOGIC
DOWN MIX
S.DIRECT
MONITOR
DSP
MEMO
ST.
TUNED
STEREO
3
DIGITAL
AUTO SOUND
AUTO
SW
L R
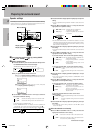
2 Press the SET UP or display operation 2 [Next] key to
accept the setting.
• The receiver enters the speaker volume level adjustment mode.
• In step 4, indications appear only for the selected channels of the
speakers that require adjusting.
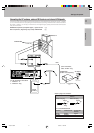
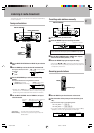
Adjust the speaker volume.
From your usual listening position, adjust the volume levels. The volume
levels from each speaker should be the same.
1 Use the MULTI CONTROL knob or 5/∞ keys to adjust the
volume of the test tone output from the speaker channel to
be adjusted.
The channel indication blinks while the test tone is being output.
The test tone is heard from the speakers in the following
sequence for 2 seconds each:
= L = C = R = SR = SL = SW
STEREO
R
FM
AM
MHz
kHz
PRO LOGIC
3
DOWN MIX
DIGITAL
S.DIRECT
MONITOR
DSP
MEMO
ST.
TUNED
AUTO SOUND
AUTO
LFE
C
S
RSLS
TI.VOLB
CLIP MUTE
RDS EON PTY
TP TA NEWS
L
SP A
FM
AM
MHz
kHz
PRO LOGIC
3
DOWN MIX
DIGITAL
S.DIRECT
MONITOR
DSP
MEMO
ST.
TUNED
AUTO SOUND
AUTO
LFE
C
S
RSLS
TI.VOLB
CLIP MUTE
RDS EON PTY
TP TA NEWS
SW
L
SP A
R
STEREO
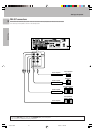
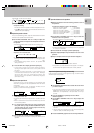
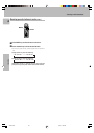
Input the distance to the speakers.
1 Measure the distance from the listening position to each of
the speakers.
Jot down the distance to each of the speakers.
Distance to front left speaker : ____ feet (meters)
Distance to center speaker : ____ feet (meters)
Distance to front right speaker : ____ feet (meters)
Distance to surround right speaker : ____ feet (meters)
Distance to surround left speaker : ____ feet (meters)
Distance to subwoofer : ____ feet (meters)
2 Use the MULTI CONTROL knob or 5/∞ keys to select the
distance to the front speakers.
• The allowable setting range is 1 to 30 feet (0.3 to 9.0 m), adjustable
in 1 foot (0.3 m) increment.
3 Press the SET UP or display operation 2 [Next] key.
4 Repeat steps 2 and 3 to input the distance for each of the
speakers.
5 Setup is complete when the input indication reappears.
• The speakers you have selected should appear on the display.
Confirm that all the speakers have been correctly selected.
SW
FM
AM
MHz
kHz
PRO LOGIC
3
DOWN MIX
DIGITAL
S.DIRECT
MONITOR
DSP
MEMO
ST.
TUNED
AUTO SOUND
AUTO
LFE
C
S
RSLS
TI.VOLB
CLIP MUTE
RDS EON PTY
TP TA NEWS
L
SP A
R
STEREO
SW
LFE SW
FM
AM
MHz
kHz
PRO LOGIC
3
DOWN MIX
DIGITAL
S.DIRECT
MONITOR
DSP
MEMO
ST.
TUNED
AUTO SOUND
AUTO
C
S
RSLS
TI.VOLB
CLIP MUTE
RDS EON PTY
TP TA NEWS
SP A
L
STEREO
The speaker indicator to be adjusted blinks.
Indication in feet Indication in meters
Display when all speakers have been selected.
LFE
C
S
RSLS
TI.VOLB
CLIP MUTE
RDS EON PTY
TP TA NEWS
L
SP A
R
SW
6
STEREO
FM
AM
MHz
kHz
PRO LOGIC
3
DOWN MIX
DIGITAL
S.DIRECT
MONITOR
DSP
MEMO
ST.
TUNED
AUTO SOUND
AUTO
LFE
S RSLS
TI.VOLB
CLIP MUTE
RDS EON PTY
TP TA NEWS
SP A
SW
• If you change the volume level settings for the speakers while
listening to music, the settings referred to on this page are also
changed. ∞
• If the speaker setting selects are OFF, the speaker level
settings are reset.
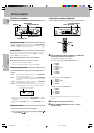
2 Press the SET UP or display operation 2 [Next] key.
• The test tone is turned off. The receiver enters the mode for
inputing the bass peak level and the current peak level will
be shown.
• To obtain accurate output levels, it is recommended to use
a handheld Sound Pressure Level (SPL) meter. Readings
should be taken from your actual listening position and
adjust the level of each speaker to 75dB SPL (C-weighted/
slow meter mode).
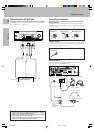
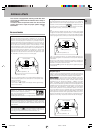
Adjust the bass peak level.
A restriction is put on the low frequency so that the bass peak
level will not go higher than the acceptable level when the volume
is increased.
If subwoofer speaker is OFF, the limitation will affect the low
frequency of the front left and right speakers.
1 Use the MULTI CONTROL knob or 5/∞ keys to adjust the
bass peak level to –30.
• The bass peak level may be adjusted from – 30dB to 0dB and
OFF.
• When no subwoofer is in use, the test tone will be output from the
front channel speakers.
2 To find the bass peak level limit, keep increasing the
bass peak level by using the MULTI CONTROL knob or
5/∞ keys while test tone is being output until the clip
point of the subwoofer is found.
3 Press the SET UP or display operation 2 [Next] key.
• The receiver enters the mode for inputting the distance to the
speakers.
1 Use the INPUT SELECTOR knob to select the source which
you want to adjust.
• You can store a separate input level for each input source. If the
MONITOR function is ON, you can store an input level for when
MONITOR is on independently of the input levels for the input
sources.
2 Press the SOUND key repeatedly until the “INPUT”
indication appears.
3 Use the MULTI CONTROL knob or 5/∞ keys to adjust the
input level.
• The adjustment mode is displayed for approximately eight
seconds.
• The input level may be adjusted to any one of three settings:0dB,
-3dB, and -6dB. (The initial setting is 0dB.)
4 Press the SOUND key again to return to the input indication.
RDS
TP
CLIP
If the input level of an analog source signal is too high, the CLIP indicator
will blink. Adjust the input level.
Input level adjustment (analog sources only)
*510/22-23/EN 3/15/01, 11:42 AM23