17
EN
Preparations
Basic section
Application section
Knowledge section
Controls and indicators
TUNING (1 / ¡) keys
DVD/CD : ›
Used for fast-forward or fast-reverse the played
music.
TUNER : q
Used for receiving a radio station.
8 (POWER) key ¢
Used for setting the unit to On or Standby.
9DISPLAY key °
Used for changing the CD-TEXT displays.
Used for displaying the day of week and the time.
TIMER key Ø
Used for activating or deactivating timer function.
PTY key r
Used for entering PTY mode or searching a program
type.
CLEAR key W
Used for clearing a programed track(s).
0VOLUME (%/fi) keys ∞
Used for adjusting the volume.
!INPUT SELECTOR key ¢
Used for selecting an input source.
SP SETUP key l
Used for speaker setup.
DVD SETUP key d
Used to change the initial DVD set values.
D.AUDIO REC key
It does not use this key in this model.
@Sound setting mode keys
Press for entering the sound setting mode with the
following keys.
FLAT key º
D-BASS key •
TONE TURN OVER key •
MANUAL EQ key ª
SOUND PRESET key º
#AUTO ROOM EQ key §
ROOM EQ MODE key ¶
Used to select one of three room equalizer setting
modes.
CHANNEL SEL. key
Used to switch the power amplifier speaker output be-
tween 2 channels (50 W x 2) and 4 channels (25 W x 4).
$ON SCREEN key I
Used to switch between display and no display for the
information displayed on screen.
AUDIO key U
Used to select the audio at the time of DVD playback.
SUBTITLE key U
Used to select the subtitles at the time of DVD play-
back.
MUTE key ∞
Used for muting the sound temporarily.
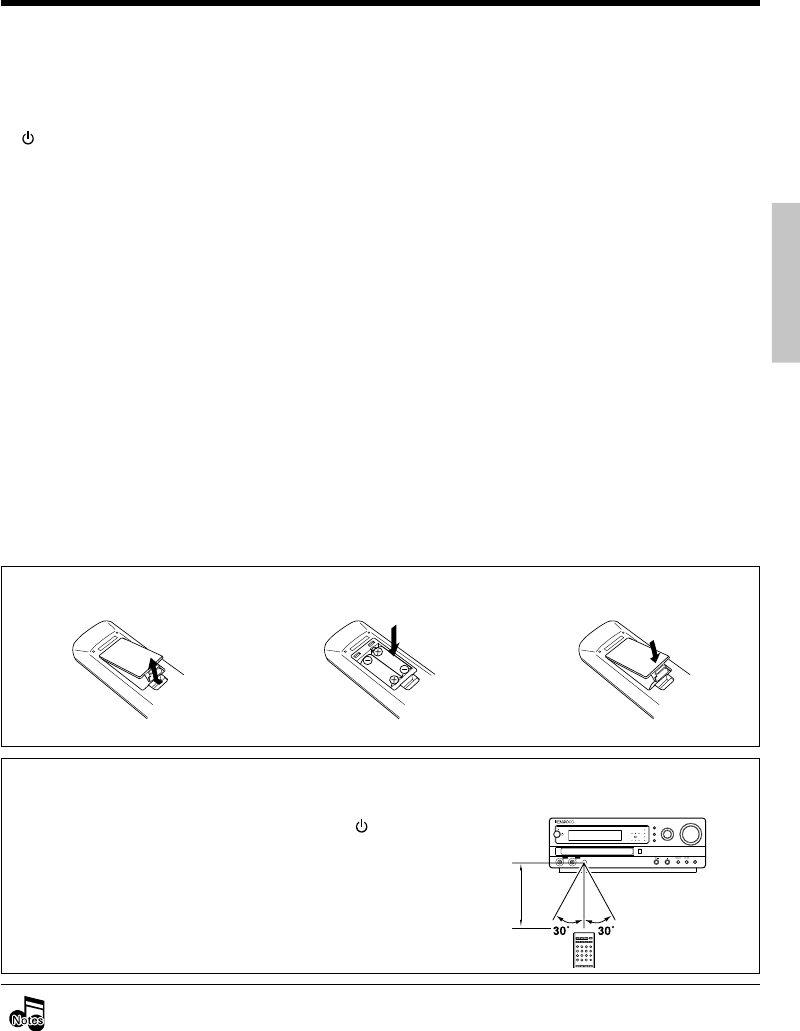
Loading batteries
1Remove the cover. 2Insert batteries. 3Close the cover.
÷ Insert two R03 ("AAA"-size) batteries following the polarity indications.
DVD TUNER CONTROL PRE-AMPLIFIER
SOUND
SELECTOR
INPUT SEL.
/ MULTI CONTROL
VOLUME
MODE
MUTE
Tuning Mode
SET
D.AUDIOPHONES D.AUDIO
LC
SW
LFE
SL
R
SR
SURROUND
standby
/ timer
Room EQ
Mode
A.R. EQ
Clear voice
Tone
0
When the POWER switch of the M-AX7 is ON and
the standby indicator is lit in red, press the
(POWER) key of the remote control unit to turn the
system ON. When the system is turned ON, press
the key of the function to be operated.
Operation
÷ When pressing more than one remote control keys
successively, press the keys securely by leaving an
interval of 1 second or more between keys.
Operating range (approx.)
Remote sensor
6 m
÷ The provided batteries are intended for use in operation checking, and their service life may be short.
÷ When the remote controllable distance becomes short, replace both of the batteries with new ones.
÷ If direct sunlight or the light of a high-frequency fluorescent lamp (inverter type, etc.) is incident to the remote
sensor, malfunction may occur. In such a case, change the installation position to avoid malfunction.
*5613/08-22/EN 06.1.6, 0:53 PM17


