


Masterpage:Right+
Filename [TH-R1R3EK_05Name.fm]
Page 9Friday, 8 April 2005 16:00
INDEX
9
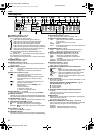
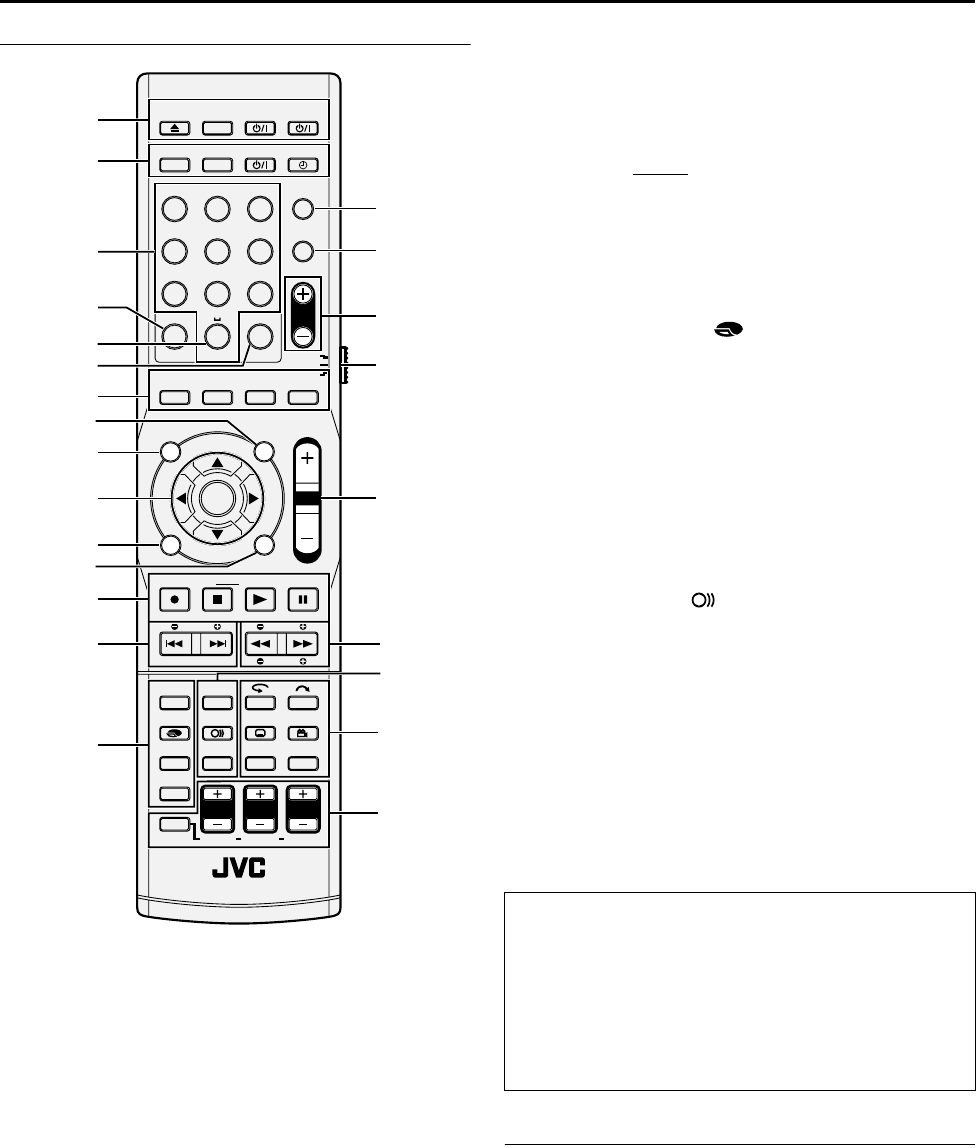
Remote Control
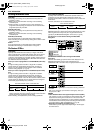
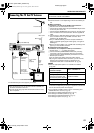
A Open/Close Button (M ) A pg. 5
TV/VIDEO Button (TV/VIDEO) A pg. 24
TV STANDBY/ON Button (TV A) A pg. 71
AUDIO STANDBY/ON Button (AUDIO A) A pg. 18, 52
B DVD Button (DVD) A pg. 21
FM/AM Button (FM/AM) A pg. 43, 44
SAT STANDBY/ON Button (SAT A) A pg. 72
Timer Button (TIMERj) A pg. 48, 52
C Number Keys A pg. 27, 36, 37, 57
D Cancel Button (CANCEL) A pg. 36, 52, 79
E Auxiliary Button (AUX)
F Memory Button (MEMORY) A pg. 43, 55
Mark Button (MARK) A pg. 29
G SHOWVIEW/VIDEO Plus+ Button (SHOWVIEW/VIDEO
Plus+) A pg. 48
Automatic Satellite Programme Recording Button (SATj)
A pg. 52, 53
Setting Button (SETTING) A pg. 23
Surround Button (SURROUND) A pg. 25, 26, 42
H Navigation Button (NAVIGATION) A pg. 32, 54
Programme Type Search Button (PTY SEARCH) A pg. 45
I Top Menu Button (TOP MENU) A pg. 27
J Selection Keys (FGDE) A pg. 21
Enter Button (ENTER) A pg. 21
K Menu Button (MENU) A pg. 27
L Return Button (RETURN) A pg. 48, 79
RDS Display Button (RDS DISPLAY) A pg. 44
M Record Button (R) A pg. 38, 39
Stop Button (o) A pg. 24
Clear Button (CLEAR
) A pg. 36, 52, 55
Play Button (I) A pg. 24
TA/NEWS/INFO Select Button (TA/NEWS/INFO) A pg. 46
Pause Button (W) A pg. 24
N Tuning Buttons (TUNING +/–) A pg. 43
Reverse Skip Button (S) A pg. 27, 30, 33, 37
Forward Skip Button (T) A pg. 27, 30, 33, 37
O
Display Button (DISPLAY)
A
pg. 29
Recording Mode Button (REC MODE)
A
pg. 38
Remain Button (REMAIN )
A
pg. 29
FM Mode Button (FM MODE)
A
pg. 43
Smart Surround Set Up Button (SMART S.SET UP)
A
pg. 22
P TV Direct Button (TV DIRECT) A pg. 30
Q Programme Button (PROG) A pg. 49
R Programme Up/down Buttons (PR +/–) A pg. 38, 43
S Remote Control Selector Switch (AUDIO/TV/SAT) A pg. 71
T Volume Buttons (VOL +/–) A pg. 25, 71
U Reverse Search Button (O) A pg. 27, 33
Reverse Slow Button (SLOW –) A pg. 28
Forward Search Button (N) A pg. 27, 33
Forward Slow Button (SLOW +) A pg. 28
Programme Type+ Button (PTY +) A pg. 45
Programme Type- Button (PTY –) A pg. 45
V On-Screen Button (ON SCREEN) A pg. 12, 34
Audio Button (AUDIO ) A pg. 30
Test Tone Button (TEST TONE) A pg. 84
W One Touch Replay Button (w) A pg. 28, 32
Skip Search Button (v) A pg. 28
Subtitle Button (SUBTITLE h) A pg. 29
Angle Button (ANGLE y) A pg. 29
Live Check Button (LIVE CHECK y) A pg. 33
Progressive Scan Button (PROGRESSIVE SCAN) A pg. 76
Set Up Button (SET UP) A pg. 21
X Shift Button (SHIFT) A pg. 25
Left Buttons (L +/–) A pg. 25
Center Buttons (CENTER +/–) A pg. 25
Right Buttons (R +/–) A pg. 25
Left Surround Buttons (SURR. L +/–) A pg. 25
Subwoofer Buttons (S. WFR +/–) A pg. 25
Right Surround Buttons (SURR. R +/–) A pg. 25
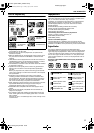
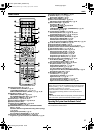
Operating The System From the Remote Control
Aim the remote control directly at the front panel of the center unit.
● Do not block the remote sensor.
1 2
ABC
3
DEF
4 5
JKLGHI
6
MNO
7 8
TUV
ENTER
TOPMENU
NAVIGATION
PTY SEARCH
RETURN
RDS DISPLAY
MENU
PQRS
9
WXYZ
TVDIRECT
PROG
PR
0
AUX MARK
CANCEL
MEMORY
VOL
L
OPEN/
CLOSE
TV/VIDEO
TV AUDIO
DVD
SHOWVIEW/
VIDEOPlus+
SATj
DISPLAY
FMMODE
SHIFT
TESTTONE
SURR.L
SETUP
AUDIO
SUBTITLE
RECMODE/
REMAIN
SMART
S.SETUP
ANGLE/
LIVECHECK
PROGRESSIVE
SCAN
ONSCREEN
REC
TUNING
STOP/
CLEAR
PLAY PAUSE
SETTING
SURROUND
SAT
FM/AM
SAT
TIMER
TV
AUDIO
SLOW
PTY
CENTER
S.WFR
R
SURR.R
TA/NEWS/INFO
X
W
V
U
O
N
M
L
K
J
I
H
G
F
E
D
A
C
B
P
Q
R
S
T
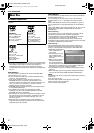
How To Use
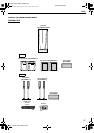
Before use, insert two AA size batteries into the remote control
with the polarity (F and G) matched correctly as indicated on
the battery compartment or on the lid.
● Point the remote control toward the receiving window.
● The maximum operating distance of the remote control is
about 8 m.
NOTE:
If the remote control doesn’t work properly, remove its batteries,
wait a short time, replace the batteries and then try again.
TH-R1R3EK_00.book Page 9 Friday, April 8, 2005 4:00 PM