


24
English
■■
Using the Timers
MD TUNER CD
CD
OPEN
/
CLOSE
MD
EJECT
PHONES
TAPE
/
AUX
BAND
STANDBY
/
ON
DOWN UPMULTI CONTROL
VOLUME
PTY
/
EON CLOCK
DISPLAY
MODE
TIMER/
SNOOZE
MD REC
AHB PRO
4
¢
REMOTE CONTROL RM-RXUV
9
RMD
DIMMER SLEEP
DISPLAY FM MODE TAPE
/
AUX
AHB PRO
AUTO
PRESET
CD
PROGRAM RANDOM REPEAT
BASS TREBLE CANCEL
PTY/
EON
EDIT
/
TITLE
CHARA
UP
SET
DOWN
TUNER
BAND
MD
VOLUME
CD
DISPLAY MODE
SLEEP
CLOCK
TIMER/
SNOOZE
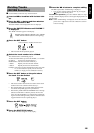
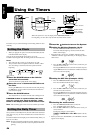
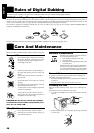
When the System is in use, the display shows other items as well.
For simplicity, we show here only the items described in this section.
ON time, OFF time
MD REC indicator
SLEEP indicator
Timer indicator
SNOOZE indicator
The timers let you control listening and recording functions auto-
matically.
• When you plug the AC power cord into the wall outlet, the time
indication blinks on the display.
You can set the clock whether the System is on or off.
In addition to the digital clock, the analog clock also shows the time.
Notes:
• The clock must be correctly set for the timers to work.
• The procedure must be completed within two minutes. Other-
wise, the setting is cleared and must be repeated from the
beginning.
■
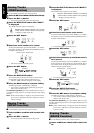
1. Press the CLOCK button on the Unit for
more than two seconds.
The time indication rapidly blinks on the display.
■
2. Press the
¢
or
4
button on the Unit to set
the time.
Pressing the ¢ button moves the time forwards and pressing
the
4 button moves it backwards. Hold down the button to
move the time rapidly.
■
3. Press the CLOCK button.
The selected time is set and the seconds start counting from 0.
CAUTION: If there is a power failure, the clock
loses its setting after about 20 minutes. “0:00”
blinks on the display and the clock must be reset.
Note: The clock may gain or lose one to two minutes per month.
Once you have set the Daily Timer, the timer will be activated at the
same time every day. It can be cancelled and re-activate whenever
you wish.
The Timer indicator on the display shows when the Daily Timer you
have set is in effect.
Note: Perform each setting within 30 seconds. Otherwise, setting
is cleared and the procedure must be repeated from the be-
ginning.
■
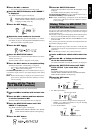
1. Press the button to turn on the System.
■
2. Setting the ON time (Example: 12:15).
1. Press the TIMER/SNOOZE button on the Unit.
The Timer indicator lights up and the current ON time
blinks on the display.
• When the clock is not set, the “CLOCK” indicator and the
“ADJUST” indicator appear alternately on the display. Set the
clock at first.
2. Press the
¢ or 4 button on the Unit to set the time you
want the Unit to come on.
Pressing the ¢ button moves the time forwards and press-
ing the
4 button moves it backwards. Hold down the but-
ton to move the time rapidly.
■
3. Setting the OFF time (Example: 13:15).
1. Press the TIMER/SNOOZE button on the Unit.
The current OFF time blinks on the display.
2. Press the ¢ or 4 button on the Unit to set the time you
want the Unit to be turned off.
Pressing the ¢ button moves the time forwards and press-
ing the
4 button moves it backwards. Hold down the but-
ton to move the time rapidly.
■
4. Selecting the music source.
1. Press the TIMER/SNOOZE button on the Unit.
The “TUNER” blinks on the display.
2. Press the ¢ or 4 button to select the music source you
want to listen to.
The display changes as shown below.
TUNER
ÔTUNER RECÔCDÔMDÔ(back to the be-
ginning)
• When you select the “TUNER REC”, the “MD REC” indicator
appears on the display.
Setting the Clock
Setting the Daily Timer
CLOCK CLOCK
DOWN UPMULTI CONTROL
(for 2 seconds)