


11
Preparation
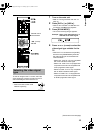
• When the TV is connected to the [HDMI
MONITOR OUT] terminal, the video signal
type can be selected as instructed below.
- Select “AUTO” for normal usage. (the
initial setting)
- Select “PAL. 576P”, “PAL. 720P”,
“PAL.1080I”, “PAL.1080P”, “NT. 480P”,
“NT. 720P”, “NT.1080I” or “NT.1080P” as
needed. (The selectable settings differ
according to the resolution of the
connected TV.)
• You can also select the video signal type by
repeatedly pressing [SCAN MODE].
NOTE
• “480”, “576”, “720” and “1080” refer to the
number of the scanning lines. Generally, the
larger the number, the better picture that can be
obtained.
• “I” refers to the interlaced scanning. “P” refers to
the progressive scanning. A better picture can
be obtained in the progressive scanning than in
the interlaced scanning.
• When an HDMI video signal is output, the
“HDMI” indicator lights up in the display window.
• When an HD video signal is output, the “HD”
indicator lights up in the display window.
• When “PAL. 576P”, “PAL. 720P”, “PAL.1080P”,
“NT. 480P”, “NT. 720P” or “NT.1080P” is
selected, the “PROGRESSIVE” indicator lights
up in the display window.
5 Press [ENTER].
NOTE
• It is recommended that you slide the remote
control mode selector to [AUDIO] after selecting
the video signal type. Most of the other functions
can be used when the remote control mode
selector is at [AUDIO].
• To check the compatibility of your TV, contact
your local JVC customer service center.
• Even if the main unit is turned off, the video
signal type setting is stored.
Preparation (continued)
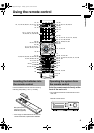
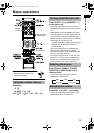
For the locations of the remote
control buttons, refer to page 10.
NX-F30[U].book Page 11 Tuesday, April 21, 2009 6:23 PM