6
Insignia NS-HT511 Home Theater System
www.insigniaproducts.com
Setting up your home
theater system
Finding a location for your home theater
system
• Install your home theater system on a stable flat
surface. Position your receiver so that it has a
direct line of sight to the remote control.
• Do not expose your system to extremes of
temperature or humidity.
• Avoid placing your system on a hot surface such
as on top of other hot running equipment. Make
sure that there is adequate ventilation to your
system.
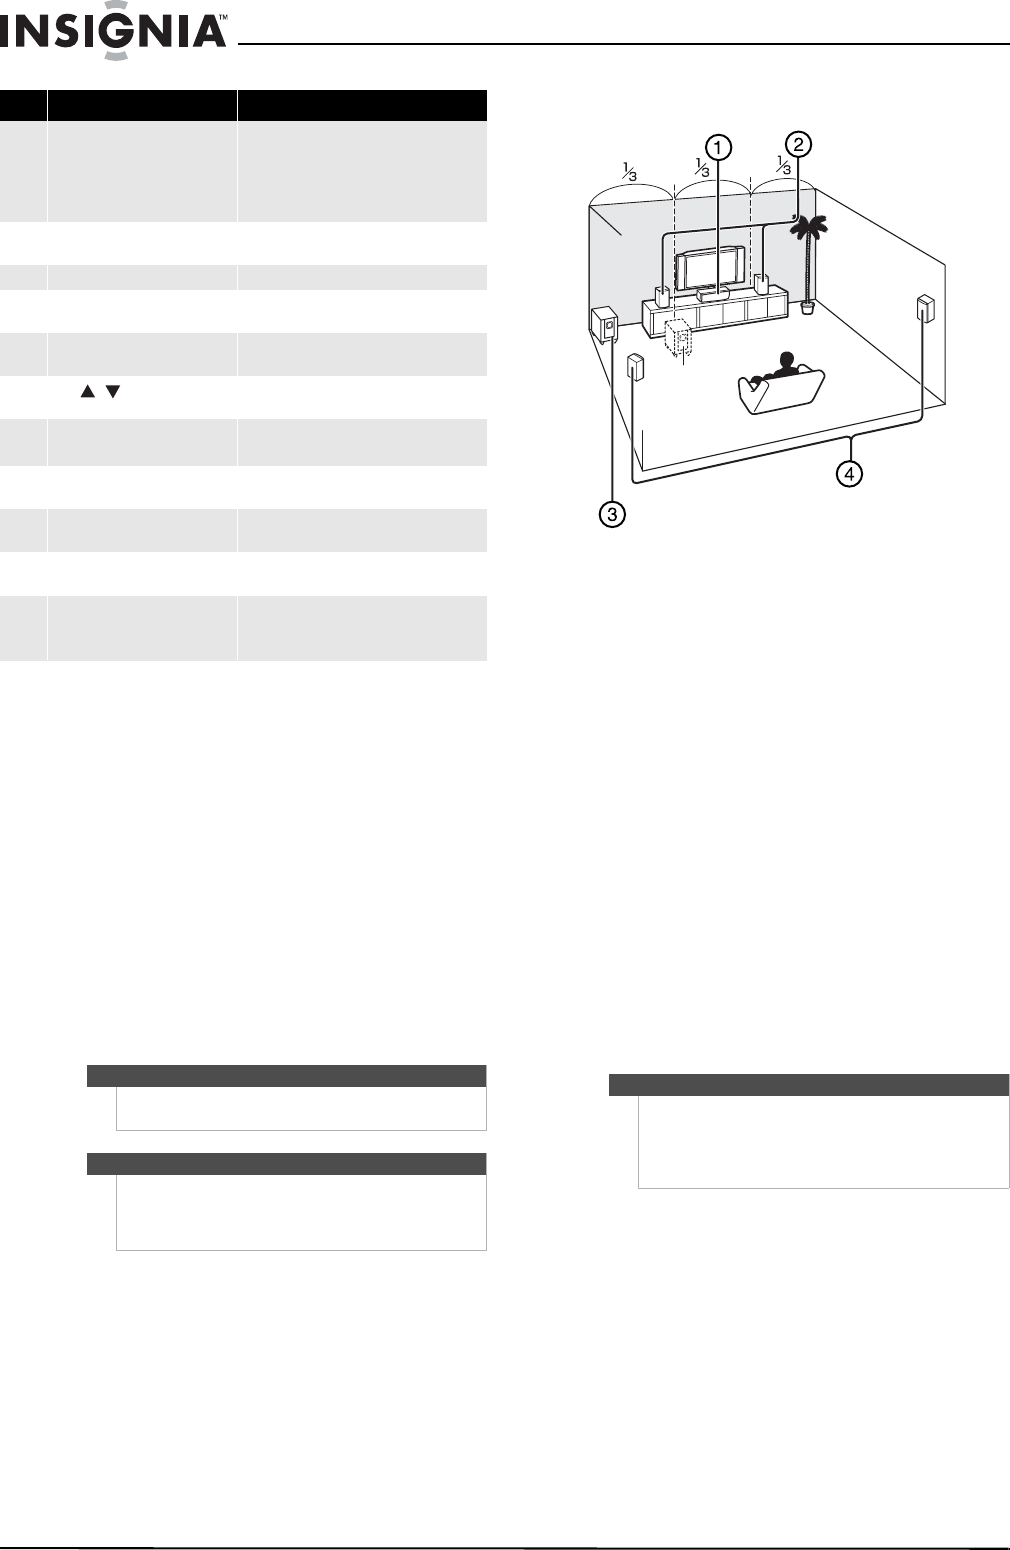
Placing your speakers
1 - Center speaker
This speaker enhances the front speakers, making
sound movements distinct and providing a
full-sound image. In movies it is used mainly for
dialog. Position it close to your TV facing forward at
about ear level, or at the same height as the front
speakers.
2 - Front speakers
These provide the overall sound. Their role in a
home theater system is to provide a solid anchor for
the sound image. They should be positioned facing
the listener at about ear level, and equidistant from
the TV. Angle them inward so as to create a triangle,
with the listener at the apex.
3 - Subwoofer
The subwoofer handles the bass sounds of the LFE
(Low-Frequency Effects) channel. The volume and
quality of the bass output from your subwoofer
depends on its position, the shape of your listening
room, and your listening position. In general, a
good bass sound can be obtained by installing the
subwoofer in a front corner, or at one-third the
width of the wall, as shown.
4 - Surround speakers
These speakers are used for precise sound
positioning and to add realistic ambience. Position
them at the sides of the listener, or slightly behind,
about two to three feet (60 to 100 cm) above ear
level. Ideally they should be equidistant from the
listener.
Speaker precautions
• Do not put water or other liquids close to the
speakers. If liquid is spilled on the speakers, they
may be damaged.
• Speakers should only be placed on sturdy, flat
surfaces that are free from vibration. Putting them
on uneven or unstable surfaces, where they may
fall and cause damage, affects the sound quality.
6 D.TUN
DIMMER
In tuner mode, press D.TUN, then the
number buttons to tune directly to a
frequency.
Press DIMMER to adjust the brightness of
the display.
7 DISPLAY button Press repeatedly to cycle through the
available input source information.
8 RECEIVER button Press to control the receiver.
9 MUTING button Press to mute the sound output from the
receiver.
10 TUN MODE button Press to toggle between auto and manual
tuning modes.
11
VOL / buttons
Press to increase or decrease the sound
volume.
12 CH +/– buttons
ALBUM
In tuner mode, press to go to the next or
previous preset channel.
13 RETURN button In menu mode, press to return to the main
menu or previous menu.
14 HOME button Press to access audio settings. See
“Changing audio settings” on page 25.
15 Number buttons Press to enter a preset number or to
manually tune the radio.
16 SLEEP/CLR button Press repeatedly to select the sleep timer
duration.
In menu mode, press to clear an entry.
Caution
Do not install the receiver in a confined space such as
a bookcase.
Caution
Connect the AC cord only after the speakers,
antenna, and all optional equipment have been
connected. Never make or change any
connections with the power turned on.
Item Description Function
Tip
To find the best position for your subwoofer, while
playing a movie or some music with good bass,
experiment by placing your subwoofer at various
positions within the room, and choose the one that
provides the most satisfying results.
NS-HT511_11-0310_MAN_.book Page 6 Wednesday, April 13, 2011 11:12 PM


