


18
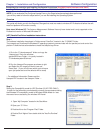
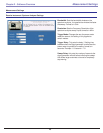
5. Press the “Advanced” button to bring up the Advanced Properties Dialog Box.
Set the Instrument Timeout to 15 seconds. Press OK , then OK, then “SAVE”. You have now
successfully completed the Analyzer Configuration Process.
4.
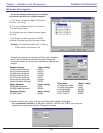
Select your analyzer from the list and Click on the “Properties
button” You should see the window to the right, Change the
name that is shown to one from the list below that matches your
analyzer.
Network Analyzer
HP 8510 series Analyzers
HP 8714 series Analyzers
HP 8720 series Analyzers
HP 8753 series Analyzers
HP 5071 series Analyzers
Anritsu Scorpion Analyzers
Rhode & Schwarz RS series
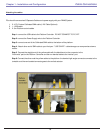
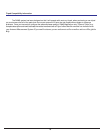
You must complete these steps for the Sofware
to communicate with your network analyzer!.
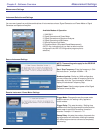
1. Click Start -> Programs->Agilent VEE pro 6.0
Runtime-> I/O Config
2. Turn on you Network Analyzer and Click the
“Find Instruments button.
3. You should see your network analyzer appear
in the list
The instrument number consists of the GPIB
controller ID number and the Instrument number
Example: ID (newinstrument@1416) 14=Nat inst
GPIB controller 16=Analyzer ID #
“Name” setting
HP8510
HP8714
HP8720
HP8753
HP5071
Scorpion
RSZVR
VEE Runtime I/O Configuration
Chapter 1 - Installation and Configuration Software Configuration
“Name” setting
HP836
HP8350
Signal Generator
HP 83650B Signal Gen.
HP 8350 Sweep Generator
“Name” setting
HP436
HP437
ML2438
ML4803
DPM10
Power Meter
HP 436A Power Meter
HP 437B Power Meter
Anritsu ML2438A
Anritsu ML4803A
ELVA-1 DPM 10
Spectrum Analyzer
HP 8565 Series
“Name” setting
HP8565