


AVR 1650/AVR 165
23
Advanced Functions, continued
Step Four – Setting Channel Output Levels Manually
For a conventional stereo AVR, a simple balance control adjusts the stereo imaging by
varying the relative loudness of the left and right channels. In a home theater system
with up to seven main channels plus a subwoofer, achieving proper imaging becomes
both more critical and more complex. The goal is to ensure that each channel is heard
at the listening position with equal loudness (when signals of equal loudness are played
through them).
Your AVR’s EzSet/EQ calibration can handle this critical task for you simply and
automatically. However, the AVR’s Adjust Speaker Levels menu allows you to calibrate
the levels manually, either using the system’s built-in test tone or while playing source
material.
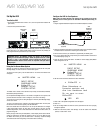
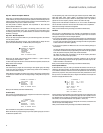
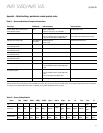
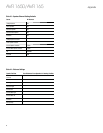
After you return to the Manual Setup menu, navigate to the Level Adjust line and press
the OK button to display the Level Adjust menu.
* LEVEL ADJUST*
FL : 0dB
CEN: 0dB
FR : 0dB
SR : 0dB
SL : 0dB
SUB: 0dB
CHANNEL RESET: OFF
TEST TONE SEQ: MANUAL
TEST TONE : OFF
BACK TO MANUAL SETUP
All of the system’s speakers will appear with their current level settings. You can adjust
each speaker’s level between –10dB and +10dB in 1dB increments.
While making adjustments, you can measure the channel levels in one of these ways:
• Preferably, use a handheld SPL meter set to the C-weighting, slow scale. Adjust each
speaker so that the meter reads 75dB when the AVR’s built-in test noise is playing.
• By ear. Adjust the levels so that the test tone sounds equally loud to you when it plays
through each speaker.
To set your levels using the AVR’s internal test tone, select the menu’s Test Tone Seq
line and use the Left/Right buttons to select between Auto and Manual. After selecting
Auto or Manual, move the cursor to the Test Tone line and use the Left/Right buttons to
change the setting to On.
Auto: The test tone will automatically circulate to all speakers, as indicated by the
highlight bar. Use the Left/Right buttons to adjust the level for any speaker when the
test tone is paused there. Use the Up/Down buttons to move the cursor to another line,
and the test tone will follow the cursor. To stop the test tone, use the Up/Down buttons
to move the cursor out of the screen’s speaker-listings area.
Manual: The test tone will stay on the current speaker until you use the Up/Down
buttons to move it to another speaker. Use the Left/Right buttons to adjust the level for
the speaker through which the test tone is playing.
If you are using an external source to set your output levels, set Test Tone to Off, use the
Up/Down buttons to navigate to each speaker, and use the Left/Right buttons to adjust
the speaker’s level while the source plays. NOTE: If you are using a handheld SPL meter
with external source material, such as a test disc or an audio selection, play it and
adjust the AVR’s master volume control until the meter measures 75dB. Then adjust the
individual speaker levels.
Channel Reset: To reset all channel levels to their factory defaults of 0dB, select this line
and press the Left/Right buttons.
When you have finished adjusting the speaker levels, record the settings in Table A6 in
the Appendix. Then select the Back to Manual Setup option in the OSD.
Notes on Setting Speaker Volumes in Home Theater Systems:
While setting your system’s individual speaker volume levels is ultimately up to your
personal taste, here are some ideas you may find helpful:
• For films and video-music programs, your overall goal should be to create an
enveloping, realistic sound field that draws you into the film or music program without
drawing your attention away from the action on the screen.
• For multichannel music recordings, some music producers will create a sound field
that places the musicians all around you; others will create a sound field that places
the musicians in front of you, with more subtle ambience in the surround speakers (as
you would experience in a concert hall).
• In most 5.1-channel film soundtracks, the surround speakers are not intended to be
as loud or as active as the front speakers. Adjusting the surround speakers so they are
always as loud as the front speakers could make dialogue difficult to understand and
will make some sound effects sound unrealistically loud.
Notes on Setting Subwoofer Volume:
• Sometimes the ideal subwoofer volume setting for music is too loud for films, while
the ideal setting for films is too quiet for music. When setting the subwoofer volume,
listen to both music and films with strong bass content and find a “middle ground”
volume level that works for both.
• If your subwoofer always seems too loud or too quiet, you may want to place it in a
different location. Placing the subwoofer in a corner will always tend to increase its
bass output, while placing it away from any walls or corners will always tend to lessen
its bass output.
System Setup
The AVR’s System Setup menu lets you customize in what way many of the AVR’s
features operate. Press the OSD button and navigate to the System Setup line. Press the
OK button to display the System Setup menu.
VFD Fade Time Out: Some people find the brightness of the AVR’s front-panel display
distracting during movies or listening sessions. It’s possible to dim the front-panel
display completely using the remote’s Display Dimmer button (see System Remote
Control Functions, on pages 8 and 9). The VFD Fade Time Out sets the display to remain
dark most of the time, lighting up only when a button is pressed or a remote command
is received, and going dark again five seconds after the last command. The feature also
causes the display to light up only when a button is pressed but the display immediately
begins to fade to dark. This setting allows you to program the length of the fade time.
Select a time-out period of between three and ten seconds, or select Off if you prefer to
leave the displays on at all times or to use the Display Dimmer button.
Volume Default and Default Volume Set: These two settings are used together to
program the volume level when you turn on the AVR. Set Volume Default to On, and then
set the Default Volume Set to the desired turn-on volume. When Volume Default is set
to Off, the AVR will turn on at the last-used volume setting from the previous listening
session.
HDMI Audio To TV: This setting determines whether HDMI audio signals are passed
through the HDMI Monitor Out connector to the video display. In normal operation, leave
this setting at Off, as audio will be played through the AVR. To use the TV by itself, without
the home theater system, turn this setting to On. In this case, you will need to mute the
TV’s speakers (or switch the setting to Off) when using the AVR for audio.
Semi OSD Time Out: Program the amount of time (2 to 5 seconds) the two-line semi-
OSD status messages remain on screen, or deactivate the semi-OSD display altogether
if you find it distracting. These messages will continue to appear on the front panel of
the AVR.
Full OSD Time Out: Program the amount of time (20, 30, 40 or 50 seconds) the full OSD
menus remain visible on screen. The full OSD system may not be deactivated. NOTE: It
isn’t possible to view video sources while the full OSD menus are displayed.
HDMI Link: This setting allows the communication of control information among the
HDMI devices in your system. Turn this setting to On to allow control communication
among the HDMI devices; turn the setting to Off to forbid control communication.
HDMI ARC: Selecting On will send audio from the TV to the AVR via the HDMI Audio
Return Channel (ARC) connection (which is in the HDMI cable connecting the AVR to the
TV). This way, whenever you’re watching a source that is connected directly to your TV
(such as an Internet connection), you can listen to the sound through the AVR. NOTE: This
setting is available only when HDMI Link is set to On.