49
ADVANCED FUNCTIONS
You may also access the Channel command by pressing the Channel
Button on the remote. Use the
⁄
/
¤
Buttons to select the desired
speaker channel and press the Set Button, then use the
⁄
/
¤
Buttons
again to adjust the level. As with the front-panel controls, a source
should be playing for best results. However, the source may be mixed to
highlight certain channels at various times during the selection, which
could skew the results when a different program is played.
C. Using the Full-OSD Menu
Next to EzSet/EQ, the full-OSD menu system offers the easiest and
most flexible manner of setting output levels. Press the OSD Button to
display the Master Menu, and then navigate to the MANUAL SETUP line.
Press the Set Button to display the Manual Setup menu, and then navi-
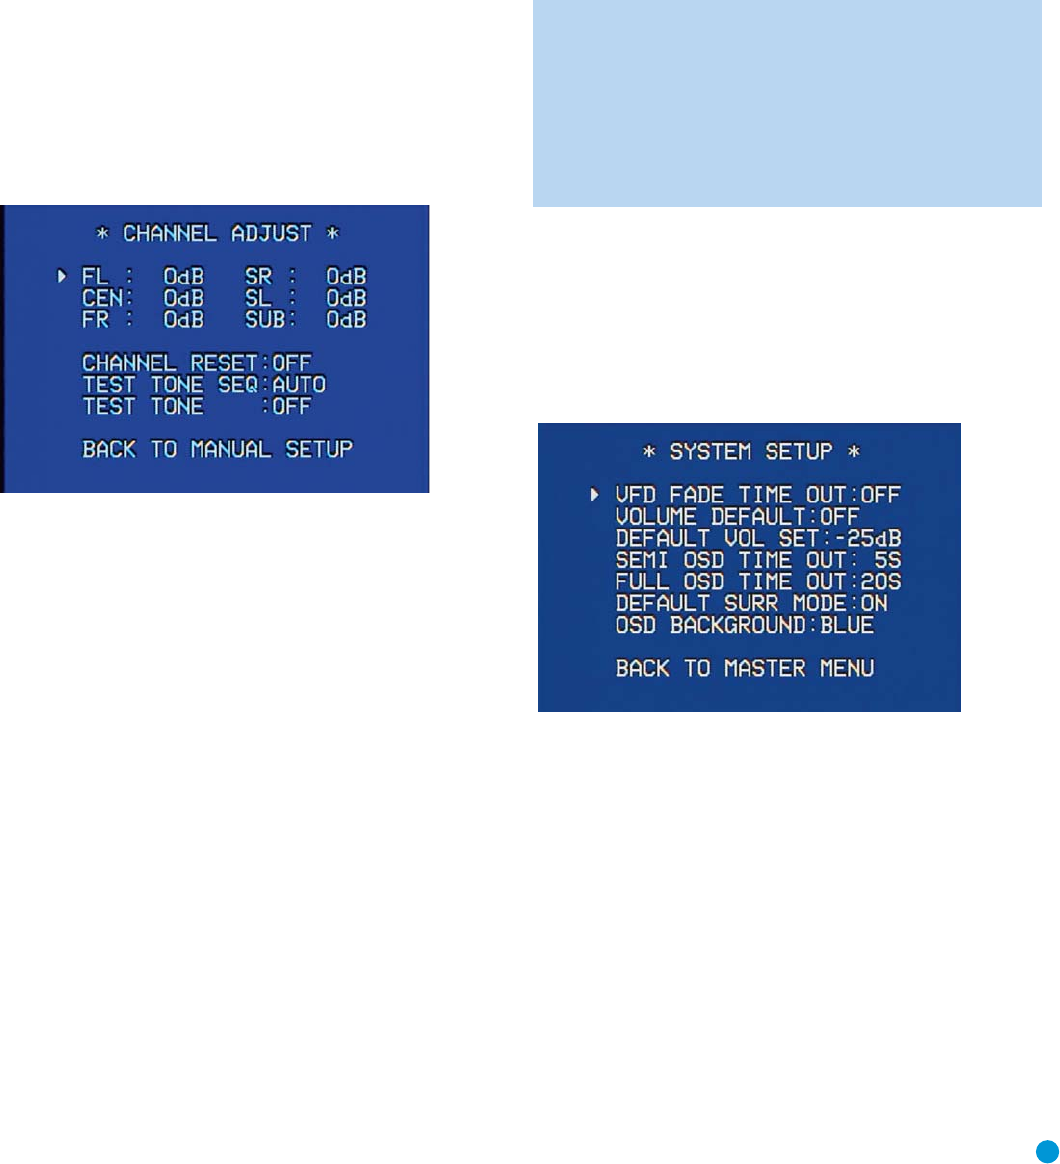
gate to the CHANNEL ADJUST line. Press the Set Button to display the
Channel Adjust menu. See Figure 85.
Figure 85 – Channel Adjust Menu Screen
All of the speaker channels will appear at the top of the screen with their
current level settings. Any channels that have not been programmed
using the Speaker Size menu will display four dashes and will not be
accessible. If you have selected a surround mode that does not utilize
all speakers, such as Surround Off, you will see dashed lines next to the
speakers that aren’t needed for that mode.
CHANNEL RESET: If you wish to start by resetting all of the levels to
their factory defaults of 0dB, navigate to this line and change the setting
to ON. The levels will be reset, and this setting will then revert to OFF.
If you are using an external source to set your output levels, simply
navigate to each channel and use the
⁄
/
¤
Buttons to adjust the level
as desired.
If you would like to set your levels using the AVR 147’s internal test
tone, adjust the TEST TONE SEQ and TEST TONE lines as follows.
TEST TONE SEQ: When this setting reads AUTO, the test tone will
automatically circulate to all channels, pausing for a few moments at
each channel and then moving to the next channel several seconds
later, as indicated by the blinking cursor. You may adjust the level for any
channel when the test tone is paused there by using the
‹
/
›
Buttons.
You may also use the
⁄
/
¤
Buttons at any time to move the cursor
to another line, and the test tone will follow the cursor.
When this setting reads MANUAL, the test tone will not move to the
next channel until you use the
⁄
/
¤
Buttons to move it.
TEST TONE: This line determines whether the test tone is active. To
begin the process of setting the levels, use the
‹/› Buttons to change
the setting to ON. Any time you manually move the cursor out of the
channel listings area of the screen, this setting will automatically change
to OFF, stopping the test tone.
NOTE: Setting the channel levels while one surround mode is
active does not necessarily carry over to all other modes. We
recommend that after you have set the levels satisfactorily in
one mode, you note the results and change to other surround
modes. For those modes that don’t reflect your level settings,
you may either copy the settings you obtained (as a short cut),
or re-do the procedure to determine the correct settings for
those surround modes.
System Settings
The AVR 147 offers several system settings that allow you to make the
receiver easier to use rather than directly affecting performance. Most of
these settings may be accessed from the SYSTEM SETUP menu, which
is selected by pressing the OSD Button and navigating to the SYSTEM
SETUP line of the MASTER MENU. Press the Set Button to display the
submenu. See Figure 86.
Figure 86 – System Setup Menu Screen
VFD FADE TIME OUT: Some people find the brightness of the AVR’s
front-panel display distracting during movies or listening sessions. It’s
possible to dim the front-panel display completely using the Dim function
(see below). This sets the display to remain dark most of the time, lighting
up only when a button is pressed or a remote command is received,
and going dark again 5 seconds after the last command. The VFD FADE
TIME OUT feature also causes the display to light up only when a button
is pressed or a change in the incoming signal is detected, but the display
immediately begins to fade to dark. This setting allows you to program
the length of the fade time.
Select a time-out period of between 3 and 10 seconds, or select
OFF if you prefer to leave the displays on at all times or to use the
Dim function.
AVR147-OM.qxd 2/6/07 3:19 PM Page 49


