


Appendix
NOTE: The following steps will overwrite these settings, so you will need to keep this information to
restore your network settings.
e. Select the ‘Obtain an IP address automatically’ radio button.
f. (XP Only) Click on the Alternate Configuration tab and make sure that ‘Automatic private IP
address’ is selected.
g. Click OK in each window to close them.
h. After about 1-2 minutes your computer will configure itself with the correct IP settings. Verify this
by running the ipconfig command again, as described above.
9. Select the Network Wizard in the Tools menu of the Venue View and change the IP address of the device
so it can be on the same network as your computer. This is done by:
a. Selecting the device in the Network Wizard.
b. Click the Configure button.
c. Disable DHCP by deselecting that checkbox.
d. Type in the new IP address.
Once the DriveRack device and your computer are on the same network, the unit should show up on the
System Architect Venue View.
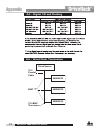
A.10.3 - Setup of a Simple Isolated
Ethernet Network Using DHCP
Assumptions:
• Using Microsoft Windows XP or 2000.
• Computer has a working Ethernet network adapter.
• You have an Ethernet switch/router with DHCP capability and Ethernet cables for each connection
needed.
• You have administrative rights on the PC so that network settings can be changed if needed.
• The Ethernet network consists of exactly one computer that will be used to run the System Architect
software and one or more 4800/4820 units.
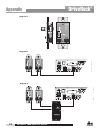
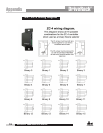
1. Connect the PC and any 4800/4820 to the switch hub using normal Ethernet cables.
2. Apply power to all 4800/4820s and wait for them to boot.
3. With DHCP enabled, the Ethernet switch/router should assign an IP address to each of the devices
including your computer.
4. Launch System Architect. The DriveRack units should come up in the Venue View window.
5. If they do not, you should first check that your System Architect application has the ‘Network active
when application starts’ and ‘Auto Populate venue view with detected devices’ boxes checked; these are
in the Tools menu under Options/General Network Information.
6. If Auto Populate is checked and the network is active (this can be seen in the bottom left-hand corner
of the Venue View window) and the devices are still not shown in the Venue View, select the Network
Wizard in the Tools menu of the Venue View and change the IP address of the devices so they can be
on the same network as your computer.
A.10.4 - Proxy
Proxy is not available in version V1.0 of the DriveRack 4800/4820 firmware, but will be available in
upcoming releases. The proxy feature allows you to access a 4800/4820 over a complex or remote network.
An example of this is when the PC and the 4800/4820 reside on different subnets. The mechanism that is
used by default for the System Architect software to discover and maintain a connection to the 4800/4820
DriveRack
®
DriveRack
®
4800/4820 User Manual
80