


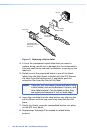
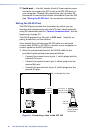
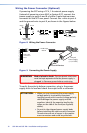

Fig_Replacing button label
2
3
TEXT
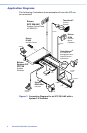
Separate the two-
piece button here at
the corner.
Pry the two
pieces apart.
Diffuser
Plunger
Base
Button Label
Clear Cap
Notch
Figure 3. Replacing a Button Label
4. Lift out the transparent square label that you want to
replace, being careful not to damage the circuits beneath it.
You may need to use the small screwdriver to gently pry the
label out.
5. Detach one of the preprinted labels or one of the blank
labels from the label sheets included with the SCP. Remove
the label from the backing and, if applicable, peel the
protective film from the front of the label.
NOTE: If desired, you can create customized labels using
a label maker, such as the Brother
®
P-touch
®
, and
clear label material. Cut the labels so that they
are square and measure ½ inch on each edge.
6. Insert the new label into the clear button cap, aligning the
white diffuser with the cap, and firmly snap the cap into
place.
7. Gently, but firmly, press the reassembled button into place
on the SCP front panel.
8. Repeat steps 1 through 7 as needed to relabel other
buttons.
SCP 104 and SCP 226 • Installation and Operation
7