


Page 12
Studio Reference
II
II
I
&
IIII
IIII
II
Professional Studio Amplifiers
making connections, selecting sources and controlling
output levels. The load you save may be your own!
Crown is not responsible for damaged loads that result
from carelessness or deliberate overpowering.
CAUTION: Always disconnect the AC power and
turn the level controls down when making or break-
ing connections. This practice reduces the chance of
loud blasts that can cause loudspeaker damage.
Studio Reference
amplifiers provide three operating
modes: Stereo, Bridge-Mono and Parallel-Mono. Ste-
reo mode provides standard two-channel operation;
Bridge-Mono provides a single channel with double
the output voltage of Stereo mode; and Parallel-Mono
mode provides a single channel with double the output
current of Stereo mode. These modes can be selected
using the stereo/mono switch on the back panel. Each
mode is wired differently, so be sure to note any spe-
cial wiring requirements for the mode you will be using.
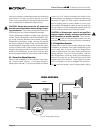
3.3.1 Stereo (Two-Channel) Operation
Stereo mode installation is very intuitive: input chan-
nel 1 feeds output channel 1, and input channel 2
feeds output channel 2. To put the amplifier into Stereo
mode, turn it off, slide the stereo/mono switch to the
center position, and properly connect the output wiring
as shown in Figure 3.5. Each output channel has two
sets of binding posts to make it easier for you to con-
nect multiple loudspeaker cables to each channel. Be
sure to observe correct loudspeaker polarity (see Fig-
ure 3.5) and be careful not to short the outputs.
CAUTION: In Stereo mode, never tie an amplifier’s
outputs together directly, and never parallel them
with the output of another amplifier. Such connec-
tions do not result in increased output power, but may
activate the protection circuitry to prevent overheating.
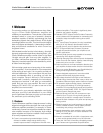
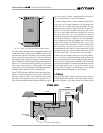
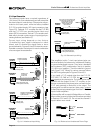
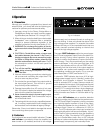
3.3.2 Bridge-Mono Operation
Bridge-Mono mode is used to drive loads with a total
impedance of at least 4 ohms (see Parallel-Mono if the
load is less than 4 ohms). Wiring for Bridge-Mono
mode is different from the other modes and requires
special attention. First, turn off the amplifier. Then se-
lect Bridge-Mono mode by sliding the stereo/mono
switch to the right (as you face the back panel). Both
outputs receive the channel 1 input signal, but chan-
nel 2 is inverted so it can be bridged with channel 1.
Do not use the channel 2 input or signal quality will be
Reference
STUDIO
CH-2 CH-1
PUSHPUSH
FX
STUDIO REFERENCE
AMPLIFIER
MIXER
LOUDSPEAKER
–
+
CHANNEL 1
DO NOT USE
THE CHANNEL 2
INPUTS.
DO NOT USE
THE BLACK
BINDING
POSTS.
CAUTION: TURN OFF AMPLIFIER
BEFORE CHANGING THIS SWITCH!
STEREO
BRIDGE
MONO
PARALLEL
MONO
BRIDGE-MONO MODE
Fig. 3.6 Bridge-Mono Wiring