


Section 5.0 - Setting Up the SSP-30 MKII
The SSP-30 MKII has a complete and well-thought-out configuration system, flexible enough for even a complex audio
and Home Theater system. You will find setup to be quite intuitive, and that once set up, operation of the SSP-30 MKII
will prove to be simple and straightforward.
Setup requires use of the supplied Classé remote control. You may use either the On-Screen (TV) menu or the
illuminated front panel readout. The two methods are equally easy to use and understand. The same highlighted
selection on the TV output is the visible on the panel.
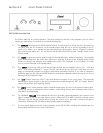
To Begin: be sure the SSP-30 MKII is on. (Press “Standby” if green light on the left is on). If the SSP-30 MKII is not on,
and the green light is not lit, turn the unit “ON” with the rocker switch above the AC cord on the rear panel. (The SSP-
30 MKII may be left in “Standby” mode indefinitely when not in use. You may wish to unplug it or turn it completely off
when you will be away for a long period of time, or when a thunderstorm threatens.)
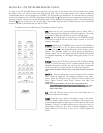
You must use the Classé remote control to Set Up the SSP-30 MKII.
Pressing the MENU key on the remote accesses the main menu. The /\ and \/ keys (above and below the ENTER key)
scroll through the main menus and the sub-menus, highlighting the choices. Press the ENTER key to access the menu
item you have highlighted.
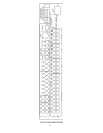
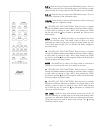
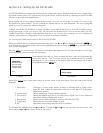
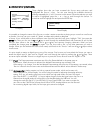
Press the MENU key on the remote. The box on the left shows the display on the TV screen and the box on the right
shows the display on the front panel of the processor.
These displays show that you have accessed the Main menu and highlighted the
Audio setup feature. You can scan through the available choices by pressing
repeatedly the \/ and /\ buttons on the remote. When the feature you wish to adjust
is highlighted press the ENTER key.
Main Menu
Audio setup
Speaker setup
Source setup
Display setup
Trigger setup
Exit
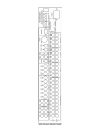
Main menu
Audio setup
TV Display Panel display
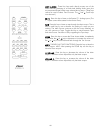
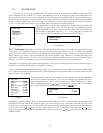
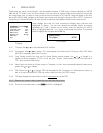
Pressing the MENU key to begin setup brings up screens similar to the ones above. Seven sub menus and Exit are
displayed:
1. Audio Setup Configures 5 custom audio presets, increase or decrease Bass or Treble output,
adjust LFE level, enable PL II panorama, adjust PL II width, adjust PL II dimension,
adjust Reverb wetness.
2. Speaker setup Defines speaker size, level and distance settings.
3. Source setup Defines and adjusts each Source, including Name, Digital input (if any), Preset and
also adjusts Analog to Digital gain amount.
4. Display setup Defines various Video parameters, including NTSC/PAL and OSD
5. Trigger setup Defines the use of the three Voltage Triggers
8. Exit Memorizes current settings and returns to full operation.
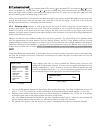
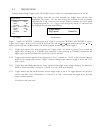
The functions are adjusted using the < and > keys. Though the /\ and \/ keys can jump from first item to last, (and
last to first), the < and > keys stop at the first or last choice.
17