


MIDI FOOT CONTROLLER FCB1010
9
s If you have selected EXP A or EXP B, you can now enter
the controller number the EXPRESSION PEDAL of your
choice is aimed to send values for. Confirm your selection
with UP/ENTER and enter the lower value (pedal up). Confirm
with UP/ENTER.
Afterwards, enter the upper value (pedal pressed down
completely) and confirm once again with UP/ENTER.
+ Please keep in mind that the first controller value
always has to be lower than the second controller
value!
+ You can quit the programming mode at any time by
means of a long press on DOWN. Any confirmed
entries will be stored with the currently selected
PRESET.
+ How to program the NOTE function is explained in
chapter 2.4.6.
2.4 Detailed PRESET programming
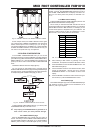
2.4.1 Preset copy function
The preset copy function copies an already programmed preset
to a new preset of your choice. This saves you time, since you
do not have to repeat all adjustments for each newly programmed
preset.
s Activate CONFIG in the GLOBAL CONFIGURATION (see
chapter 2.2).
s Now, press footswitch 5 to activate the copy function.
The VALUE 1 LED lights up. The number in the display and
the footswitch LED start flashing.
s Enter the number of the preset you wish to copy and
confirm your selection with UP/ENTER. The VALUE 2 LED
lights up. The number in the display and the footswitch LED
start flashing.
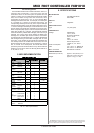
+ Presets 1 - 10 are stored in bank 0, presets 11 - 20 in
bank 1, and so on.
s Enter the target preset and confirm your selection with UP/
ENTER, or cancel with DOWN/ESCAPE.
s If you want to copy further presets, please press
footswitch 5 again. Press and hold DOWN/ESCAPE to
quit the GLOBAL CONFIGURATION.
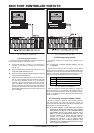
2.4.2 Programming switches
s Select the PRESET you wish to edit.
s Press DOWN for more than 2.5 sec to enter PRESET
programming mode. The green SWITCH 1/SWITCH 2 LED in
the display starts flashing.
s Enable/disable the SWITCHES using footswitches 1 and/or
2 and confirm your selection with UP/ENTER. The
corresponding footswitch and SWITCH LEDs light up.
s Exit PRESET programming mode through keeping the DOWN/
ESCAPE key for a few seconds, or press the UP/ENTER
key in order to get to the next page, where you can edit
various MIDI functions for the preset selected at the beginning.
2.4.3 Programming program changes
s Select the PRESET you wish to edit.
s Keep the DOWN/ESCAPE key pressed longer than 2.5 sec.
to get to the programming mode. The green SWITCH 1/
SWITCH 2 LED in the display starts flashing.
s Use the UP/ENTER key to get to the next page. The SELECT
LED in the display is lit.
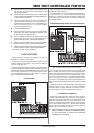
+ To program a MIDI function, you have to first activate
it. Individual MIDI functions are activated by keeping
the corresponding keys pressed for a few seconds.
Active MIDI functions are indicated by a permanently
lit footswitch LED.
s Select the PROGRAM CHANGE you wish to program for
the selected PRESET by briefly pressing the respective
footswitch (footswitches 1 to 5). The footswitch LED blinks.
s Confirm your selection by pressing UP/ENTER. The NUMBER
LED in the display lights up.
s Enter the program change command (1 bis 128) via the
footswitch or expression pedal A.
s Confirm your selection by pressing UP/ENTER or cancel by
pressing DOWN/ESCAPE. The SELECT LED in the display
lights up.
s Select an additional MIDI function you wish to edit or exit
the PRESET programming mode by keeping the DOWN/
ESCAPE key for a few seconds.
2.4.4 Programming CONTROL CHANGES
s Select the PRESET you wish to edit.
s Keep DOWN pressed for more than 2.5 sec to enter PRESET
programming mode. The green SWITCH 1/SWITCH 2 LED in
the display starts flashing.
s Use the UP/ENTER key to get to the next page. The SELECT
LED in the display lights up.
+ To program a MIDI function, you have to first activate
it. Individual MIDI functions are activated by keeping
the corresponding keys pressed for a few seconds.
Active MIDI functions are indicated by a permanently
lit footswitch LED.
s Keep the corresponding footswitch (foot key 6 or 7)
pressed for a few seconds to activate the controller you
wish to edit. The controller is selected by pressing the key
briefly again. The LED blinks.
s Confirm your selection by pressing UP/ENTER. The NUMBER
LED in the display lights up.
s Enter the desired controller number (0 to 127) by using the
foot keys or the expression pedal A.
s Confirm your selection with UP/ENTER. The VALUE 1 LED
in the display lights up.
s Use the footswitches 1 through 10/0 or EXPRESSION
PEDAL A to enter the controller value (0 through 127).
+ To correct your selection, use the DOWN/ESCAPE
key to go one step backward.
s Confirm your selection by pressing UP/ENTER. The SELECT
LED in the display lights up.
s Select an additional MIDI function you wish to edit or quit
the PRESET programming mode by keeping DOWN/ESCAPE
pressed for a few seconds.
2.4.5 Programming EXPRESSION PEDALS A/B
s Select the PRESET you wish to edit.
s Keep DOWN pressed for more than 2.5 sec to enter PRESET
programming mode. The green SWITCH 1/SWITCH 2 LED in
the display starts flashing.
s Use UP/ENTER to get to the next page. The SELECT LED in
the display begins to light up.
+ To program a MIDI function, you have to first activate
it. Individual MIDI functions are activated by keeping
the corresponding keys pressed for a few seconds.
Active MIDI functions are indicated by a permanently
lit footswitch LED.
2. PROGRAMMING THE FCB1010