


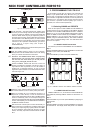
MIDI FOOT CONTROLLER FCB1010
10
s Activate the expression pedal you wish to program by
keeping the corresponding foot key pressed for a few
seconds (foot keys 8 or 9). The foot key LED blinks after
you briefly press the foot key yet again.
s Confirm with UP/ENTER. The NUMBER LED lights up.
s Enter the control nunmber (0 bis 127) via the footswitches
or the expression pedal A.
s Confirm your selection with UP/ENTER. The VALUE 1 LED
lights up.
s Enter the value to be transmitted when the pedal is completely
open by using the foot keys or the expression pedal A.
s Confirm your selection with UP/ENTER. The VALUE 2 LED
lights up.
s Enter the value to be transmitted when the pedal is completely
pressed downward by using the foot keys or the expression
pedal A.
+ Use DOWN/ESCAPE to go one step backward.
s Confirm your selection with UP/ENTER. The SELECT LED
lights up.
s Quit PRESET programming mode by means of a long press
on DOWN, or select another MIDI function for editing.
2.4.6 Programming the NOTE function
The NOTE function allows you to send a MIDI note, for example,
to use the tap-tempo features offered by many MIDI devices or
to play sounds the same way you would on a keyboard.
s Select the PRESET you wish to edit.
s Keep DOWN pressed for more than 2.5 sec to enter PRESET
programming mode. The green SWITCH 1/SWITCH 2 LED in
the display starts flashing.
s Use UP/ENTER to get to the next page. The SELECT LED in
the display begins to light up.
+ To program a MIDI function, you have to first activate
it. Individual MIDI functions are activated by keeping
the corresponding keys pressed for a few seconds.
Active MIDI functions are indicated by a permanently
lit footswitch LED.
s Keep footswitch 10/0 pressed for a few seconds to
activate the NOTE function. Pressing the footswitch briefly
once again makes the footswitch LED blink.
s Confirm your selection with UP/ENTER. The NUMBER LED
lights up.
s Use the footswitches 1 through 10/0 or EXPRESSION
PEDAL A to enter the MIDI NOTE number you wish to send
with the PRESET. You can choose from the values 0 through
127.
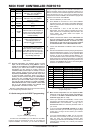
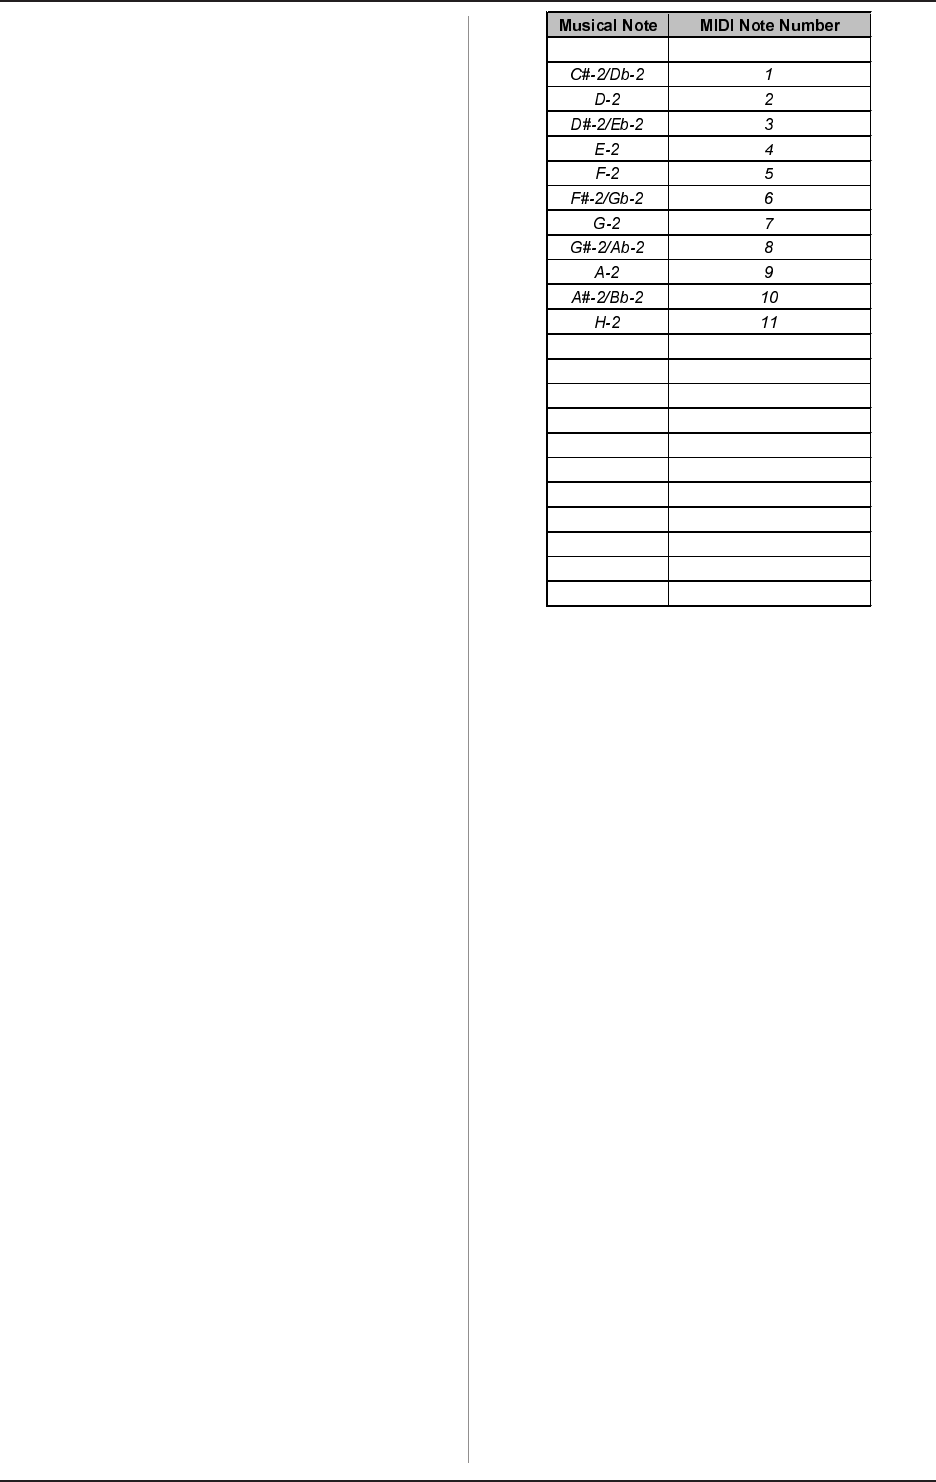
The table below shows which musical notes are assigned to
which MIDI notes (with a detailed list for the octave from C-2 to
C-1; simply use this pattern to assign the remaining notes/octaves
yourself).
C-2 0
C-1 12
C0 24
C1 36
C2 48
C3 (Clef C) 60 (Yamaha Convention)
C4 72
C5 84
C6 96
C7 108
C8 120
G8 127
Tab. 2.4: Assignment of MIDI NOTE numbers
s Confirm your selection by pressing UP/ENTER or cancel by
pressing DOWN/ESCAPE. The SELECT LED in the display
lights up.
s Select an additional MIDI function you wish to edit or exit
the PRESET programming mode by keeping DOWN/ESCAPE
pressed for a few seconds.
The NOTE function will be particularly useful for so-called tap-
tempo applications. Many of todays multi-effects devices allow
the user to enter the delay time by means of an on-board TAP
button. The device measures the time between two TAP button
presses and uses this interval to adjust the delay time. Often,
this function can be remotely controlled via MIDI. In this case,
tapping is the transmission of two subsequent NOTE ON
commands, which is what the NOTE function of your FCB1010
does for you. For example, this is how a sequencing software
can be launched or closed.
+ If you program the NOTE function with a PRESET, a
NOTE ON command will be sent each time you select
the PRESET. Getting your foot off the switch
transmits the NOTE OFF command.
+ To tap the tempo, simply press the PRESET switch
several times in the rhythm of the music.
+ CNT 1 is always transmitted together with the note
on command. For example, it can be used for
sending a volume value (number 07) together with
a note to trigger a sound. When the controllers
operation is not desired, it can either be relayed to
an unused MIDI channel in GLOBAL CONFIGURATION
(this channel is then valid for all presets) or an
unused controller number can be assigned to the
controller (can be done for each individual preset).
2. PROGRAMMING THE FCB1010