


MIDI FOOT CONTROLLER FCB1010
6 2. PROGRAMMING THE FCB1010
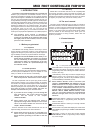
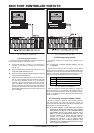
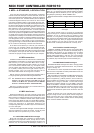
1.3.2 Rear panel
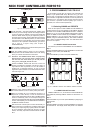
Fig. 1.2: Rear panel connectors
FUSE HOLDER / VOLTAGE SELECTOR. Please make
sure that your local voltage matches the voltage indicated
on the unit, before you attempt to connect and operate the
FCB1010. Blown fuses may only be replaced by fuses of
the same type and rating. Some models allow for inserting
the fuse holder in two different positions, in order to switch
over from 230-V to 120-V operation, and vice versa. Please
note that for 120-V operation outside Europe, you need to
use a fuse of a higher rating (see chapter 6
SPECIFICATIONS).
IEC POWER CONNECTOR. Use the enclosed power cord
to connect the unit to the mains.
Use the POWER switch to power up your FCB1010.
Always make sure the POWER switch is in its Off setting
when you connect the FCB1010 to the mains.
+ Attention: The POWER switch does not physically
disconnect the unit from the mains. Always unplug
the unit from the mains when you do not plan on
using it for prolonged periods of time.
SERIAL NUMBER. Please take the time to have the
warranty card filled out completely, and return it within 14
days after the date of purchase, so as to be entitled to
benefit from our extended warranty. Or use our online
registration option available on the World Wide Web under
www.behringer.com.
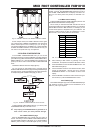
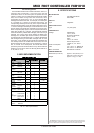
Fig. 1.3: Rear panel connectors
SWITCH 1 and 2. Use these jacks to connect your amplifier
for channel selection (mono or stereo phone jack cable).
MIDI IN. The MIDI IN of your FCB1010 connects to a
sequencer or similar device, in order to download the
memory data saved before with the help of the MIDI SysEx
function. Additionally, data can be looped through the
FCB1010 and merged with other data using the MIDI MERGE
function. Subsequently, the combined data are available at
the MIDI OUT/THRU connector.
MIDI OUT/THRU. Use this jack to connect the devices you
wish to control from your FCB1010. The SOFT THRU circuit
allows you to loop through any signals present at the MIDI
IN of your FCB1010, merge them with the units own data
stream, and finally output the combined data at the MIDI
OUT.
2. PROGRAMMING THE FCB1010
In this chapter you will learn to program your FCB1010 and
adapt it to your specific MIDI set-up. But dont worry, you wont
have to learn a programming language before you could give
your FCB1010 a single MIDI command. The unit will perform all
functions for you, one after the other. Simply make and confirm
your choices. If particular functions prompt you to enter a
parameter, this will be covered specifically.
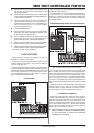
2.1 Selecting BANKS and PRESETS
There are two options to select a BANK and the PRESETS it
contains. Which one you use depends on the DIRECT SELECT
parameter in the GLOBAL CONFIGURATION menu. If DIRECT
SELECT is on, you can use the PRESET footswitches to directly
select the BANK number followed by the PRESET number. If
DIRECT SELECT is off, you need to step through the various
BANKS (using the UP/DOWN switches), then select a PRESET
from a bank. The default setting is OFF. The illustrations below
show the two options.
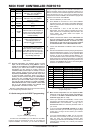
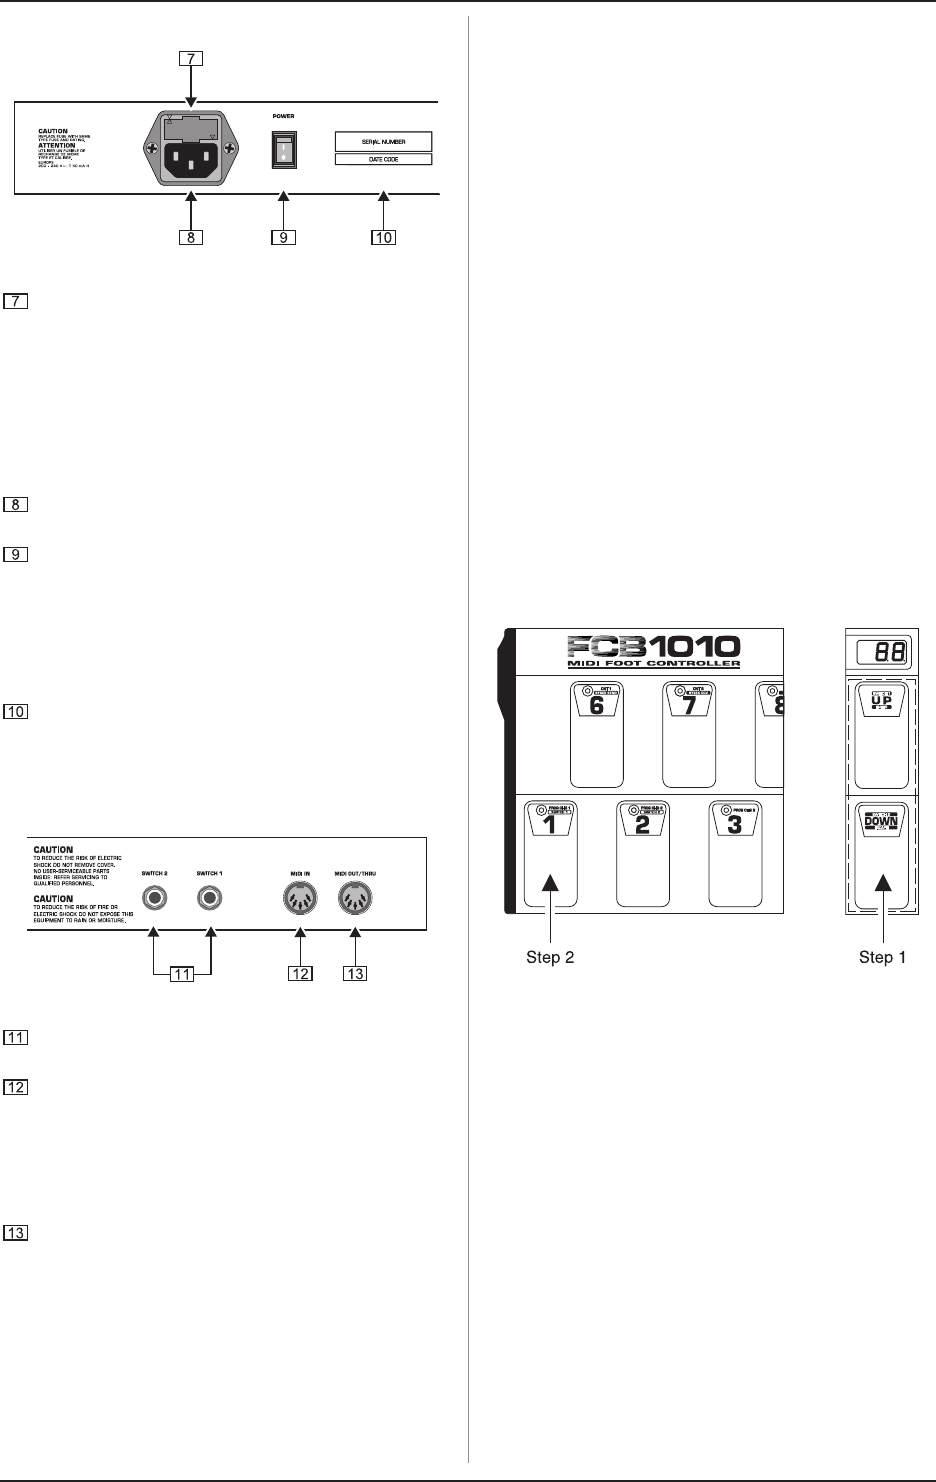
2.1.1 DIRECT SELECT deactivated
Lets assume you wish to select PRESET #1 from BANK #3...
Step 1
Use the UP/DOWN switches to go to the BANK that contains the
PRESET of your choice (here: BANK #3).
Step 2:
Select the PRESET you wish to use (here: PRESET #1).
Fig. 2.1: PRESET selection with DIRECT SELECT disabled
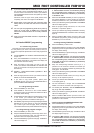
2.1.2 DIRECT SELECT activated
If DIRECT SELECT is on, do as follows to select PRESET #1
from BANK #3 (activating DIRECT SELECT is discussed in ch.
2.2.1):
Step 1
Select the BANK of your choice (here: BANK #3) by stepping on
footswitch #3.
Step 2
Select the PRESET you wish to use (here: PRESET #1) by stepping
on footswitch #1. The display shows that preset 31 is selected.