


MIDI FOOT CONTROLLER FCB1010
13
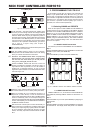
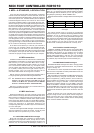
s Keep the switches 1 and 3 pressed while powering up the
unit. This puts your FCB1010 into self-test mode, and all
LEDs are being tested.
s Please wait until all switch LEDs light up. Then press all the
switches, including the UP/ENTER and DOWN/ESCAPE keys,
so that all LEDs are turned off.
s Wait for a moment while the relay test is completed (four
quiet cliking sounds are heard). The display shows F1 if
no MIDI connection is present. If you connected MIDI Out to
MIDI In, the display shows A1. In this case, the MIDI
connections operate correctly.
s Press DOWN/ESCAPE once.
s Move the expression pedal A to the lowest value possible
(pedal open). The VALUE 1 LED lights up. When the value
is adjusted, press the UP/ENTER key.
s Move the expression pedal A to the highest value possible
(pressed down all the way). The VALUE 2 LED lights up.
When the value is adjusted, press the UP/ENTER key.
s Move the expression pedal B to the lowest value possible.
When the value is adjusted, press the UP/ENTER key.
s Move the expression pedal B to the highest value possible.
When the value is adjusted, press the UP/ENTER key.
Both pedals are now correctly calibrated.
3. APPLICATIONS
Several application examples that should help you with the
MIDI setup are described in this chapter.
As long as your equipment features MIDI connectors, you can
control it entirely via the FCB1010. All you need is a MIDI IN
connector at the other end.
No audio signal pass through the FCB1010 and consequently
no signal processing takes place in it either. The FCB1010 merely
transmits control data to your MIDI equipment, so it can for example
call up presets, turn effects on or off, or adjust volume. You can
find more detailed information on this subject in chapter 4
MIDIA STANDARD, A REVOLUTION.
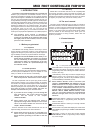
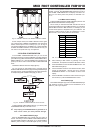
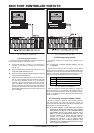
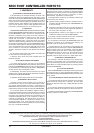
3.1 Basic setup
Fig. 3.1: Basic setup with a guitar amp
Here, the FCB1010 is used to control a guitar amp that is
equipped with a MIDI interface.
Connect the MIDI OUT jack of your FCB1010 to the MIDI IN of
your amp (see fig. 3.1), using a standard 5-pole MIDI cable.
Program your FCB1010 as described in chapter 2.4. Please refer
to the users manual of your amp to find out what functions can
be controlled via MIDI.
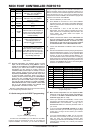
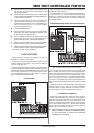
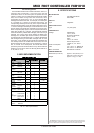
3.2 Expanded setup (using the switch function)
Fig. 3.2: Guitar setup (using the switch function)
Here, the FCB1010 is used to control an effects device via
MIDI. In addition, the switch function is used to toggle between
the two channels (clean/overdrive) of the guitar amp. Please
connect your effects device via the FX send/return loop of your
amp. Now connect the SWITCH 1 connector with the footswitch
input of your guitar amp. Use a standard jack cable for this
purpose. Connect the MIDI OUT connector of the FCB1010 to the
MIDI IN connector of the effects device using a standard MIDI
cable.
The effects processor is controlled via MIDI, while the SWITCH
function toggles the amp. Thus, youll need no additional
footswitch when you switch between the channels; instead,
your entire setup is centrally controlled from the FCB1010.
3.3 Connections (general)
Please use commercial-grade cables with phone plugs to
connect the SWITCH outputs of your FCB1010 to your amplifier.
Since these outputs are normalized, you can send both switching
pulses from one SWITCH output, by using a stereo cable, which
is useful in combination with amplifiers that have a stereo phone
jack to select several functions (e.g. channel select and effect
on/off). In this case, please use only one of the two SWITCH
outputs with one stereo cable connected.
+ Find out whether or not your guitar amp supports a
stereo connection via SWITCH 1 or SWITCH 2. Simply
try and experiment to identify the switching
configuration of your amp.
3. APPLICATIONS