


7
• Maintain stereo separation to the lowest
frequencies.
• Cope with larger listening rooms.
• Enable greater maximum sound output – often
useful for effectively reproducing special effects
in Home Theatre applications.
• Smooth out the effects of low-frequency room
resonances.
If you are using two subwoofers for stereo audio,
stereo separation is improved if each channel
has its own subwoofer, providing each one is
sited close to the relevant satellite speaker.
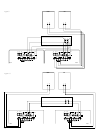
If using a decoder, use the phono ‘T’-piece
provided, and make connections to the decoder
input on each subwoofer. For two channel audio,
use both line input channels.
Double check the connections
ENSURE THAT THE VOLTAGE INDICATED
ON THE AMPLIFIER PANEL MATCHES THAT
OF THE POWER SUPPLY.
Before auditioning the sound quality of your new
installation and fine tuning it, double check the
connections. All too often, users complain that
they cannot get a decent sound however they set
the controls, only to discover something has been
wrongly connected. Make sure that:
•
The phasing is correct – there should be no
positive to negative connections (this applies
only to speaker level interconnects). If
something is out of phase you may get a fuzzy
sound with an imprecise and floating image,
a lack of bass or a combination of the two.
• There are no left to right mix-ups – this can
result, for example, in the orchestra being the
wrong way round or, more disastrously, sounds
on your Home Theatre going in the opposite
direction to the action on the screen.
Switching on and off
We recommend that you switch the subwoofer
on before any power amplifiers receiving signals
from the subwoofer. Similarly, when switching
off, switch the subwoofer off last.
Auto:
On first switching the subwoofer to Auto, the
amplifier becomes fully active and the light
above the on/auto/off switch glows green.
After a period of about 5 minutes without an
input signal, the amplifier automatically reverts to
standby mode, and the light glows red. When
an input signal is detected, the amplifier
automatically becomes fully active and the light
glows green.
On:
With the switch in this position, the amplifier
remains permanently on, and the light glows
green.
Off:
In this position, the amplifier is in standby, and
the light glows red.
Setting the controls
Line and speaker level inputs
There are three controls to consider:
• The LOW-PASS filter frequency
• The VOLUME control
• The PHASE switch
Decoder input
There are three controls to consider:
• The DECODER VOLUME control
• The PHASE switch
• The EQUALISATION switch
The optimum settings depend on the other
equipment used with the subwoofer. If using
more than one subwoofer, make sure the controls
on each one are set the same.
Use with THX
®
controllers (including THX
controllers set in non-THX mode)
The ASW
™
4000 is not a THX
®
licensed
component, but may be used with a THX
®
controller if desired.
• Set the decoder volume control to the detent at
the half-way (12 o’clock) position (this is a
standard THX
®
pre-set level of 88dB SPL @ 1m
for 100mV input signal).
• Set the EQUALISATION switch initially to
position A, then see the section below on
fine tuning.
• Set the PHASE switch initially to 0°, then see
the section below on fine tuning.
Ensure that the subwoofer function on the THX
®
controller is enabled. When so configured it
incorporates all the filtering and level setting
required for the subwoofer in all modes. For level
calibration, the internal test noise and channel
level controls in the THX
®
controller should be
used. In all cases the levels should be set so as
to obtain 75dB spl (C-weighted) at the listening
position from the controller’s internal noise test
signal. Refer to your controller manual for further
details as to how to set the levels. Inexpensive
sound level meters are readily available from
electronics stores and should be used to
calibrate the levels.
Use with other Home Theatre decoders
• If the decoder has a dedicated subwoofer
output and an internal LOW-PASS filter for the
subwoofer having a slope of 2nd-order
(12db/octave) or greater, set the LOW-PASS
filter frequency to maximum, otherwise set it
initially to 80 Hz.
•
Set the VOLUME control initially to the half-way
(12 o’clock) position, then see the section
below on fine tuning.
• Set the PHASE switch initially to 0°, then see
the section below on fine tuning.
Use for stereo audio
•
Set the LOW-PASS filter initially to 80 Hz then
see the section below on fine tuning.
• Set the volume control initially to the half way
(12 o’clock) position, then see the section
below on fine tuning.
•
Set the PHASE switch initially to 0°, then
see the section below on fine tuning.
Fine tuning
The setting of the EQUALISATION switch affects
only the signal via the decoder input. Position A
is optimised to allow the subwoofer to provide
the highest listening levels, while position B gives
greater bass extension.
The optimum settings of the PHASE switch and
the LOW-PASS filter frequency are inter-related
and also dependent on the low-frequency
cut-off characteristic of the satellite speakers
and the relative positions of all the speakers
in the installation.
Set the system up in the preferred position and
play some programme with a steady basscontent.
The optimum setting for the LOW-PASS cut-off
frequency depends on several variables – the
bass performance and power handling of the
satellite speakers, the number of subwoofers
used and their position relative to the satellite
speakers. The range 80-90 Hz is a good
starting point for the LOW-PASS frequency.
Unless two subwoofers are used to preserve
separate right and left channel information and
are sited close to the relevant satellite speakers,
using a higher cut-off frequency may compromise
the stereo image and should only be considered
if the bass performance of the satellite speakers
is particularly limited.
At each setting of the cut-off frequency, listen with
the phase switch in both positions. The correct
one is that which gives the fullest bass and that
will depend on the bass characteristics of your
satellite speakers and the relative distances of
the subwoofer(s) and the satellite speakers to the
listeners. When using more than one subwoofer,
ensure that each one has its cut-off frequency
and phase switch set the same way.
If at any time you make changes to the
amplification of the system such that you change
from speaker to line level connections to the
subwoofer, it is worth checking the phase setting
again, as the speaker level and line level
high-pass filter phase characteristics of the
subwoofer are different.
Set the loudness of the subwoofer relative to the
satellite systems to your liking. Use a wide
variety of programme material to get an average
setting. One that sounds impressive on one piece
may sound overpowering on another. Listen at
realistic levels as the perception of balance
varies with sound level.
If you get problems with lumpy bass – if certain
bass notes are exaggerated more than others –
then you probably have a room interface
problem and it is worth experimenting with the
placement of the subwoofer. What may seem
like small changes in position – 15cm (6in) or
so – can have a profound effect on the sound.