


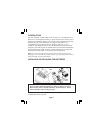
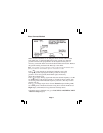


Make sure the Transmitter is off. Plug the direct connect cable into the
front panel jack. Connect the Black clip to the ground rod. Place the
ground rod in the earth perpendicular to the suspected cable path. If
necessary, extend the black lead with the Ground Extension Cable. Remove
the ground bonding and attach the Red clip to the shield.
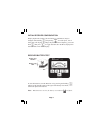
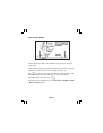
Press to turn the unit on and select Continuity Test (solid
tone=good ground; beepingtone=usable ground; no tone=poor
ground or no far-end ground). Both LEDs light continuously
during the continuity test.
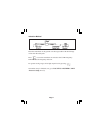
Press to apply Tracing signal and select the desired frequency: 577 Hz
for direct connect with far-end ground; or 33 kHz for direct connect with
no far-end ground. LED indicates frequency selection. (This key can also
turn the unit on.)
Press to change output level. Choose Normal output (flashing LED)
for locating short to moderate distances using direct connect method. Use
High output (solid LED) for long distances and deep cables.
Transmitter setup is finished, now go to LOCATING A BURIED CABLE
- Receiver Setup (Page 8).
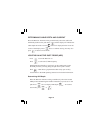
Note: Never attach or remove the direct connect cable from the Transmitter front
panel jack while the red and black clips are connected to a cable.
Direct Connect Method
Page 5