


ADVANCED SETUP
43 En
ADVANCED
OPERATION
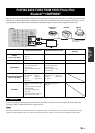
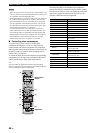
■ ADVANCED SETUP menu parameters
Change the initial settings to reflect the needs of your
listening environment.
y
The default settings are marked with “*”.
REMOTE ID
Choices: ID1, ID2*
Changes the remote control ID of this unit.
• Select ID1 to operate this unit using an alternative
code.
• Select ID2 to operate this unit using the default code.
The remote control’s ID (see page 44) must be set to the same ID
as this unit.
SR PIN (SIRIUS Personal Identification Number)
Choices: CANCEL*, RESET
Resets the Parental Lock code used to lock/unlock
SIRIUS satellite radio channels.
APD (Automatic Power Down) TIMER
Choices: 4H (4 hours), 8H* (8 hours), 12H (12 hours)
When the POWER MANAGEMENT switch on the rear
panel of this unit (see page 7) is set to ON, this unit’s Main
zone and Zone 2 automatically enters standby mode if this
unit is not operated for the specified amount of time.
When the POWER MANAGEMENT switch is set to OFF, “APD
TIMER -OFF” is displayed.
INITIALIZE
Choices: NO*, YES
Resets all parameters to their factory presets.
• Select NO to cancel without resetting all parameters to
their factory presets.
• Select YES to reset all parameters to their factory
presets.
If “YES” is selected the parameters are reset the next time you
turn on the power of this unit.
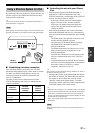
The ADVANCED SETUP menu is displayed in the front
panel display.
y
• Audio output is muted while setting parameters in the
ADVANCED SETUP menu.
• While setting parameters in the ADVANCED SETUP menu,
most controls on the front panel are disabled; only MAIN
ZONE A, the INPUT selector and FM MODE/INFO are
operational.
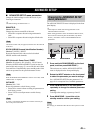
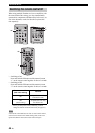
1 Press and hold FM MODE/INFO on the front
panel, and then press MAIN ZONE A.
This unit turns on, and the ADVANCED SETUP
menu is displayed on the front panel display.
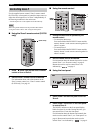
2 Rotate the INPUT selector on the front panel
to select the parameter you want to change.
See “ADVANCED SETUP menu parameters” on
page 43 for a complete list of available parameters.
3 Press FM MODE/INFO on the front panel
repeatedly to change the selected parameter
setting.
To change other settings, repeat steps 2 and 3.
4 Press MAIN ZONE A to set this unit to
standby mode to confirm your setting.
The settings you made take effect the next time you turn on this
unit.
ADVANCED SETUP
Note
Note
Note
Changing the ADVANCED SETUP
menu parameters
Note
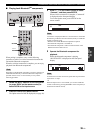
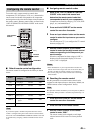
MAIN ZONE A FM MODE/INFO INPUT selector