E-8
MAINS
SUBWOOFER
OUT
VIDEO SIGNAL
OUT
IN
VCR
VIDEO
R L
OUT
IN
AUX/MD
SPEAKERS
SEE OWNER'S MANUAL
FOR CONNECTION.
REAR CENTER REAR
R L
CENTER:6 MIN./SPEAKER
REAR: 12 MIN./SPEAKER
FRONT
R L
6 MIN./SPEAKER
SPEAKERS
MONITOR
OUT
R
L
L R
Preparations and connections
Connections
Never plug the AC supply lead of this system into the AC outlet until all connections are
completed.
On the main unit
Red: positive (+)
Black: negative (–)
Caution
Do not let the bare speaker wires touch each other as this could damage the amplifier and/or speakers.
When connecting a subwoofer (not included in this system)
You may wish to add a subwoofer to reinforce the bass frequencies.
When connecting a subwoofer to this system, connect the SUBWOOFER OUT terminal of this system to the INPUT
terminal of the subwoofer.
* Ordinary subwoofers, including the Yamaha Active Servo Processing Subwoofer System, are designed so that both the
amplifier and subwoofer are contained in the same unit.
* The SUBWOOFER OUT terminal outputs low frequencies from the left front, center and right front channels.
(The cut-off frequency of this terminal is 200 Hz.)
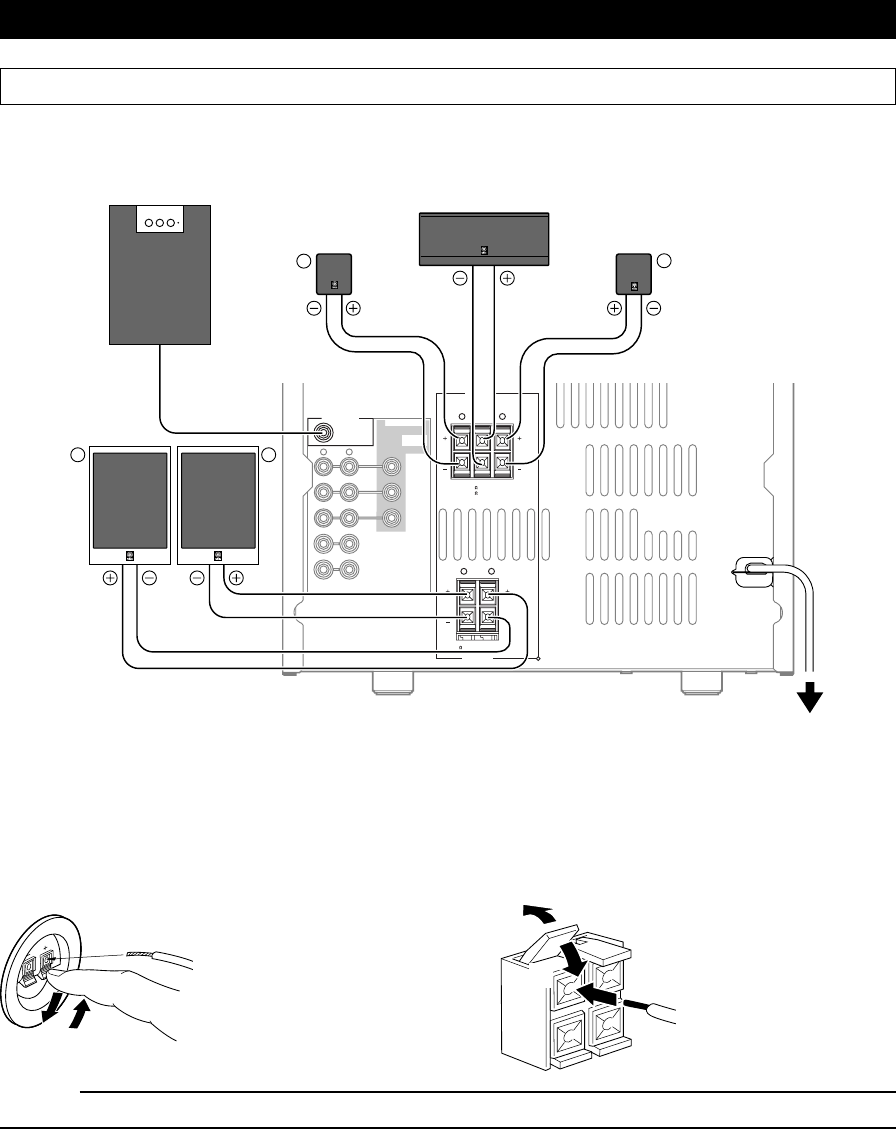
■ Connecting speakers
Connect the speakers to the corresponding speaker terminals on the rear of the main unit by using the speaker cords. Make
sure that the polarity of the speaker cords is correct, that is the + and – markings are observed. If these cords are reversed,
the sound will be unnatural and lack bass.
Subwoofer system
(not included in this system)
Rear speaker
Center speaker
Rear speaker
INPUT
Front speakers
To AC outlet
On the speakers
Red: positive (+)
Black: negative (–)
1
2
3
1
2
3
1Press the tab.
2Insert the bare wire.
[Remove approx. 5mm (1/
4”) insulation from the
speaker wires.]
3Release the tab and secure
the wire.
1Pull up the tab.
2Insert the bare wire.
[Remove approx. 5mm (1/
4”) insulation from the
speaker wires.]
3Press down the tab and
secure the wire.


