


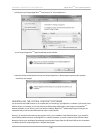

5) On the Frequency Response and Parameters screen, select the Self option in the EQ Optimization Option Selection and
Initiation
area.
6) Click
Start.
7
) The subwoofer produces its own sweep tone and its frequency response.
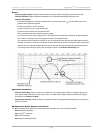
8) You can watch the subwoofer smooth its frequency response by adjusting the parametric EQ filter levels on the
Frequency
R
esponse and Parameters
s
creen. Self-EQ doesn’t change the Setup preset parameters (volume, crossover, etc.) Self-EQ
uses a 160 Hz crossover.
9) When Self-EQ finishes, the front subwoofer display shows End for 10 seconds, then the subwoofer reboots by turning itself off and
back on. The display shows the preset number and then volume level. During this process the new filter settings are saved into the
subwoofer’s memory.
10) Click
Save to File to save the Setup preset’s EQ filter settings to a DDP file on your computer.
The frequency response curve is only saved with Manual-EQ, not Self-EQ or Auto-EQ
P
LUS
.
RUNNING AUTO-EQ
P
LUS
OPTIMIZATION – STEPPING UP IN POWER
The next level up in the Digital Drive
P
LUS
EQ optimization methods is Auto-EQ
P
LUS
optimization. To perform Auto-EQ
P
LUS
optimization:
1) Set up the microphone as in the Self-EQ instructions above.
2) Make sure the subwoofer and your audio system are both on.
3) Place the Digital Drive
PLUS
Sweep Tone CD into your disc player and press play.
4) Once the sweep tone starts to play, adjust the receiver or processor output level to about the level of a normal-loudness conversation.
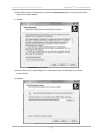
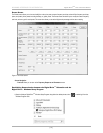
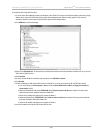
5) On the
Frequency Response and Parameters screen, select the Auto option in the EQ Optimization Option Selection
and Initiation
area.
6) Click
Start.
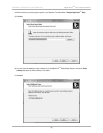
7) The subwoofer not only adjusts the Setup preset EQ filter parameters as you watch, but it also adjusts the volume, crossover, slope,
and phase while these input fields are grayed out during the Auto-EQ
PLUS
optimization process.
8) You can also watch the status of the subwoofer in the process down in the lower right in the subwoofer/EQ status line.
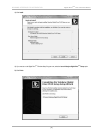
9) When Auto-EQ
PLUS
optimization finishes, the front display shows End for 10 seconds, the subwoofer reboots by turning itself off
and back on. The display shows the preset number and then volume level. During this process the new filter settings are saved
into the subwoofer’s memory. When the subwoofer is rebooting, the Digital Drive
PLUS
Windows Setup Program shows the
subwoofer is
Disconnected.
10) While the subwoofer is rebooting, shut off the Sweep Tone CD and remove it from the player.
11) When the subwoofer has finished rebooting, either the program and subwoofer reconnect automatically or you can
click
DDPLUS > Reconnect in the menu.
12)
Click
Save to File to save the Setup preset’
s EQ filter settings to a DDP
file on your computer.
Y
ou will need it to
perform the following Manual-EQ optimization instruction.
The frequency response curve is only saved with Manual-EQ, not Self-EQ or Auto-EQ
PLUS
.
RUNNING MANUAL EQ OPTIMIZATION – ADJUST IT TO YOUR LIKING
In some particularly problematic rooms, it may be necessary to employ even further adjustment than the Auto-EQ
PLUS
. Manual EQ gives
enough flexibility to get the subwoofer response very flat:
1) Set up the microphone, subwoofer and Sweep
T
one CD as in the
Auto-EQ
PLUS
optimization instructions.
2) Set the system playback volume level as in the Auto-EQ
PLUS
optimization instructions.
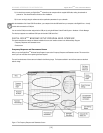
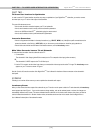
3)
On the
Frequency Response and Parameters screen, select the Manual option in the EQ Optimization Option Selection
and Initiation
area, then click Start.
4) Watch the subwoofer/EQ status line until it says
Connected, Not Synced and then Syncing.
[ 15 ]
D
igital Drive
P
LUS
U
ser Interface Manual
WINDOWS INTERFACE FOR OPTIMIZATION