


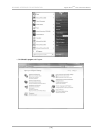

2) Connect your subwoofer’s front panel USB port to your computer using the supplied USB cable. Refer to the Digital Drive
PLUS
User’s Manual for directions on how to remove the subwoofer’s front grille to access the USB port.
3) The program establishes communication with the subwoofer and indicates this by displaying
Connected or Connected, Not Synced
i
n the program’s title bar and in the lower left corner of the window in the
S
ubwoofer/EQ Status Line
.
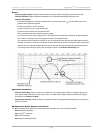
4) Once communication is established, the subwoofer model and serial number appear at the top of the
Frequency Response
G
raph
a
rea.
5) Once you see the Connection message, you can use the program to control the subwoofer.
6) See the Troubleshooting section of this part of the manual if you don’t see the Connection message.
Refer to the Digital Drive
P
LUS
User’s Manual for more information about the different optimization methods and setup options.
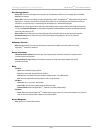
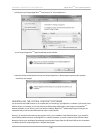
MAKING & SAVING PRESET CHANGES
The simplest customization of parameters you can do is to make and save changes to the presets.
You can modify the preset parameters either in the
Preset Parameter Settings area on the Frequency Response and Parameters screen
or on the
Preset screen. The Preset screen has the advantage that you can see settings for all the presets at one time and also modify the
night mode and power on settings. The
Frequency Response and Parameters screen has the advantage that you don’t have to open the
Preset screen.
See the Digital Drive
PLUS
User’s Manual for a detailed explanation of the preset parameter settings that you can modify.
To modify the presets using the
Preset screen:
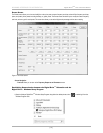
1) On the
Frequency Response and Parameters screen, click Next (upper right hand corner).
• Some values are changed with pull-down menus, like the slopes, whereas others increment with up/down buttons.
• The parameter input fields can also be selected with the mouse and the value typed into them.
2) Click
Previous to return to the Frequency Response and Parameters screen.
3) Click
Save to DD+ to save the preset setting changes to the subwoofer’s memory.
4) Click
Save to File to save the preset changes to a file on your computer. Velodyne recommends this practice as a way to “back up
your work” and to be able to retrieve subwoofer settings without having the subwoofer connected to your computer. You can also save
the settings using the
File > Save menu option. Previously saved profile files can be retrieved using the File > Open menu option.
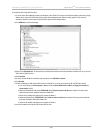
To modify the presets using the
Frequency Response and Parameters screen:
1) In the
Preset Parameter Settings area use the Preset pull down menu to select which preset to modify.
2) Use the pull down menus to change the preset parameter settings.
3) Click
Save to DD+ to save the preset setting changes to the subwoofer
’
s memory.
4) Click
Save to File to save the preset changes to a file on your computer.
RUNNING SELF-EQ OPTIMIZATION– YOUR FIRST EQ
The easiest EQ optimization to perform is the Self-EQ. With Self-EQ the subwoofer generates its own sweep tone.
To perform Self-EQ optimization:
1) Remove the microphone, mic cable and stand from the accessory kit. Carefully snap the microphone into the stand and attach the
larger end of the cable to it. See the Digital Drive
PLUS
User’s Manual for more information.
2) Place the microphone at the main listening position.
3) Attach the small end of the mic cable to the jack on the left side of the subwoofer front control panel.
4) Make sure the subwoofer is on and your audio system is of
f.
[ 14 ]
D
igital Drive
P
LUS
U
ser Interface Manual
WINDOWS INTERFACE FOR OPTIMIZATION