


TL-R402M Cable/DSL Router User Guide
32
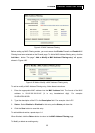
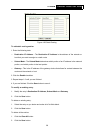
Keep the field open, which means all WAN Ports have been put into the field.
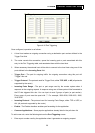
5 Protocol - Select which protocol is to be used, either TCP, UDP, or All (all protocols
supported by the router).
6 Pass - Select either Allow or Deny through the router.
7 Status - Select Enabled or Disabled for this entry on the Status pull-down list.
8 Click the Save button to save this entry.
To add additional entries, repeat steps 1-8.
When finished, click the Return button to return to IP Address Filtering page.
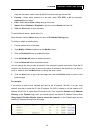
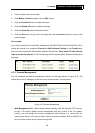
To modify or delete an existing entry:
1. Find the desired entry in the table.
2. Click Modify or Delete as desired on the Modify column.
3. Click the Enable All button to enable all entries.
4. Click the Disable All button to disable all entries.
5. Click the Delete All button to delete all entries
You can change the entry’s order as desired. Fore entries are before hind entries. Enter the ID
number in the first box you want to move and another ID number in the second box you want to
move to, and then click the Move button to change the entry’s order.
6. Click the Next button to go to the next page and click the Previous button to return to the
previous page.
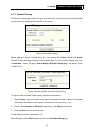
For example:
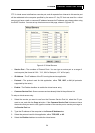
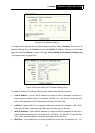
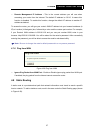
If you desire to block E-mail received and sent by the IP address 192.168.1.7 on your local
network, and wish to make the PC with IP address 192.168.1.8 unable to visit the website of IP
address 202.96.134.12, while other PCs have no limit. First, enable the Firewall and IP Address
Filtering on the Firewall page, then, you should specify the Default IP Address Filtering Rule
"Deny these PCs with effective rules to access the Internet" on the Firewall page and the
following IP
addr
ess filtering list on this page: