


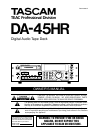

1 - Introduction to the DA-45HR
TASCAM DA-45HR
7
Fingerprints on the tape may cause wear and damage
to the tape deck heads.
DAT cassettes can only be loaded and unloaded
when the tape deck is switched on. Do not leave cas-
settes in the deck when the deck is switched off.
Always store DAT cassettes in their plastic cases to
prevent dust damage. Keep them away from mag-
netic fields (TV sets and monitors, speakers, etc.)
Although 180-minute DAT cassettes are available,
we do not recommend their use, as the tape in these
cassettes is thin, and may cause winding problems,
and physical damage to the tape.
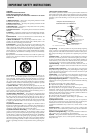
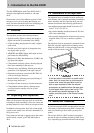
DAT cassettes play in one direction only. Always
load DAT cassettes with the tape window uppermost,
and the arrow on top of the cassette pointing into the
tape deck, as illustrated below:
NOTE
Start recording on a new blank tape from the
beginning of the tape. There is no need for a
lead-in section, and recording from the start
of the tape will record the subcode from the
start, allowing accurate positioning within the
tape.
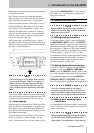
Also note that DAT cassettes are fitted with a sliding
write-protect tab to prevent accidental recording. The
cassette is write-protected when the tab is closed.
1.4.1Head cleaning
Never attempt to clean the head of a DAT deck in the
same way that you clean the head of an analog tape
deck. Always use a special DAT head cleaning cas-
sette. Follow the instructions on the cleaning cassette
for optimum performance.
The head may need to be cleaned if you hear errors
(noise) on playback or while recording. You can
make a visual check of the error rates and error loca-
tions using the
DISPLAY [24]
key or the error dis-
play menu (3.19, "Viewing points at which block
errors have occurred").
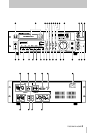
1.5 Making connections
NOTE
Before making any audio or word clock con-
nections to the tape deck, make sure that all
equipment is turned off.
1.5.1Making analog connections
Use balanced cables to make connections between
the
BALANCED INPUT
(female) and
OUTPUT
(male) XLR connectors of the tape deck, and the out-
puts and inputs of other audio equipment operating at
the professional +4 dBu level. The wiring standards
for the XLR connections are printed on the rear panel
of the tape deck (1 = ground, 2 = hot, 3 = cold)
Use unbalanced cables to make connections between
the unbalanced input and output RCA connectors of
the tape deck and the outputs and inputs of audio
equipment operating at other levels.
1.5.2Making digital audio connections
Use cables wired in accordance with the AES/EBU
standard to connect the
DIGITAL (AES/EBU)
INPUT
(male) and
OUTPUT
(female) XLR connec-
tors of the tape deck to other digital audio equipment.
Use unbalanced cables to connect the
DIGITAL
(COAXIAL) INPUT
and
OUTPUT
RCA connec-
tors of the tape deck to other digital audio equipment.
NOTE
The use of analog cables is not recom-
mended for digital audio use, and TASCAM
cannot guarantee reliable performance if such
cables are used for digital audio connections.
1.5.3Making word synchronization
connections
Use standard BNC-terminated cables to connect the
word in connector of the tape deck to the word clock
output of other device.
NOTE
There is no dedicated word output. Since both
the AES/EBU and SPDIF formats contain a
clock signal, if the tape deck is to be used as