4 – Recording—Advanced recording
24 TASCAM CD-RW4U
NOTE
This function is only available from the remote control unit.
It is not possible to use this function with the main unit only.
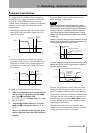
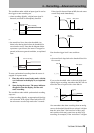
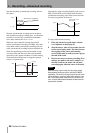
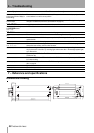
Fade-in and fade-out
To provide smooth beginnings and endings to
recorded tracks, the unit provides fade facilities.
Fade-ins are from –∞ (silence) to the set input level
and fade-outs go from the current input level to
silence.
The fade-in and fade-out times can be set indepen-
dently in increments of one second, from 1 second to
24 seconds.
To set the fade times:
1 Press the
MENU key (E or 7) repeatedly
until the display shows
FADE IN >
XXs
, where XX is the current fade-in time,
in seconds.
2 Turn the
MULTI DIAL control B or use the
SKIP
keys Ito change the value of the fade-
in time.
3 Press the
MENU key again so that the display
shows
FADE OUT> XXs, where XX is
the current fade-out time, in seconds.
4 Turn the
MULTI DIAL control or use the SKIP
keys to change the value of the fade-out time.
It is possible to set the fade-in time only (exit
the menu system after step 2) or the fade-out
time only (in step 1, press the
MENU key until
the fade-out time menu item is shown).
To perform the fade-in:
1 With a recordable disc loaded, press the
RECORD key (5 or E) so that the unit
enters record ready mode.
2 Start the source material, and press the
FADER key (9).
The display shows
FADE IN for the time
specified in the menu item above.
As the fade progresses, the monitored signal
gradually becomes louder, reflecting the level
recorded on disc.
To perform a fade-out:
1 While recording, press the FADER key (9).
The display shows
FADE OUT for the
time specified in the menu above.
As the fade progresses, the monitored signal
gradually becomes quieter, reflecting the
level recorded on disc.
When the end of the fade-out time is reached,
the unit goes into record ready mode.
Recording can be restarted with the
FADER
key or the
PLAY/PAUSE, PLAY or PAUSE
keys.
Synchronized recording
Synchronized recording means that recording will
begin automatically when a signal is received, and
will stop when the signal ends.
To enable or disable synchronized recording:
1 With the unit in record ready or record mode
and a recordable disc loaded, press the
SYNC
REC
key (4or F).
The display shows
SYNC ON briefly, and
then changes to the track and time display.
When synchronized recording is enabled, the
SYNC
indicator lights in the display.
The
SYNC REC key is also used to turn off
synchronized recording (the display briefly
shows
SYNC OFF and then returns to the
track and time display).