


16
GB
NAS-C5E GB 3-280-821-11(1)
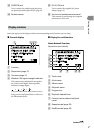
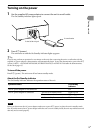
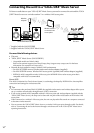
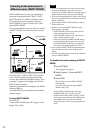
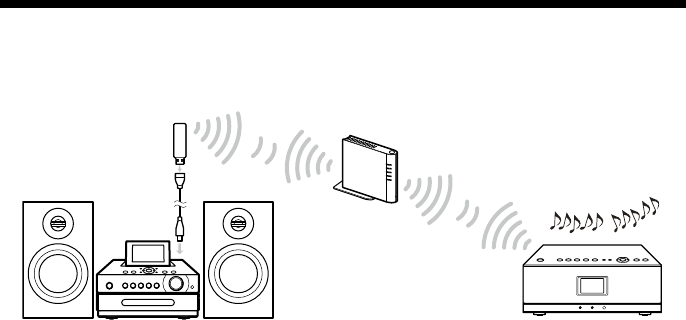
Connecting the unit to a “GIGA JUKE” Music Server
To listen to audio data on your “GIGA JUKE” Music Server, you need to connect the unit and the “GIGA
JUKE” Music Server over a wireless station*
1
or a wireless LAN access point.
Wireless
adaptor*
2
Wireless station*
1
or wireless LAN
access point
“GIGA JUKE” Music Server This unit
*
1
Supplied with the NAS-SC55PKE
*
2
Supplied with the “GIGA JUKE” Music Server
You need the following devices.
This unit
“GIGA JUKE” Music Server (NAS-S55HDE*)
* Compatible models as of March, 2008
Refer to the customer support site of Sony Europe, http://support.sony-europe.com/ for the latest
information (for customers in Europe only).
Network devices needed to create a wireless LAN environment
— For NAS-SC55PKE owners: Wireless station and wireless adaptor (supplied)
— For NAS-S55HDE owners: Wireless LAN access point* (optional) and wireless adaptor (supplied)
* BUFFALO AOSS-compatible wireless LAN access point WHR-HP-G54 or other access point that is
compatible with AOSS is recommended.
About AOSS
The AOSS (AirStation One-Touch Secure System) is a technology developed by BUFFALO Inc. that simplifies
connections and settings for wireless networks.
Tips
For customers who purchased NAS-SC55PKE, the supplied wireless station and wireless adaptor allow you to
set up a wireless network easily through Instant (S-IWS) connection.
If you use the optional AOSS-compatible wireless LAN access point and wireless adaptor (supplied with the
“GIGA JUKE” Music Server), the setup can be done with one push of the AOSS button on the wireless LAN
access point.
When connected to a wireless LAN access point, the unit can play audio files stored on a computer connected
to the same wireless network.
You can connect the “GIGA JUKE” Music Server to a wireless LAN access point through a cable. For details,
refer to “Connecting the unit to the Internet through a wired network” in the “GIGA JUKE” Music Server
operating instructions.
Connection and preparation